Contribute
Register

[SUCCESS] i7-5820k / GTX 970 / GA-X99-UD4 High Sierra 10.13 [Clover Guide] (100% Working)

Status
Not open for further replies.
Last year I went as far as to upgrade the cpu on this hackintosh to a 6950x for better performance in premiere, and felt the same as you with your graphics card upgrade. It was a letdown.
Sick laptop you got there! Try to hack it and see if you get same results

I also was experiencing cooling CPU problems last year (even posted on this thread about it) and apparently it was the pump problem. Got it replaced for free, loved their warranty support.

I feel (and thats just me) that Premiere isnt taking full potential with MacOS and the systems (maybe only for rendering).

My playback problems were with sony a7iii 4k footage, when using clips in reverse, combining with speed ramps and normal speed, it would just dropframes like crazy. Just solved it by "pre" rendering it from "in to out" - even added a shortcut for that :thumbup: if you use the previews as 422HQ those exports may even get faster.

My RAM will soon be 64GB - also hoping to see less system crashes. did a memtest and they seem to be fine, so, hopefully those crashes during Finder navigation and dragging files will soon be gone :wave:
 
Last edited:
Sick laptop you got there! Try to hack it and see if you get same results

I also was experiencing cooling CPU problems last year (even posted on this thread about it) and apparently it was the pump problem. Got it replaced for free, loved their warranty support.

I feel (and thats just me) that Premiere isnt taking full potential with MacOS and the systems (maybe only for rendering).

My playback problems were with sony a7iii 4k footage, when using clips in reverse, combining with speed ramps and normal speed, it would just dropframes like crazy. Just solved it by "pre" rendering it from "in to out" - even added a shortcut for that :thumbup: if you use the previews as 422HQ those exports may even get faster.

My RAM will soon be 64GB - also hoping to see less system crashes. did a memtest and they seem to be fine, so, hopefully those crashes during Finder navigation and dragging files will soon be gone :wave:

Lol I am very happy with my laptop running windows actually, but I might in the future. Definitely a good idea! I need to buy another HD before that though. The laptop has room for another nvme drive! I don't want to partition my system drive, as I need all the space I can get.

As far as doing speed changes, reverse, stuff like that in premiere, unfortunately that is not GPU accelerated. That is why the graphics card change did not make a difference for you. That is 100% on your cpu, so only way to get better performance there is to upgrade the cpu. Most built in special effects in premiere are CPU only which sucks! For me, my workaround is to do color correction and all the cuts first. (color correction will take advantage of your gpu) Get the video how I want it, then export the whole video. Then I'll re import the export, and do any FX as a final step. (Also add the text and stuff like that). That way it doesn't get super bogged down by adding cpu effects on top of your color correction. Those CPU effects always drop a lot of frames for me, so when I add effects like that I do 1/4 or 1/8 res so at least i can get it to play mostly smooth.

I don't transcode any of my footage. I did some testing with transcoding to pro res 422 and testing it vs the built in gh5 codec. Actually there was very little difference suprisingly. But it may have been my hard drive speed bottlenecking it with pro res. I am editing on a standard 7200rpm wd black drive. I need to get a sata drive to edit from now since prices have dropped. I may do that one day.

Btw 64 gb ram will be WAY MORE than enough. I check my memory usage, It is rarely above 20 when I edit in 4k. So 16 isn't enough but 32 is just right. 64 is probably overkill, but it will be future proof!
 
Last edited:
Oh last thing, I have done a few comparisons for performance on this system Mac os vs windows in Premiere. Mac os plays the footage back much smoother than windows. I almost always get bad frame drops and horrible timeline scrubbing when I edit on this system in windows. In Mac os it's fairly smooth. I can say premiere is optimized better for mac. Thats actually all I use it for now. For almost everything else I have switched to windows 10. Windows 10 is so smooth and I prefer it in a lot of ways. Mostly because it runs everything natively, without the need for hacking and stuff. But there are certain programs that run better on mac. Premiere is one of them. I get much better performance out of my hardware running premiere on Mac. But overall the whole program could be better optimized, I agree.
 
Sick laptop you got there! Try to hack it and see if you get same results

I also was experiencing cooling CPU problems last year (even posted on this thread about it) and apparently it was the pump problem. Got it replaced for free, loved their warranty support.

I feel (and thats just me) that Premiere isnt taking full potential with MacOS and the systems (maybe only for rendering).

My playback problems were with sony a7iii 4k footage, when using clips in reverse, combining with speed ramps and normal speed, it would just dropframes like crazy. Just solved it by "pre" rendering it from "in to out" - even added a shortcut for that :thumbup: if you use the previews as 422HQ those exports may even get faster.

My RAM will soon be 64GB - also hoping to see less system crashes. did a memtest and they seem to be fine, so, hopefully those crashes during Finder navigation and dragging files will soon be gone :wave:

hey by the way your posts inspired me to try transcoding my footage to pro res 1 last time to see if it makes a diff in editing. I transcoded my last edit with the gh5 to pro res and put it on an SSD. Editing the regular .h264 files off an SSD made 0 difference as I remembered. Scrubbing was still slow, there was literally no benefit. But! When I played pro res off an SSD there was a large improvement in smootheness and scrubbing the timeline. Everything was smoooooooth. Then I played that same pro res footage off of my 7200rpm WD Black HDD, suprisingly it wasn't too bad. About 80% of the smoothness the SSD had. Not bad at all. I think I am going to look into getting a external recording device like a Atomos Ninja V so I can shoot Pro res 10 bit 422 directly from the gh5, especially since i shoot almost exclusively 60p. The atomos ninja V enables the gh5 to record 10 bit 60p 422, which is impossible to record internally. + Pro res seems to edit a lot smoother. Only downsides is, file size, and weight as I use a gimbal. It will make the whole rig heavy. But may be worth doing. I have been on the fence about it but am now seriously considering it. Makes computer feel more powerful when the footage plays nice too
 
hey by the way your posts inspired me to try transcoding my footage to pro res 1 last time to see if it makes a diff in editing. I transcoded my last edit with the gh5 to pro res and put it on an SSD. Editing the regular .h264 files off an SSD made 0 difference as I remembered. Scrubbing was still slow, there was literally no benefit. But! When I played pro res off an SSD there was a large improvement in smootheness and scrubbing the timeline. Everything was smoooooooth. Then I played that same pro res footage off of my 7200rpm WD Black HDD, suprisingly it wasn't too bad. About 80% of the smoothness the SSD had. Not bad at all. I think I am going to look into getting a external recording device like a Atomos Ninja V so I can shoot Pro res 10 bit 422 directly from the gh5, especially since i shoot almost exclusively 60p. The atomos ninja V enables the gh5 to record 10 bit 60p 422, which is impossible to record internally. + Pro res seems to edit a lot smoother. Only downsides is, file size, and weight as I use a gimbal. It will make the whole rig heavy. But may be worth doing. I have been on the fence about it but am now seriously considering it. Makes computer feel more powerful when the footage plays nice too
eheh it's nice to know you tried comparing it.
a. Atomos / Black Magic are great, but they will use a looot of disk space... I use it when productions have a budget for it and i want to have more control of colours - your gh5 already has 10bit so you win there :thumbup:

b. Converting all files to ProRes before starting to edit, reminds me of Final Cut users, which i used to make fun of my friends using that workflow :lol: (touche for them now)

c. You can also use proxy while importing ( see here ) .

d. My option came from a friend, using the ProRes for previews like i said before.
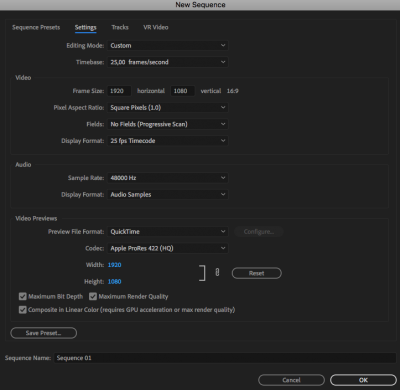
When Starting a sequence create a Custom and use 422 HQ - you may want to create a template for future

Screen Shot 2019-03-18 at 16.26.33.png

Create a shortcut for the "Render in to Out" (whenever you have 2 min render it, your yellow bar will then become green - this also uses disk space, but it's faster i guess, only uses the footage that is on the timeline and you can clean cache when needed)
393700


So, i guess in the end is not a hardware or software problem... its a 4k h264 codec ? ridiculous... :banghead:
 
eheh it's nice to know you tried comparing it.
a. Atomos / Black Magic are great, but they will use a looot of disk space... I use it when productions have a budget for it and i want to have more control of colours - your gh5 already has 10bit so you win there :thumbup:

b. Converting all files to ProRes before starting to edit, reminds me of Final Cut users, which i used to make fun of my friends using that workflow :lol: (touche for them now)

c. You can also use proxy while importing ( see here ) .

d. My option came from a friend, using the ProRes for previews like i said before.
When Starting a sequence create a Custom and use 422 HQ - you may want to create a template for future

View attachment 393699

Create a shortcut for the "Render in to Out" (whenever you have 2 min render it, your yellow bar will then become green - this also uses disk space, but it's faster i guess, only uses the footage that is on the timeline and you can clean cache when needed)
View attachment 393700


So, i guess in the end is not a hardware or software problem... its a 4k h264 codec ? ridiculous... :banghead:

Thanks for this. forgot about the proxy method. Ill try that maybe.

Last video I just cut in all pro res 422. It came out perfect, and it was a very enjoyable experience actually. Since the machine ran much smoother. I am not used to that. I am used to it stuttering every 2 seconds when I get effects heavy.

The only thing that might keep me from proxy editing is color correction. I noticed the same lumetri color settings will look different on H264 than on Pro Res. So if i color grade a proxy clip it will probably shift the color once I put the full h264 clip back in place I think. And if I grade the h264 it can get slow and annoying. Also not sure how FX work on proxy's.

Might just go 422 transcodes for most videos. Depending on time constraints
 
Great! I am interested to hear how you were able to clock it that high Unfortunately since the bios update where it completely changed the layout of the bios (maybe around f20 or so) I lost all manual control for overclock. I used to be able to change every setting manually, now it won't let me change any settings except the overclock presets. 4.3 ghz is highest for mine since its the highest overclock preset. I think I can crank it a little higher since I have a good cpu cooler, but there's no way since the bios won't let me change anything pertaining to speed. The option is just greyed out or something. Is that happening for you?

In a nutshell, you CAN achieve an overclock of 4.5 GHz by pushing the BCLK to 125 MHz instead of the default 100, but the Gigabyt BIOS in its current state is very unstable, and can give you an unstable boot depending on a lot of seemingly extraneous factors, like whether you have the Show gull-screen Gigabyte logo set to enabled (Go figure!). However, I have found this to be a more stable approach, than the typical one of pushing the processor higher, while leaving everything else the same.

To do this, go to the Advanced Frequency Settings page of the BIOS, and change the BCLK from Auto to 125 MHz (Auto is 100 MHz). In the processor frequency settings below this, you can set the multiplier to 36, which will give you a resultant frequency of 4.5 GHz (125 x 36 = 45). That's basically it. You will also need to go into the advanced core settings and enable turbo, set the multiplier as 36 for all 6 cores (there are options for 1 core active, 2 cores active, and so on till 6 cores active), enable C2, C3 and C6 states etc., disable EIST (which seemingly has no effect) and disable the thermal sensor.

(Optional) I have also undervolted my CPU to achieve a stable 4.5 GHz overclock without giving it too much power to avoid processor overheating and thermal throttling. My particular chip is stable at 1.353 volts for the VCore voltage (no other voltage-related settings changed. Yours could possible be stable at a lower or higher voltage setting (depending on your particular chip), but it is broadly around the 1.35 volt mark. You can run stress tests after setting your core voltage to determine the sweet spot for your processor.

Note: When you push the BCLK on your processor, make sure that your RAM is NOT set to a XMP profile. I read somewhere (or saw it on Youtube) that the 5820K is not compatible with RAM set to 3000 MHz (XMP profile 2, or Profile 1 with BCLK boosted to 125x). Sure enough - I have 2133 MHz DDR4 and when I set it to Profile 1, the computer doesn't POST.

There are several smaller settings that are necessary for a stable boot, which are too numerous to write here. I have also saved all my BIOS settings in the current overclocked state, and you can download them from here. Once you load them (from a USB drive), you will automatically get my current settings. You can then go ahead and tweak the voltage to suit your chip.

Let me know how it goes. All the best!
I wish I could do that. I can't change any manual settings. Check this video.


I will try to just load your OC Settings from the USB lol. I wonder if that will work
 
In a nutshell, you CAN achieve an overclock of 4.5 GHz by pushing the BCLK to 125 MHz instead of the default 100, but the Gigabyt BIOS in its current state is very unstable, and can give you an unstable boot depending on a lot of seemingly extraneous factors, like whether you have the Show gull-screen Gigabyte logo set to enabled (Go figure!). However, I have found this to be a more stable approach, than the typical one of pushing the processor higher, while leaving everything else the same.

To do this, go to the Advanced Frequency Settings page of the BIOS, and change the BCLK from Auto to 125 MHz (Auto is 100 MHz). In the processor frequency settings below this, you can set the multiplier to 36, which will give you a resultant frequency of 4.5 GHz (125 x 36 = 45). That's basically it. You will also need to go into the advanced core settings and enable turbo, set the multiplier as 36 for all 6 cores (there are options for 1 core active, 2 cores active, and so on till 6 cores active), enable C2, C3 and C6 states etc., disable EIST (which seemingly has no effect) and disable the thermal sensor.

(Optional) I have also undervolted my CPU to achieve a stable 4.5 GHz overclock without giving it too much power to avoid processor overheating and thermal throttling. My particular chip is stable at 1.353 volts for the VCore voltage (no other voltage-related settings changed. Yours could possible be stable at a lower or higher voltage setting (depending on your particular chip), but it is broadly around the 1.35 volt mark. You can run stress tests after setting your core voltage to determine the sweet spot for your processor.

Note: When you push the BCLK on your processor, make sure that your RAM is NOT set to a XMP profile. I read somewhere (or saw it on Youtube) that the 5820K is not compatible with RAM set to 3000 MHz (XMP profile 2, or Profile 1 with BCLK boosted to 125x). Sure enough - I have 2133 MHz DDR4 and when I set it to Profile 1, the computer doesn't POST.

There are several smaller settings that are necessary for a stable boot, which are too numerous to write here. I have also saved all my BIOS settings in the current overclocked state, and you can download them from here. Once you load them (from a USB drive), you will automatically get my current settings. You can then go ahead and tweak the voltage to suit your chip.

Let me know how it goes. All the best!

OMG! It worked! I could not change any bios settings like in the video. But I did load your OC Preset. At first when I booted it would not move the mouse. But would load windows. Then I saw you had it set to Windows 8 / 10 in the bios. I screenshotted all my previous bios settings and copied them after loading your 4.5 ghz overclock preset. I think the main thing was I had to change it back to "Other OS". Now I am getting 4.5ghz overclock booting Mac OS no problem. Wow! Thanks!
 
omg look at my geekbench score now
 

Attachments

  • Screen Shot 2019-03-27 at 3.20.50 PM.png
    Screen Shot 2019-03-27 at 3.20.50 PM.png
    126.8 KB · Views: 128
Status
Not open for further replies.
Back
Top