
- Joined
- Nov 18, 2016
- Messages
- 14
- Motherboard
- Gigabyte GA-Z10MX
- CPU
- Skylake i7-6700K
- Graphics
- AMD RX 580
Hugo’s mATX Sylake Build: ElCap, Sierra, HighSierra
Core i7-6700K - GA-Z170MX Gaming 5 - 32GB RAM - GTX 960
ComponentsCore i7-6700K - GA-Z170MX Gaming 5 - 32GB RAM - GTX 960

Everything was sourced from this buyer’s guide page: https://www.tonymacx86.com/buyersguide/november/2016
Intel i7-6700K Processor
https://www.amazon.com/gp/product/B012M8LXQW/?tag=tonymacx86com-20
Gigabyte GA-Z170MX-Gaming 5 Motherboard
https://www.amazon.com/gp/product/B014SL2XKQ/?tag=tonymacx86com-20
GTX 960 Gaming 1 (4GB) Graphics Card
https://www.amazon.com/gp/product/B00VBNT3X0/?tag=tonymacx86com-20
Crucial Ballistix Sport LT (32GB) Memory
https://www.amazon.com/gp/product/B01B4F3IJY/?tag=tonymacx86com-20
Samsung 850 EVO 500GB SSD
https://www.amazon.com/gp/product/B00OBRE5UE/?tag=tonymacx86com-20
Corsair H60 Processor (Water) Cooler
https://www.amazon.com/gp/product/B00A0HZMGA/?tag=tonymacx86com-20
Corsair RM 650x Watt Power Supply
https://www.amazon.com/gp/product/B015YEIBJ8/?tag=tonymacx86com-20
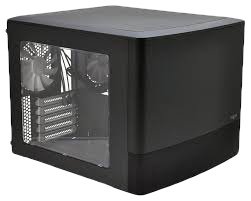
Fractal Node 804 Computer Case
https://www.amazon.com/gp/product/B00K6OVG0I/?tag=tonymacx86com-20
USB drive
[https://www.amazon.com/gp/product/B006W8U2WU/?tag=tonymacx86com-20
Network card (Fenvi - pricey but flawless)
https://www.aliexpress.com/item/Bro...CI-Express-WiFi-Bluetooth-BT/32746786692.html
Already Owned
Apple wired USB keyboard
https://www.amazon.com/gp/product/B002C7JG4A/?tag=tonymacx86com-20
Apple wireless trackpad
https://www.amazon.com/dp/B016E2YUHG/?tag=tonymacx86com-20
Comments
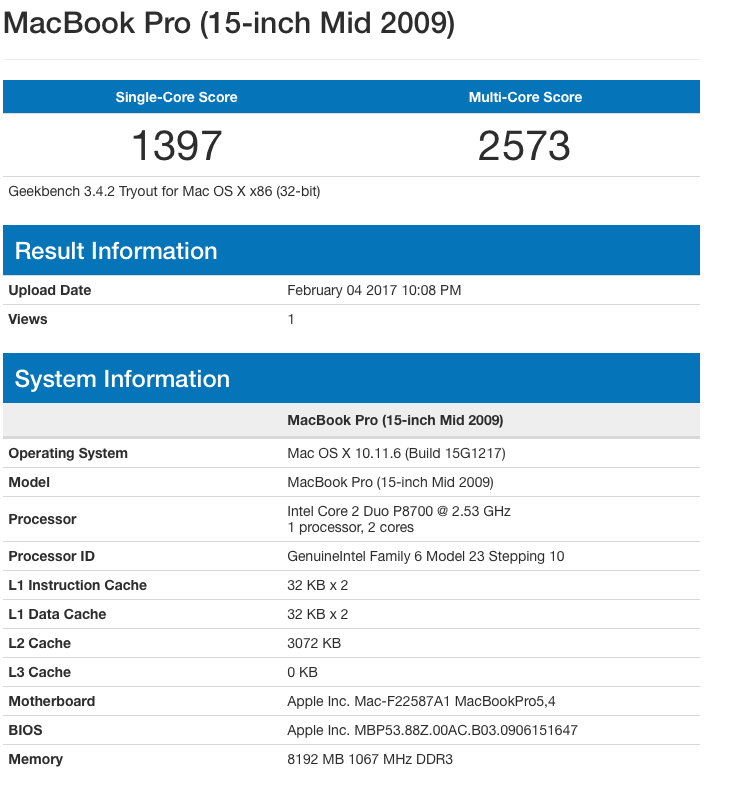
Well, I had reached the end of the road with my MacBookPro 2009. It still works perfectly (and all credit to Apple for creating such a resilient laptop) but it can’t be officially upgraded to Sierra. I was definitely looking to upgrade last year, but was really disappointed with the new 15” MBP 2016. So, I decided to have a go at building a PC with similar or better processing power but for less cost. Portability wasn’t an issue. I now have a build with a fast CPU (not overclocked yet), 32GB of RAM, a decent GFX card (I’m not a gamer) and a liquid cooling system which keeps it super quiet (I barely hear the fans). Furthermore, I can now explore other options such as Windows or Linux. The result is a machine which appears very stable and sufficiently future-proof.
I went with the slightly more expensive Fenvi network card after seeing it mentioned many times on this forum. It worked straightaway for Handoff stuff without any tweaking. So I deem the extra expense worth it.
I’ve had tower cases before so I wanted to try something different. The fractal node cube case is that alternative. It’s well constructed with two separate chambers (one for the motherboard and expansion cards, and the other for hard drives, SSD drives and power supply).
Software
(El Capitan)
OS X El Capitan 10.11.6 (from App Store)
UniBeast v6.2.0
Clover configurator v4.33
Clover bootloader v2.3k r3949
MultiBeast v8.2.3
KextBeast v1.0
(Sierra)
MacOS Sierra 10.12.2 (from App Store)
Clover bootloader v2.3k r3974
Multibeast v9.0.1
Installation (Summary)
- Built PC
- Installed El Capitan (v10.11.6)
- Imported software/user accounts from the laptop (using Migration Assistant via Ethernet connection)
- Tested for a month.
- Backed up using Carbon Copy Cloner (EFI partition and main OS partition).
- Performed in-place upgrade to Sierra (Yay!)
- Tested for a week.
- Wiped hard drive (Boo!)
- Re-installed El Capitan (2nd run)
- Re-installed essential software (NO migration). Tested.
- Performed in-place upgrade to Sierra (2nd run)
Listed below are the steps taken for the second run of the build. For brevity, I’ve listed the key actions instead of reproducing all the steps covered by the standard OS installation guides. The steps illustrate any unusual actions required because of i) my particular hardware or ii) my wish to perform a 2-stage upgrade to Sierra.
Installation date - 12 Dec 2016
Followed the guidelines for El Capitan installation here: https://www.tonymacx86.com/forums/el-capitan-desktop-support.180/
(NOTE: my motherboard is on revision F4, but a more recent F5 revision is available from Gigabyte... which I think needs Windows software to install it. Anyway, I’ve not tried installing it)
Entered BIOS screen which has layout as below
| M.I.T | System Information | BIOS Features | Peripherals | Chipset | Power Management |
| Option1 | |||||
| Option2 | |||||
| Option3 |
Tweaked BIOS settings as below
System Information
Secure Boot State - Disabled
Chipset
VT-d - Enabled
Internal Graphics - Auto
Audio Controller - Enabled
Peripherals
Initial Display Output - PCIe 1 Slot
OnBoard LAN Controller - Enabled
Legacy USB Support - Enabled
XHCI HandOff - Enabled
Used UniBeast to create Clover-based OS X Install (on USB drive).
Restarted PC to boot from USB drive.
Installed El Capitan.
(Post installation)
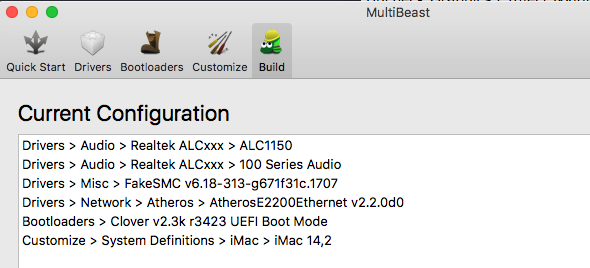
Ran MultiBeast 8 with these settings
- Drivers / Audio : Realtek ALC1150, HD100 Series audio
- Drivers / Network : AtherosE2200 v2.2.0d0
- Drivers / Misc: Fake SMC v6.18
- Bootloaders : Clover 2.3 UEFI Boot mode
- Customize / System Definitions : iMac14,2
Saved MultiBeast config to a file MB_configElCap.
Selected ‘Build’ and then restarted PC.
From Clover screen, chose "Boot options"
Added “nvda_drv=1” to boot args.
Booted using "boot from El Capitan”.
Ran Clover Bootloader v2.3k 3949.
Customized installation by choosing the following options
- Install for UEFI booting only
- Install Clover in the ESP
- Drivers64UEFI/EmuVariableUefi-64 (NVRAM needed for Nvidia cards)
- Install RC scripts on target volume
Clicked “Build”. (If you have any other storage devices attached, eg USB drive, ensure that your Install action targets the correct EFI partition!)
Ran Clover Configurator v4.33
- Mounted EFI partition.
- Loaded config.plist from EFI:EFI\CLOVER
- Tweaked the following and saved the changes.
. Checked ACPI / FixShutdown (No more instant wake after shutdown)
. Selected Boot / darkwake=8
. Selected Boot / XMPDetection=N0
. Selected Boot / nvda_drv=1
. Checked SystemParameters / NvidiaWeb
. Unchecked Graphics / NvidiaSingle
. Unchecked Graphics / Inject Nvidia
Installed Nvidia web driver package (346.03.15b01) from here
https://www.tonymacx86.com/threads/nvidia-releases-alternate-graphics-drivers-for-os-x-10-11-6-346-03-15.198033/
As you can see, there is more than one version for El Capitan 10.11.6!!!
Entered System Preferences - Nvidia Driver Manager.
Checked for updates (None). Changed preference to "Nvidia Web Driver".
Restarted PC. Worked!
Tested playing some music in iTunes (Worked).
Tested playing trailer in iTunes (Worked).
Tested playing DRM content (Failed).
Followed instructions here to fix DHCP protection issue.
https://www.tonymacx86.com/threads/itunes-protected-video-black-screen-solution-hdcp.195083/
Downloaded Shiki.kext
Mounted EFI partition using the terminal command diskutil (alternatively there is the EFImounter tool which I've never tried)
Code:
cp ~/Downloads/Shiki.kext /Volumes/EFI/EFI/CLOVER/kexts/10.11
defaults write com.apple.AppleGVA forceNV -boolean yes
defaults delete com.apple.coremedia
defaults delete com.apple.AppleGVA
sudo rm -rf /Users/Shared/SC\ Info
sudo defaults delete com.apple.coremedia
sudo defaults delete com.apple.AppleGVA
Restarted PC. Tested playing DRM content (Worked).
(Fixed lost audio after wake from sleep)
Followed help here:
https://www.tonymacx86.com/threads/fix-no-sound-after-sleep-on-1150-and-possibly-other-realteks.170063/
Placed CodecCommander.kext on desktop
Launched KextBeast to install
Restarted PC. Slept PC. Woke PC. Audio Worked!
SUCCESS! Feel free to stop here and enjoy your new installation.
Installation Instructions (2nd Run - Upgrade to Sierra)
At the time of installation, the latest OS was version macOS Sierra 10.12.2.
To upgrade to Sierra,
Installed a more recent Clover bootloader, v2.3k r3974.
Followed this guide.
https://www.tonymacx86.com/threads/direct-update-to-macos-sierra-using-clover.201465
BEFORE clicking "Install macOS Sierra", preserved custom kernel extensions
Mounted the EFI partition using terminal command diskutil
Typed in terminal
Code:
cd /Volumes/EFI/EFI/CLOVER/kexts
cd Other
cp -rp ../10.11/Shiki.kext .
cp -rp /System/Library/Extensions/CodecCommander.kext .
cp -rp /Library/Extensions/*kext .
Clicked "Install macOS Sierra"
Restarted PC.
On Clover bootloader screen, moved to "mac install OS" and pressed spacebar.
Disabled Nvidia drivers (nv_disable)
Selected "Boot macOS with selected options"
(Inside Sierra)
Launched already installed Nvidia driver manager
Checked for updates which caused program to download the latest driver for 10.12.2 (367.15.10.25f02).
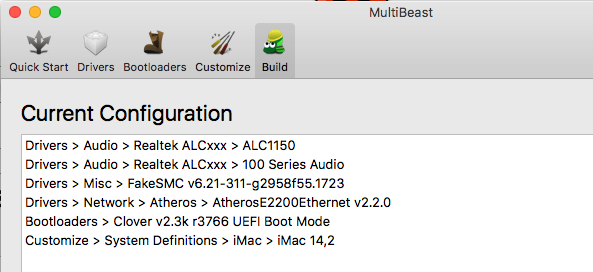
Ran Multibeast 9.
Imported previously-saved config MB_configElCap
Skipped through the warnings.
Rechecked Network / AtherosE2200Ethernet v2.2.0.
Saved config to MB_configSierra
Clicked "Build"
Restarted PC.
SUCCESS!!
Post-install Software
There’s a lot of useful software here: https://www.tonymacx86.com/threads/os-x-configuration-tuning-utility-tools.138280/
In particular, I like to use “Intel Power gadget” to keep an eye on CPU temperature.
Settings
config.plist - see attachment config.plist
Clover boot loader

MultiBeast Settings - see attachment MB_configElCap
MultiBeast Settings - see attachment MB_configSierra
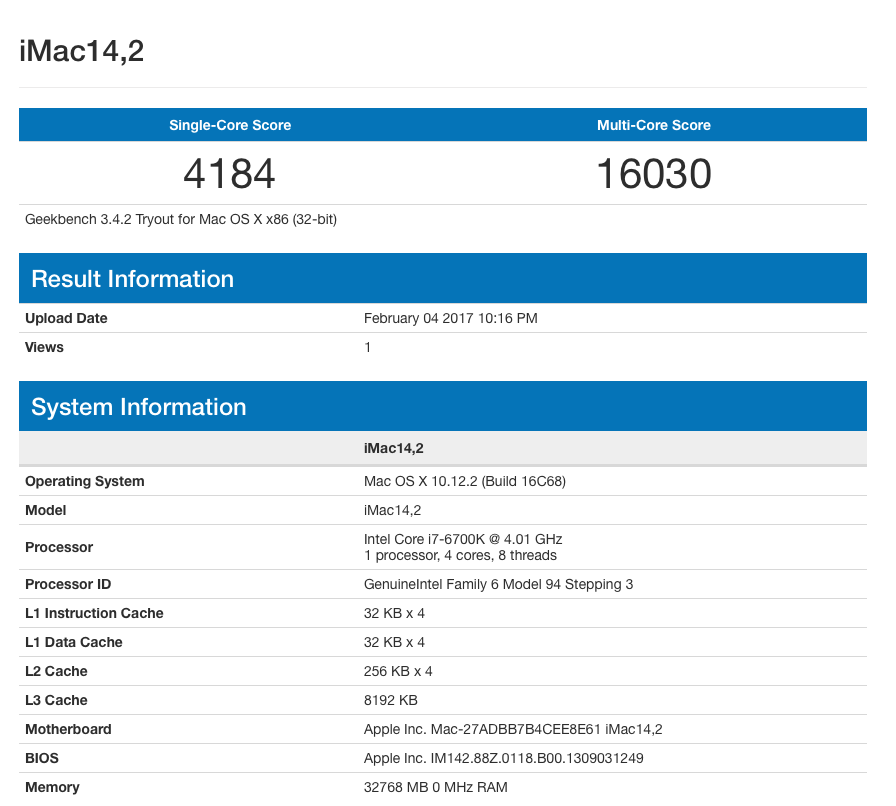
GeekBench 3 (32-bit) scores for my 15” MBP 2009 and new hackintosh. Just a slight improvement then ;-)
What works
Bluetooth (tested Handoff), WIFI, USB 2/3, Ethernet , Audio, Shutdown, Sleep/Wake
Not working (or untested)
Intel HD graphics - Untested (using the Nvidia 960 card)
iMessage / FaceTime - Untested (never used)
Thunderbolt - Untested (no peripherals)
Tips
Everybody has their own approach to building a hackintosh, so feel free to follow or completely ignore my recommendations below. There’s no one way to suit everybody but here’s what worked for me.
- Read the guidelines on a specific OS installation. They provide an overall picture of the effort required and typical problems encountered.
- Read example user build installations. They provide great insight into how other builders resolved their issues. There are thousands of permutations (in hardware configurations and firmware / software settings).
- Pay attention to your current time. Certain historical solutions may have become obsolete. Various software tools (UniBeast, Clover, MultiBeast) change versions over time.
- Keep a log of everything you do, including missteps. Having a separate PC or tablet is useful for this.
- Download all required software ahead of time. Record the actual versions used.
- Use a backup drive with some backup software (Carbon Copy Cloner or SuperDuper).
- When tweaking, keep old copies of working config.plist and MultiBeast configurations. It will be easier to revert during experimentation.
- After a successful build, install all your essential software (e.g. Xcode, Logic, Final Cut Pro) and test/evaluate for a week/month. If it's to become your main machine, it must be stable.
- Be prepared to trash your first installation and do it again (cleaner) from logged notes. This gives confidence that you have good notes and won't waste effort searching for that initial SUCCESS again.
") . That way, I won’t feel completely overwhelmed should a problem arise in the future.
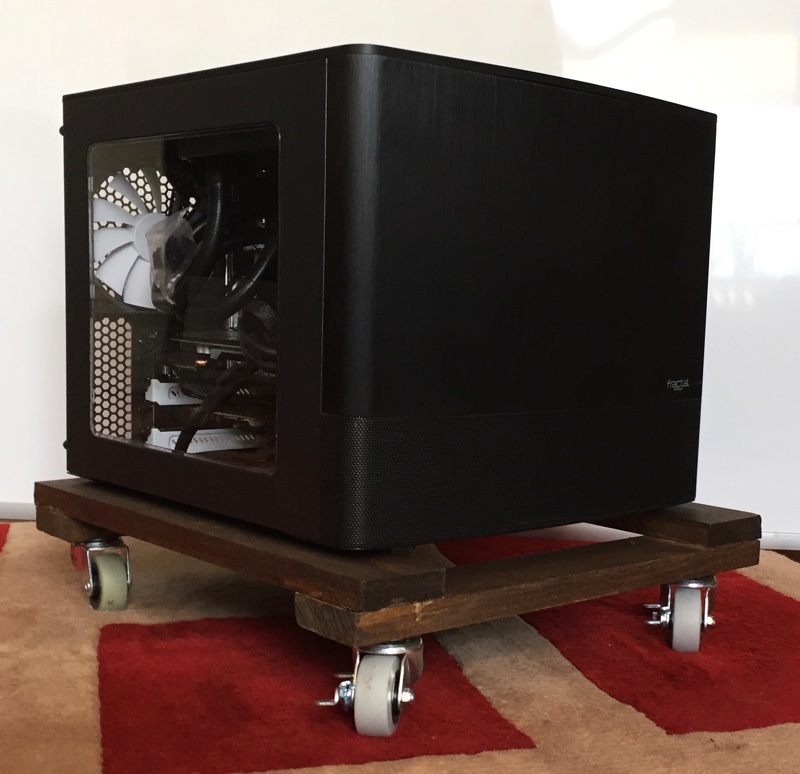
. That way, I won’t feel completely overwhelmed should a problem arise in the future.Assembled hackintosh
The built hackintosh sits on a DIY dolly (underneath my desk) which can easily be rolled out for access to the back ports.
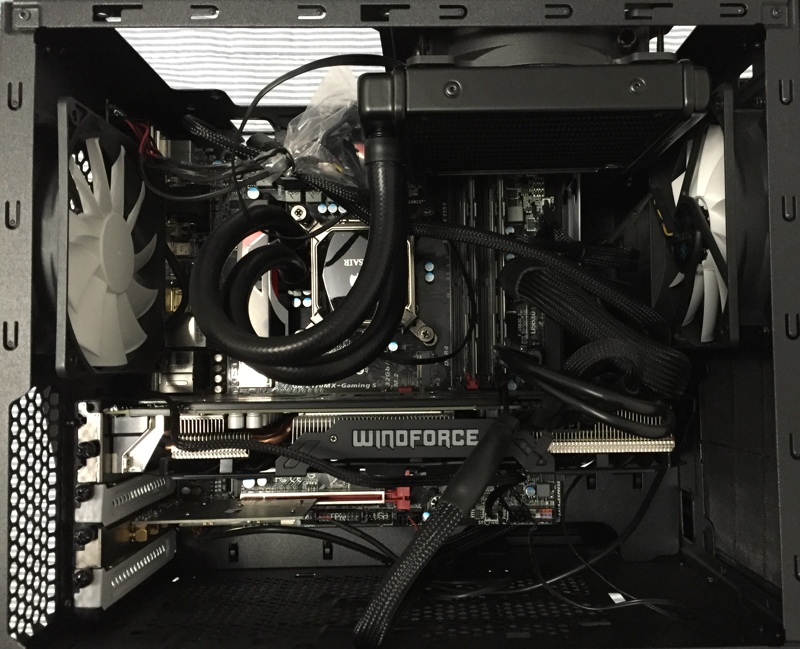
Below is the interior with power on. I like the blue glow (and the green LED in sleep mode)

Below is the interior with power off. Assembly didn't feel cramped at all.
Thank you
I would like to say a massive thanks to all in this community. Without so many rich contributions, my installation would have been a lot of more daunting and maybe unachievable in a reasonable amount of time. Hopefully, by adding my contribution here too, I can help someone else embarking on this journey. All the best.
Update 23 June 2017
Upgraded from 10.12.2 to 10.12.5 (20 minutes total time)
- Backed up my current installation to an external harddrive
- Followed this "Instructions" page
- Downloaded the 10.12.5 Nvidia drivers (378.05.05.15f01) from Downloads section.
- First tried the Mac AppStore method for updating. Didn't work.
- Downloaded the "macOS 10.12.5 Combo Update" from link on Instructions page.
- Just in case, I downloaded MultiBeast 9.1 from Downloads section (I didn't need it).
- Ran the combo update. PC restarted automatically to complete the installation.
- PC restarted again.
- On Clover bootloader screen, pressed spacebar.
- Disabled Nvidia drivers (nv_disable).
- Selected "Boot macOS with selected options"
- (Inside Sierra) Launched already-downloaded Nvidia drivers. Installation completed.
- Checked the Nvidia Preferences Manager application to ensure selection of Nvidia drivers
- Restarted PC as usual (i.e. no special boot options).
Update 23 Aug 2018 - HighSierra
Upgraded from 10.12.6 to 10.13.6. By now, most of the bugs have been ironed out of High Sierra. My notes below are in abbreviated form (less actual CLI commands). If you've come this far from my original El Capitan installation, then you should be familiar with the terminal commands to use.
- First used Carbon Copy Cloner to take a backup of current Sierra (10.12.6) installation
- Followed the upgrade guide here
- Downloaded 10.13.6 from the AppStore
- Downloaded a new version of Multibeast (10.3) and ran it with the following configuration
Audio Realtek ALCxxx 100/200/ 300 Series Audio Support (ALC 1150 driver will be installed later)
Drivers Misc FakeSMC
Network AtherosE2200 v2.2.2
Imac 14,2
Nvdia WEB drivers
- Restarted the PC. Everything is okay.
- Removed boot argument nvda_drv=1 from config.plist
- Removed Shiki.kext from EFI/CLOVER/Kext/Other (it’s not compatible with 10.13)
- Copied the latest apfs.efi driver (from upgrade guide web page) into /EFI/CLOVER/drivers64UEFI/
- Removed nvram flag for nvidia driver
- Installed MacOS High Sierra … some reboots and then 20 minute later, successfully upgraded
- No audio (as expected). Reram Multibeast and selected *only* the ALC1150 driver for installation
- Restarted PC. Sound working.
- Copied Lilu.kext (v1.2.5) to EFI/CLOVER/kexts/Other
- Copied WhateverGreen.kext (v1.2) to EFI/CLOVER/kexts/Other
- Restarted PC. iTunes movies working.
- Downloaded nvidia drivers (WebDriver-387.10.10.10.40.105.pkg) for 10.13.6 from here
- Restarted PC (no need for nvda_drv=1 which has been superseded by NvidiaWeb flag installed by Multibeast)
- Sleep with security wasn't working correctly. Upon awaking, the PC would go straight into a user's logged in account instead of the lock screen (eek!). Touched the settings in System Preferences Security & Privacy and Energy Saver. Now working correctly.
- external (USB) SSD drive . BIOS startup sequence was changed to prioritize the USB drive. This is necessary since the installation does a couple of restarts. The upgrade retained HPFS+ file format.
- internal SATA SSD drive . The upgrade converted the partition to APFS file format. There were extra Prebooter boot options appearing the Clover boot menu alongside the usual MacOS. I removed the entries by adding the GUI Hide option in config.plist file. They disappeared upon PC restart.
<array>
<string>Windows</string>
<string>\EFI\BOOT\BOOTX64.EFI</string>
<string>preboot</string>
</array>
I've stuck with the APFS upgrade and I've been using the system for a few weeks. Systems appears stable running Xcode, Pixelmator, and Final Cut Pro. Had to upgrade (i.e. purchase Logic Pro X) since Logic studio is known to be incompatible with High Sierra.
Removing the GTX960 card is not necessary during the upgrade. I did that for any earlier trial run and while it worked and I learned how to the get the integrated intel graphics working, it was such pain that I scrapped everything and started again believing it must be possible to upgrade without removing the card.
The only kernel extension I removed was Shiki.kext. This would crash the upgrade, and it has been superseded by the Lilu/WhateverGreen combo. All other kexts (e.g. CodecCommander) remain in /EFI/CLOVER/kext/Other.
Once again, thanks again to all the TonyMac community for making this possible. Hopefully, my notes above can help anyone else with a similar configuration wishing to upgrade from Sierra to High Sierra.
Update 26 April 2019 - Mojave
Upgraded to Mojave 3 weeks ago. System has been stable. Notes appear in post #24 of this thread.
Attachments
Last edited: