
- Joined
- Dec 8, 2012
- Messages
- 42
- Motherboard
- Lenovo ThinkPad W520
- CPU
- i7-2760QM
- Graphics
- HD 3000 (disabled) + Quadro 1000M
- Mobile Phone
Components
CPU: Intel Core i5-2520m
RAM: 8GB DDR3 1333MHz (RAM is 1600MHz but it downclocks to 1333MHz because of the chipset)
GPU: Integrated Intel HD 3000
SSD: 180GB OCZ Agility 3 (boot drive)
HDD: 500GB Seagate 5,400rpm (user profile HDD)
Screen: 15.6" 1366x768 60Hz
WiFi: BCM 943224HMS
Ethernet: Intel 82579V
Audio: IDT 92HD81B1X
Comments
Small intro
I've been using macOS on this laptop since Mavericks and never even thought of typing a success story. I'll keep it as short as possible though.
I am not going to type a how-to on how to completely set up macOS, however I will provide how to do it with my EFI folder.
Why I use a hackintosh
I've always loved the thought of using a Mac. However, I can't afford it's price tag. I initially bought this Probook to test out macOS and see if I could get it working (basically a test subject in a way)
Plus, I like to test out another Operating System every now and then.
Installation
I'm not going to show you how to manually patch everything, but I will provide my EFI folder to completely simplify the process.
BIOS Setup
I left everything stock. Basically default settings. However, if you're using an SSD, you must set the SATA speeds to SATA-II or your SSD won't be detected. Unfortunately, this particular laptop model is notorious for being incompatible with SATA-III SSD's.
Also make sure the SATA type is set to AHCI (which this laptop natively supports)
IMPORTANT NOTE!
This laptop has a wireless card whitelist. This means only certain wireless cards will work. As far as I know, the only wireless card that works is the Broadcom BCM943224HMS which supports both 2.4GHz & 5GHz.
Installation notes
Tools needed
Creating the bootable USB
Creating a USB is fairly easy. Plug in your USB. Open Disk Utility and format is as GUID and name it whatever you want. In my case, I named it "installer"
Open Terminal, and type the following command:
Note: Replace <USBNameHere> with the name of your USB.
After a bootable USB of macOS has been created, we are now going to mount the USB's EFI partition and place my EFI folder there.
Mounting the USB's EFI Partition
This part is also fairly easy.
Go ahead and open Clover Configurator and navigate to the "Mount EFI" option within the "Tools" section.
Click "Mount partition" on your corresponding USB. The EFI partition will now mount.
Open Finder, and click on the newly created EFI partition.
Now download my EFI folder in the download section below the post. It's called "EFI.zip"
Uncompress it and you'll now have an EFI folder, containing Clover and all file to get the USB working as well as a working installation.
Now drag and drop that EFI folder into the EFI partition.
Unmount the USB and test it. It should boot if you've followed the instructions.
Now go ahead and install macOS.
Post install/installing bootloader
So at this point, we're pretty much going to do the same thing as before when installing the EFI folder to the EFI partition. It's the same process as in "Mount the USB's EFI partition" but I will show you again for better understandings.
So now that you've installed macOS, not everything may work. Usually it'll just be WiFi and audio that wont work. For some reason, this is caused when the bootloader is on another volume altogether rather than the volume where macOS is installed (AKA, the EFI partition)
Audio also won't work after installing. The patched AppleHDA is in EFI/CLOVER/kexts/other however, it won't load because the vanilla AppleHDA is already present in /S/L/E causing it not to load. AppleHDA.kext won't load from the EFI partition anyway, so replace the AppleHDA.kext in S/L/E with my AppleHDA. Install the kext with your favourite kext installer (such as Kext Utility)
Go ahead and open Clover Configurator and navigate to the "Mount EFI" option within the "Tools" section.
Click "Mount partition" on the volume you installed macOS on. The EFI partition will now mount.
Open Finder, and click on the EFI partition.
Now, if an EFI folder already exists within the EFI partition; remove it and replace it with my EFI folder.
Now reboot, and everything should work.
Also, if you're using an SSD, I already added a TRIM patch.
What's working:
If I've left anything out or messed up somewhere, please let me know!")
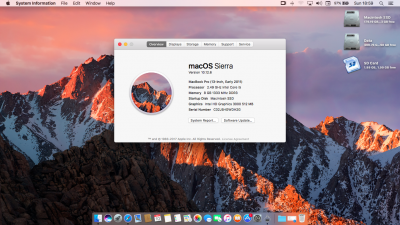
CPU: Intel Core i5-2520m
RAM: 8GB DDR3 1333MHz (RAM is 1600MHz but it downclocks to 1333MHz because of the chipset)
GPU: Integrated Intel HD 3000
SSD: 180GB OCZ Agility 3 (boot drive)
HDD: 500GB Seagate 5,400rpm (user profile HDD)
Screen: 15.6" 1366x768 60Hz
WiFi: BCM 943224HMS
Ethernet: Intel 82579V
Audio: IDT 92HD81B1X
Comments
Small intro
I've been using macOS on this laptop since Mavericks and never even thought of typing a success story. I'll keep it as short as possible though.
I am not going to type a how-to on how to completely set up macOS, however I will provide how to do it with my EFI folder.
Why I use a hackintosh
I've always loved the thought of using a Mac. However, I can't afford it's price tag. I initially bought this Probook to test out macOS and see if I could get it working (basically a test subject in a way)
Plus, I like to test out another Operating System every now and then.
Installation
I'm not going to show you how to manually patch everything, but I will provide my EFI folder to completely simplify the process.
BIOS Setup
I left everything stock. Basically default settings. However, if you're using an SSD, you must set the SATA speeds to SATA-II or your SSD won't be detected. Unfortunately, this particular laptop model is notorious for being incompatible with SATA-III SSD's.
Also make sure the SATA type is set to AHCI (which this laptop natively supports)
IMPORTANT NOTE!
This laptop has a wireless card whitelist. This means only certain wireless cards will work. As far as I know, the only wireless card that works is the Broadcom BCM943224HMS which supports both 2.4GHz & 5GHz.
Installation notes
Tools needed
- A working Mac or Hackintosh.
- A legitimate copy of Install macOS Sierra.app (ver. 10.12.6) from the App Store.
- An 8GB or larger USB
- Clover Configurator (this just makes it easy to mount the EFI partition. You can use another method of mounting the EFI folder if preferred)
- Kext Utility
- Patience. Quite a bit of patience.
Creating the bootable USB
Creating a USB is fairly easy. Plug in your USB. Open Disk Utility and format is as GUID and name it whatever you want. In my case, I named it "installer"
Open Terminal, and type the following command:
Code:
sudo /Applications/Install\ macOS\ Sierra.app/Contents/Resources/createinstallmedia --volume /Volumes/<USBNameHere> --applicationpath /Applications/Install\ macOS\ Sierra.app --nointeractionNote: Replace <USBNameHere> with the name of your USB.
After a bootable USB of macOS has been created, we are now going to mount the USB's EFI partition and place my EFI folder there.
Mounting the USB's EFI Partition
This part is also fairly easy.
Go ahead and open Clover Configurator and navigate to the "Mount EFI" option within the "Tools" section.
Click "Mount partition" on your corresponding USB. The EFI partition will now mount.
Open Finder, and click on the newly created EFI partition.
Now download my EFI folder in the download section below the post. It's called "EFI.zip"
Uncompress it and you'll now have an EFI folder, containing Clover and all file to get the USB working as well as a working installation.
Now drag and drop that EFI folder into the EFI partition.
Unmount the USB and test it. It should boot if you've followed the instructions.
Now go ahead and install macOS.
Post install/installing bootloader
So at this point, we're pretty much going to do the same thing as before when installing the EFI folder to the EFI partition. It's the same process as in "Mount the USB's EFI partition" but I will show you again for better understandings.
So now that you've installed macOS, not everything may work. Usually it'll just be WiFi and audio that wont work. For some reason, this is caused when the bootloader is on another volume altogether rather than the volume where macOS is installed (AKA, the EFI partition)
Audio also won't work after installing. The patched AppleHDA is in EFI/CLOVER/kexts/other however, it won't load because the vanilla AppleHDA is already present in /S/L/E causing it not to load. AppleHDA.kext won't load from the EFI partition anyway, so replace the AppleHDA.kext in S/L/E with my AppleHDA. Install the kext with your favourite kext installer (such as Kext Utility)
Go ahead and open Clover Configurator and navigate to the "Mount EFI" option within the "Tools" section.
Click "Mount partition" on the volume you installed macOS on. The EFI partition will now mount.
Open Finder, and click on the EFI partition.
Now, if an EFI folder already exists within the EFI partition; remove it and replace it with my EFI folder.
Now reboot, and everything should work.
Also, if you're using an SSD, I already added a TRIM patch.
What's working:
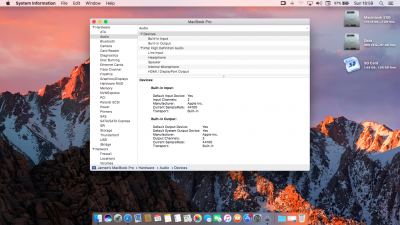
- Audio (inc. DisplayPort audio) - Working
- Microphone - Working
- Keyboard + trackpad (inc. Fn. keys) - Working
- Brightness - Working
- Display - Working - both 60Hz and 40Hz work perfectly
- Fully patched DSDT - Working
- Power Management - Working
- Sleep - Working
- Hibernation - Undetermined - Seems to work, but I need to do more testing
- Ethernet - Working
- All USB's - Working (all USB's are USB2)
- Battery - Working
- Serial Port - Working
- Dial-up port - Working
- Headphone port - Working
- QE/CI (Graphics acceleration) - Working
- App Store verification - Working
- iMessage - Working
- FaceTime - Working
- WiFi - Working
- SD Card - Working
- SDD/HDD/SATA - Working
- Bluetooth - Working
- Webcam - Working
- DisplayPort - Working
- Smart Card - Undetermined - it's detected but I've never used it
- VGA - Not Working - unneeded and unsupported
- TRIM - Working
- Mini FireWire - Working
- Fingerprint scanner - Not working - incompatible.
- CPU/GPU/HDD/Mobo Temperature readings - Working
If I've left anything out or messed up somewhere, please let me know!
Attachments
-
EFI.zip22.5 MB · Views: 3,130
-
 Screen Shot 2017-09-10 at 18.59.01.png1.7 MB · Views: 2,320
 -
 Screen Shot 2017-09-10 at 18.59.10.png1.4 MB · Views: 2,276
 -
 Screen Shot 2017-09-10 at 18.59.27.png1.4 MB · Views: 1,664
 -
 Screen Shot 2017-09-10 at 18.59.47.png1.6 MB · Views: 1,627
 -
 Screen Shot 2017-09-10 at 18.59.59.png1.3 MB · Views: 1,437
 -
 Screen Shot 2017-09-10 at 19.00.07.png1.3 MB · Views: 1,384
 -
 Screen Shot 2017-09-10 at 19.00.16.png1.4 MB · Views: 1,334
 -
 Screen Shot 2017-09-10 at 19.00.40.png1.4 MB · Views: 1,319
 -
 Screen Shot 2017-09-10 at 19.00.54.png1.4 MB · Views: 1,339
 -
 Screen Shot 2017-09-10 at 19.01.13.png1.4 MB · Views: 1,364
Last edited: