
- Joined
- Dec 25, 2015
- Messages
- 321
- Motherboard
- Gigabyte Z690 UD AX
- CPU
- i5-12400F
- Graphics
- Readon RX 6600
- Mobile Phone
Poles Coffelake Build:
MSI Z370 PC PRO - i3 8100 - UHD 630 - Corsair Vengance 8GB - Samsung EVO 860 250GB SSD
ComponentsMSI Z370 PC PRO - i3 8100 - UHD 630 - Corsair Vengance 8GB - Samsung EVO 860 250GB SSD

MSI Z370 PC PRO ATX Board
https://www.amazon.com/dp/B075VLR7Z3/?tag=tonymacx86com-20
Intel™ Core® i3 8100 3.6GHz Coffe Lake Processor
https://www.amazon.com/dp/B0759FTRZL/?tag=tonymacx86com-20
Corsair Vengeance 2400MHz DDR4 RAM
https://www.amazon.com/dp/B01ARHBBPS/?tag=tonymacx86com-20
Samsung EVO 860 250 GB Solid State Drive
https://www.amazon.com/dp/B0793FNNP6/?tag=tonymacx86com-20
Cooler Master Elite Power 350 Watt SMPS
https://www.amazon.com/dp/B0034ADOB0/?tag=tonymacx86com-20
Antec VSK4000B -U3 Cabinet
https://www.amazon.com/dp/B00CY9TMFO/?tag=tonymacx86com-20
Comments
Its been a year since I have build a hackintosh. Now, when tonymacx86 released their April 2018 buyer’s guide with the new 300 series motherboards & 8th generation Intel Processors, I couldn’t resist myself. I convinced (actually forced) one of my friends to buy his computer parts according to this site. Though I prefer Gigabyte, this time I wanted to try MSI. But I regret it a little bit. I will tell you why.
The Build
BIOS Settings:
- To access BIOS/UEFI Setup, press and hold Delete on a USB Keyboard while the system is booting up.
- Load Optimized Defaults
- Settings \ Advanced \ Integrated Peripherals → Network Stack : Disabled
- Settings \ Advanced \Integrated Peripherals → Intel Serial IO : Disabled
- Settings \ Advanced \ Integrated Graphics Configuration → DVMT Pre-Allocated : 64MB
- Settings \ Advanced \ USB Configuration → XHCI Hand-off : Enabled
- Settings \ Advanced \ USB Configuration → Legacy USB Support : Auto
- Settings \ Advanced \ Windows OS Configuration → MSI Fast Boot : Disabled
- Settings \ Advanced \ Windows OS Configuration → Fast Boot : Disabled
- Overclocking → Extreme Memory Profile(X.M.P) : Enabled
- Overclocking \ CPU Features → Intel Virtualization Tech : Enabled
- Overclocking \ CPU Features → Intel VT-D Tech : Disabled
- Press F10 to Save and Exit
UniBeast 8.3.2:
I ran UniBeast 8.3.2 on my Mac Mini to create high sierra 10.13.4 bootable flash drive. (Previously when I tried UniBeast 8.3.1 and got the famous "The recovery server could not be contacted" error while installing. Then I found that its UniBeast's bug started from version 8.2 which was corrected on 8.3.2. Thanks @P1LGRIM )
Installation
The USB didn't boot. Then I found that specially MSI motherboard has the booting problem using OsxAptioFx2Drv.efi driver. According to this post I have to use OsxAptioFix2Drv-free2000.efi !!! So I removed OsxAptioFx2Drv.efi from EFI/EFI/CLOVER/drivers64UEFI and downloaded & copied OsxAptioFix2Drv-free2000.efi. I think the UniBeast & the MultiBeast should have a option like "MSI motherboard" & "Other motherboards" so that user when user select MSI then OsxAptioFix2Drv-free2000.efi will be copied otherwise by default OsxAptioFx2Drv.efi will be copied to EFI/EFI/CLOVER/drivers64UEFI. What do you think @tonymacx86 ? After that the booting and installation went smoothly.
MultiBeast 10.2
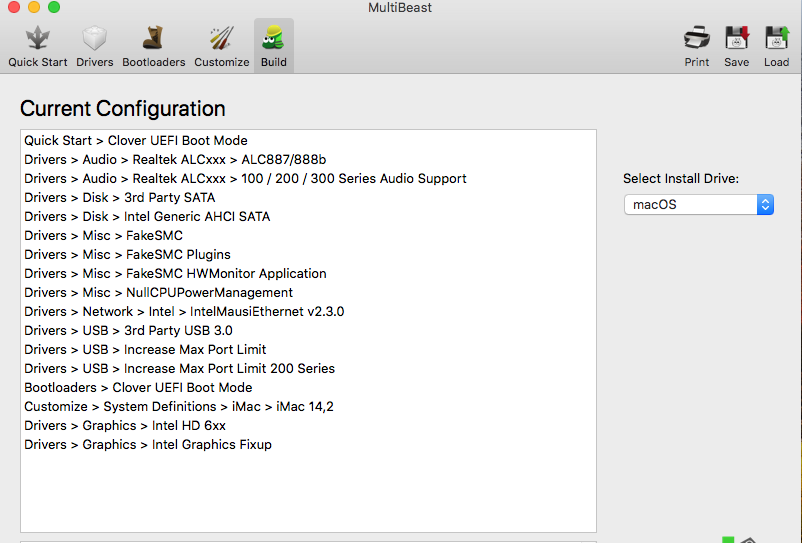
You must remove OsxAptioFx2Drv.efi from EFI/EFI/CLOVER/drivers64UEFI every time after you run MultiBeast. Remember OsxAptioFix2Drv-free2000.efi is your driver for MSI not OsxAptioFx2Drv.efi. Otherwise it won't boot. This is where I regret buying MSI motherboard.

Audio
According the the MultiBeast guide to get audio working we have to run MultiBeast twice which I did but it didn't worked. So uninstalled realtekALC & I restored native AppleHDA.
Then I decided to run CloverALC:
- AppleHDA Realtek Audio/Post #1/X. Uninstall AppleHDA Realtek Audio
- Restore native AppleHDA [Guide].pdf
AppleHDA Realtek Audio Methods - Required: a. native AppleHDA.kext, b. EFI mounted
cloverALC (c. SIP disabled, d. Clover and e. network required)
1.Download/View Raw: audio_cloverALC.command.zip
I got the audio working but it breaks on sleep/wake. Used @RehabMan 's CodecCommander.kext using KextBeast. Now audio works on sleep/wake.
Graphics
The graphics has been very glitchy though its showing UHD 630 1536MB.I found in this forum that i3's UHD graphics is not natively supported by macOS. You have to spoof it. So here are the steps I found on the internet:
Method : Coffee Lake 0x3E91808 FakeID + Blank ig-platform-id
Required Kexts:
- Download & unzip the most recent version of FakePCIID
- Copy FakePCIID.kext & FakePCIID_Intel_HD_Graphics.kext from the Release folder of Rehabman-FAKEPCIID & paste them to EFI/CLOVER/kexts/Other
- Download the latest of Shiki.kext
- Download the most recent version of IntelGraphicsFixup.kext
- Copy & Paste Shiki.kext & IntelGraphicsFixup.kext into EFI/CLOVER/kexts/Other
- Select Boot on left-side column
- Under Arguments check if -disablegfxfirmware is there or not if not then add it
- add shikigva=1 right after -disablegfxfirmware
- Select RtVariables on left-side column & Disable SIP (put CsrActiveConfig 0x67)
- Save & Exit
Now you have to edit the .plist files of two Kaby Lake kexts and insert the Coffee lake strings into them. You can’t edit the kext files directly in Finder because they are locked. So what you can do is go into Terminal and use nano to make changes.
- Open Terminal App & type the following:
sudo nano /System/Library/Extensions/AppleIntelKBLGraphics.kext/Contents/Info.plist - Enter Password and Info.plist will populate in Terminal
- Find <key>IOPCIPrimaryMatch</key> near the bottom of Info.plist in Terminal. It’s hidden when Info.plist populates. Use down arrow key scroll down Info.plist
- Use the arrow keys to highlight the first 0 in 0x3E928086
- Add 0x3E918086
- Press Space Bar
- Should look like this:
<key>IOPCIPrimaryMatch</key>
<string>0x59128086 0x59168086 0x591B8086 0x591E8086 0x59268086 0x59278086 0x3E9B8086 0x3EA58086 0x3E918086 0x3E928086</string> - Press Ctrl+X and then press Y then Enter to save it.
- Type the following into Terminal:
- sudo nano /System/Library/Extensions/AppleIntelKBLGraphicsFramebuffer.kext/Contents/Info.plist
- Enter Password and Info.plist will populate in Terminal…
- Find <key>IOPCIPrimaryMatch</key> again for this Info.plist
- Press Spacebar before the first “<” at the start of </string> using your keyboard arrow keys
- Add 0x3E918086 0x3E928086
- Should look like this:
<key>IOPCIPrimaryMatch</key>
<string>0x59128086 0x59168086 0x591B8086 0x591E8086 0x59268086 0x59278086 0x59238086 0x3E918086 0x3E928086</string> - Press Ctrl+X and then press Y then Enter to save it.
- Paste the following into Terminal:
sudo kextcache -i / - Paste the following into Terminal
sudo touch /System/Library/Extensions && sudo kextcache -u / - Close Terminal
- Navigate to /Volumes/EFI/EFI/Clover/
- Right click config.plist and open with Clover Configurator
- Click Graphics on left-column of Clover Configurator
- Remove ig-platform-id value
- Click Devices on left-column of Clover Configurator
- Set IntelGFX box to 0x3E928086
- Save config.plist & Reboot.
After reboot your graphics should be working.
What Works
- Integrated Graphics
- Audio
- Sleep/wake
- Audio after sleep/wake
- PowerManagement.
Not Checked
- iMessage
- FaceTime

Geekbench Score:

UPDATE (11-18-18) : Upgraded to Mojave 10.14.1. Used the latest Lilu+Whatevergren on that time.
Last edited:
")
