- Joined
- Feb 4, 2019
- Messages
- 82
- Motherboard
- DELL Optiplex 7050 MT
- CPU
- i7-7700
- Graphics
- RX 560
- Mobile Phone
2019/5/19 Postscript
How to prevent Optiplex 7050 MT Mojave version upgrade #37
2019/4/6 Re-edited
at first
I have created a USB boot disk to install Mojave on my Dell Optiplex 3040
I installed Mojave on my Optiplex 7050 using this USB boot disk.
The graphic card used GT730.
Optiplex 7050 SFF this specification
CPU: intel core i5-7500T
MEM: DDR4 2400MHz 8GBx2 16GB (MAX 64GB)
HDD: SAMSUNG SSD 970 EVO M.2 Series 500GB MZ-V7E500B / EC (2019/09/18 Model number correction)
Built-in audio: Realtek HDA codec ALC3234
Built-in network: Intel ~ i219-V Gigabit Ethernet LAN 10/100/1000.
Internal graphic: intel HD graphic 630/610
Chipset: Intel Q270
Graphic card: GT730 / TDP: 25 W
Power: 180 W
Necessary things and preparation
1, you support Hackintosh GT 730 (I use this card) I need a graphics card.
Supplement:
In the Optiplex 7050's internal graphics card VRAM 7MB trouble etc. occurs.
Although solution is possible, it is hard for beginners and it is difficult to handle, so it does not correspond.
2, Download MultiBeast and UniBeast
You need a Tonymacx86.com account.
3, create a bootable USB
You need a Mac that can download and run the latest version of OSX.
4, Add a patch to the USB boot disk to avoid kernel panic.
Kernel panic may occur during installation of Mojave using a USB boot disk.
4-1. Download Extensions.zip file and EFI.zip
4-2. Mount the EFI of the Install macOS Mojave USB boot drive.


4-3. Extract the Extensions.zip file into EFI / CLOVER / Kexts / Other.
4-4. Extract the EFI.ZIP file.
Overwrite EFI / CLOVER / config.plst to the EFI / CLOVER folder config.plst of the USB boot disk.

4-5. Unmount the EFI.
Install Mojave with this USB boot drive.
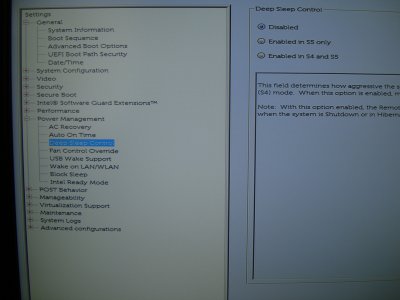
5. BIOS settings:
Updated to latest SYSTEM BIOS version.
OptiPlex_7050_1.11.0.exe
BIOS loads (initializes) the system default and then
Please correct the BIOS.
See BIOS Hardcopy.
Work procedure
I referred to Tonymacx86.com.
Step 1: After power on, press F12 to select bootable USB.
Just boot from the USB boot disk and install.
Be sure to insert the USB into the USB 2.0 port.
Step 2: Install OSX Mojave
UniBeast: Install macOS Mojave on Any Supported Intel-based PC
I have omitted the detailed steps above.
Step 3: After installation is complete, install Mojave with Clover Configuretor
Mount the EFI of the SSD (EVO 970).

Step 4. Open Finder Preferences and display on desktop:
Check the hard disk.

Step5. The library / extension of the SSD (EVO 970) which installed Mojjave
Extensions.zip which deleted all files in the folder and saved it on USB boot disk
Unzip the file and paste the file.
Step6: Delete the EFI folder of the SSD (EVO 970) with Mojjave installed and EFI.ZIP
Please paste and unzip.
Step7. After copying is complete, I installed Mojave with Clover Configuretor
Unmount EFI of SSD (EVO 970).
Step 8: Start Kext Utility
Prepare the permissions.
Step 9. Restart
Step10. Select and start the SSD (970 EVO) which installed Mojave.


Installation is complete.
Function whose operation has been confirmed
USB port:
All ports are working.
Graphic:
We were able to display 2 screens with HDMI output DVI output.
The built-in graphics are also working.

Sound:
Sound was output from the speaker of the LCD monitor built-in HDMI connection.
Built-in speaker:
The built-in speakers worked properly.

Front headphone jack:
When I connected the headphones, the speakers were muted and sound came out of the headphones.
It works fine when a microphone is connected.
Ethernet:
It was confirmed that communication can be performed by connecting a wired LAN cable.
Bruce:
It has been confirmed that a commercially available Bluetooth adapter works.
(The installation operation was unnecessary)
Wireless LAN:
It has been confirmed that a commercially available wireless adapter works.
(Installation is necessary)
Sleep operation:
There is no problem with sleep operation.
Return is with keyboard touch or mouse.
Caution: Beware of old LCD monitors
When connecting to an old LCD monitor via HDMI, sound may not be output.
As HDMI version of LCD monitor with manufacturing date before 2012 is old (Ver 1.3)
It does not match with HDMI (Ver1.4) of GT710 graphic card.
This is not a problem with Hackintosh.
How to solve difficult problems
Rear blue jack (line out) does not work.
There are still audio problems.
Linr out can connect an audio DAC to the USB port to get line out.
Please enjoy Hackintosh.
Paste 7050 EFI.ZIP
Paste 7050 Extensions.zip
END
How to prevent Optiplex 7050 MT Mojave version upgrade #37
2019/4/6 Re-edited
at first
I have created a USB boot disk to install Mojave on my Dell Optiplex 3040
I installed Mojave on my Optiplex 7050 using this USB boot disk.
The graphic card used GT730.
Optiplex 7050 SFF this specification
CPU: intel core i5-7500T
MEM: DDR4 2400MHz 8GBx2 16GB (MAX 64GB)
HDD: SAMSUNG SSD 970 EVO M.2 Series 500GB MZ-V7E500B / EC (2019/09/18 Model number correction)
Built-in audio: Realtek HDA codec ALC3234
Built-in network: Intel ~ i219-V Gigabit Ethernet LAN 10/100/1000.
Internal graphic: intel HD graphic 630/610
Chipset: Intel Q270
Graphic card: GT730 / TDP: 25 W
Power: 180 W
Necessary things and preparation
1, you support Hackintosh GT 730 (I use this card) I need a graphics card.
Supplement:
In the Optiplex 7050's internal graphics card VRAM 7MB trouble etc. occurs.
Although solution is possible, it is hard for beginners and it is difficult to handle, so it does not correspond.
2, Download MultiBeast and UniBeast
You need a Tonymacx86.com account.
3, create a bootable USB
You need a Mac that can download and run the latest version of OSX.
4, Add a patch to the USB boot disk to avoid kernel panic.
Kernel panic may occur during installation of Mojave using a USB boot disk.
4-1. Download Extensions.zip file and EFI.zip
4-2. Mount the EFI of the Install macOS Mojave USB boot drive.
4-3. Extract the Extensions.zip file into EFI / CLOVER / Kexts / Other.
4-4. Extract the EFI.ZIP file.
Overwrite EFI / CLOVER / config.plst to the EFI / CLOVER folder config.plst of the USB boot disk.
4-5. Unmount the EFI.
Install Mojave with this USB boot drive.
5. BIOS settings:
Updated to latest SYSTEM BIOS version.
OptiPlex_7050_1.11.0.exe
BIOS loads (initializes) the system default and then
Please correct the BIOS.
See BIOS Hardcopy.
Work procedure
I referred to Tonymacx86.com.
Step 1: After power on, press F12 to select bootable USB.
Just boot from the USB boot disk and install.
Be sure to insert the USB into the USB 2.0 port.
Step 2: Install OSX Mojave
UniBeast: Install macOS Mojave on Any Supported Intel-based PC
I have omitted the detailed steps above.
Step 3: After installation is complete, install Mojave with Clover Configuretor
Mount the EFI of the SSD (EVO 970).
Step 4. Open Finder Preferences and display on desktop:
Check the hard disk.
Step5. The library / extension of the SSD (EVO 970) which installed Mojjave
Extensions.zip which deleted all files in the folder and saved it on USB boot disk
Unzip the file and paste the file.
Step6: Delete the EFI folder of the SSD (EVO 970) with Mojjave installed and EFI.ZIP
Please paste and unzip.
Step7. After copying is complete, I installed Mojave with Clover Configuretor
Unmount EFI of SSD (EVO 970).
Step 8: Start Kext Utility
Prepare the permissions.
Step 9. Restart
Step10. Select and start the SSD (970 EVO) which installed Mojave.
Installation is complete.
Function whose operation has been confirmed
USB port:
All ports are working.
Graphic:
We were able to display 2 screens with HDMI output DVI output.
The built-in graphics are also working.
Sound:
Sound was output from the speaker of the LCD monitor built-in HDMI connection.
Built-in speaker:
The built-in speakers worked properly.
Front headphone jack:
When I connected the headphones, the speakers were muted and sound came out of the headphones.
It works fine when a microphone is connected.
Ethernet:
It was confirmed that communication can be performed by connecting a wired LAN cable.
Bruce:
It has been confirmed that a commercially available Bluetooth adapter works.
(The installation operation was unnecessary)
Wireless LAN:
It has been confirmed that a commercially available wireless adapter works.
(Installation is necessary)
Sleep operation:
There is no problem with sleep operation.
Return is with keyboard touch or mouse.
Caution: Beware of old LCD monitors
When connecting to an old LCD monitor via HDMI, sound may not be output.
As HDMI version of LCD monitor with manufacturing date before 2012 is old (Ver 1.3)
It does not match with HDMI (Ver1.4) of GT710 graphic card.
This is not a problem with Hackintosh.
How to solve difficult problems
Rear blue jack (line out) does not work.
There are still audio problems.
Linr out can connect an audio DAC to the USB port to get line out.
Please enjoy Hackintosh.
Paste 7050 EFI.ZIP
Paste 7050 Extensions.zip
END
Attachments
Last edited: