Contribute
Register

[Success] Hackintosh on a Dell Optiplex 3040 SFF Mojave(10.14.5)

Status
Not open for further replies.
Mojave 10.14.5 Installation Instructions
The installation of Mojave 10.14.5 is successful. It is not affected by the graphic card.
The procedure has been partially changed.
Please correct the version of the KEXT file to the latest version as it is older.
When updating failed, KEXT was fixed to the latest version.

The update fails if the KEXT version is old.
At first

Installation procedure of Mojave 10.14.1 was released in # 1. The graphics card GT710 was installed, but the method of using the HD530 built-in graphics was also proposed by everyone's favor. We created the latest installation steps for Mojave 10.14.5, as the content of the article is difficult to read and confusion for some inexperienced people.

About HD530
If you use the Optiplex 3040 SFF's built-in graphics HD530, the unit's sleep will not work properly. Sound output will be only the built-in speaker. This problem can not be solved yet.

About EFI
We have fixed the HD530 frame buffer problem using information provided by you. Thank you all.
412038


Necessary things and preparation
1. Recommended graphic card GT710 but installation is possible without it.
Supplement:
If you use the built-in graphics HD530, sleep of the console does not work properly. Sound
output will be only the built-in speaker. This problem can not be solved yet.

2, Download MultiBeast and UniBeast
You need a Tonymacx86.com account. This time I will make a boot disk with only Unibeast.
I do not use MultiBeast.
412046

3, create bootable USB
Never replace an OSX registered to a bootable USB. Installation fails. Mojave files are
about 6GB. Please check well.

4. Add patches to the USB boot disk to avoid kernel panic.

4-1. Download the Extensions.zip file and EFI.zip. Save to a USB boot disk.

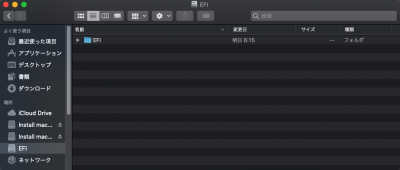
4-2. Install macOS Mount the EFI of the Mojave USB boot drive.

4-3. Open the EFI of the USB boot drive and discard the EFI folder to the trash.
Copy and unzip the EFI.ZIP file.
412237


412233


5. Unmount the EFI.

This completes the preparation of the Mojave USB boot drive.

6, BIOS settings:
Updated to latest SYSTEM BIOS version.
OptiPlex_3040_1.2.2.exe
BIOS loads (initializes) system defaults
Please fix the BIOS.
See BIOS Hard Copy.


Work procedure
Step 0: Create a bootable USB I referred you to tonymacx86.com guides.

Step 1: After turning on the power, press F12 to select bootable USB. Just boot from the
USB drive and install.
    Be sure to insert USB into the USB 2.0 port.

Step 2: Install OSX Mojave
    UniBeast: Install macOS Mojave on Any Supported Intel-based PC
    Since detailed procedures are available above, we will omit it.
412048

Step 3: After installation is complete, install Mojave with Clover Configuretor
    Mount the EFI of the SSD(CT240BX200SSD1 Media)
412051


Step 4. Open Finder Preferences and display on desktop:
    Check the hard disk.
412052


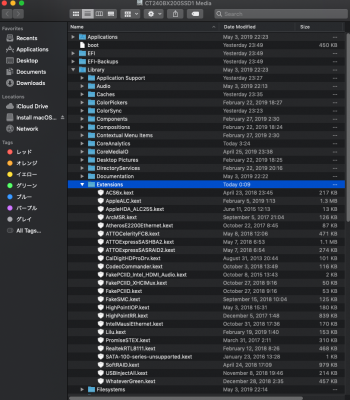
Step5. The library / extension of the SSD (CT240BX200SSD1 Media) which installed Mojjave
    Extensions.zip which deleted all files in the folder and saved it on USB boot disk
    Unzip the file and paste the file.
412235


Step 6: Delete the EFI folder of the SSD (CT240BX200SSD1 media) on which
    Mojjave is installed, paste EFI.ZIP and unzip it.
    Leave only the CLOVER / kexts / Other / FakeSMC.kext file and discard all the rest.
412055


Step7. After copying is complete, I installed Mojave with Clover Configuretor
    Unmount EFI of SSD (CT240BX200SSD1 Media).

Step 8: Start Kext Utility
    Prepare the permissions.
412056


Step 9. Restart

Step10. Select and start the SSD (8CT240BX200SSD1 Media) which installed Mojave.

GT710
412057


HD530
412058


GT710
412059


HD530
412060


Extensions EFI
 

Attachments

  • スクリーンショット 2019-06-18 23.55.39.png
    スクリーンショット 2019-06-18 23.55.39.png
    123.3 KB · Views: 269
  • Screen Shot 2019-06-19 at 19.31.25.png
    Screen Shot 2019-06-19 at 19.31.25.png
    230.2 KB · Views: 190
  • Screen Shot 2019-06-19 at 4.07.15.png
    Screen Shot 2019-06-19 at 4.07.15.png
    470.9 KB · Views: 202
  • Extensions.zip
    3.4 MB · Views: 387
  • EFI.zip
    16.9 MB · Views: 415
Last edited:
I am using 10.14.3 and 10.14.5 both created from a 2017 MacBook Pro which is running Mojave. I have tried installing from every USB port front and back with no success. I cannot even get the Dell to boot to the MacOS install menu. When I plug in the USB and turn on the computer it loads clover, then tries to load to the installer but I ket the same screen. I can load a video showing what I am doing if that helps.
The installation of Mojave 10.14.5 is successful. It is not affected by the graphic card.
The procedure has been partially changed.
#41
 
[QUOTE = "Mitsuhiro, post: 1921625, membro: 2183776"]
Apague um macarrão EFI fazer
[/CITAR]


I've reviewed the procedure several times, but I always stop at this kernel panic.

Any suggestions on where I'm going wrong? Can you help me, thanks.
Since we do not have Optiplex 3040 Micro, we can not provide useful information, but the steps have progressed since the last panic screen. Please install according to # 41 that there is slight hope. It is prohibited to replace OSX stored in USB boot disk created by Unibeast. If you replace it, re-create it with Unibeast.

The installation OS is only Mojave10.14.5. Other versions stop at the panic screen.
 
Last edited:
Hi regincrato,

I hope you can help me out. I’ve tried following the guide, and post 32 and your post to install Mojave on my Micro 3040 however i cant get it to run the installer.

It boots the boot loader of the USB, then appears to hang in various places.

I think its because the instructions are not particular clear as they’re across different posts and I don’t know if some parts are additional to previous posts instructions or in replace of them.

I’m not a stranger to hackintoshes, both custom builds and dell optiplex’s but this has got me stumped!


Hi BoothmanL, sorry for taking so long to answer.

From what I understand you are having problems installing. Remembering that my model is Dell 3040 micro

I did the following:

First configure the BIOS according to post # 1

1 - CREATING THE STARTUP DISC IN USB:

1.1 - Create bootable USB stick with unibeast.

1.2 - After creating the Mojave installation usb disk with Unibeast, open the usb disk with Clover EFI (2.4k 4961), check the following options:

- Installation for UEFI Cards

- Install Clover on ESP

- UEFI Drivers => AptioMemoryfix-64

- Install changes

1.3 - In Clover Configuration, follow the procedure of #post 32:

- Open the usb plist (mount EFI first) and go to Devices tab. In the bottom pane, choose Properties (instead of Arbitrary)

- Devices: PciRoot (0x0) / Pci (0x2,0x0)

- Properties Keys:

AAPL, ig-platform-id = 00001219

frame buffer-patch-enable = 01000000

frame buffer-stolenmem = 00003001

- Click the + sign below this panel and add framebuffer-fbmem for the key and 00009000 for the value.

- You need to do this to install USB and final installation on the main drive.


1.4 - Copy the contents of the Extensions folder (pre-installation) to usb EFI / CLOVER / Kexts / Other.

1.5 - Replace the config.plist (preinstallation) file on EFI / CLOVER / config.plst from the USB boot disk.

1.5.5 - (Alternate Procedure: Mount EFI from the usb installation with Clover Configuration and Replace EFI Folder with EFI Folder (Post Installation)

1.6 - Install Mojave or High Sierra


2 - INSTALLATION PROCEDURE:

2.1 - Configure BIOS as BIOS Folder

2.2 - Boot from UEFI: Pendrive This will take you to Clover Bootloader.

2.3 - Choose "Boot macOS Install from usb"

2.4 - On next reboot, Clover will display Choose "Preload FileVault Boot Preloader"

2.5 - On the third reboot choose Mojave Partition.


3.0 POST INSTALLATION

3.1 - Mount the EFI from the hard drive where Mojave with Clover Configuration was installed.

3.2 - Open Finder Preferences and display the hard drive on the desktop. (The HD EFI partition will appear on the desktop)

3.3 - Go to HD Library / Extensions delete all kexts and replace with those from Entensions folder (post installation)

3.4 - Delete the EFI folder from the hard disk in which Mojjave is installed, paste the EFI folder (post installation. Leave only the file CLOVER / kexts / Other / FakeSMC.kext and discard everything else.

3.5 - Unmount the EFI partition with Clover Configuration.

3.6 - Start Kext Utility, give the permissions and let the program run by itself.

3.7 - Restart the computer


4.0 START UP THE SYSTEM WITHOUT PENDRIVE:

4.1 - With Clover Configuration, mount Mojave HD EFI partition

4.2 - Go to the box and set up config.plist (EFI / EFI / CLOVER / config.plist)

4.3 - Go to GUI in Scan, select Custom and check (Entries, Tool)

4.4 - In Hide Volume (click + and add: Preboot, + again and add: Recovery)

4.5 - Custom Entries (edit Mac OS partition) copy Mojave HD UUID code and paste it into Volume

4.6 - Check the Title / FullTitle option and add the name of the Mac OS installation, under Type choose OSX, under Volume Type choose Internal.

4.7 - Save the changes.


Sorry for my English and I hope I helped you. Good luck
 
Blimey!

Thanks for making the time to go through it in such detail. I'll try it out this evening and see how I go.
 
Blimey!

Thanks for making the time to go through it in such detail. I'll try it out this evening and see how I go.


Dear BoothmanL, it is a pleasure to help you.

Another detail that I forgot to mention was about the RAM slot, my 3040 micro was in slot 2 and I had several problems, after I changed to slot 1, everything worked out.

Not yet tested in dual channel mode.

good luck!
 
Thanks.

Which slot is number 1? Lower or upper slot?

I've got an 8GB stick and a 4GB stick. So I can use one of those

Thanks
 
So, i got it working!

Thanks to your explanation i followed it through again. First time booting i had the exact same issue. Then i swapped the RAM into the upper slot and then it booted straight away! I’m not sure if that was always the problem or if it was a combination of issues but it is now fully working with accelerated graphics correctly.

Thank you again
 
Hi BoothmanL, sorry for taking so long to answer.

From what I understand you are having problems installing. Remembering that my model is Dell 3040 micro

I did the following:

First configure the BIOS according to post # 1

1 - CREATING THE STARTUP DISC IN USB:

1.1 - Create bootable USB stick with unibeast.

1.2 - After creating the Mojave installation usb disk with Unibeast, open the usb disk with Clover EFI (2.4k 4961), check the following options:

- Installation for UEFI Cards

- Install Clover on ESP

- UEFI Drivers => AptioMemoryfix-64

- Install changes

1.3 - In Clover Configuration, follow the procedure of #post 32:

- Open the usb plist (mount EFI first) and go to Devices tab. In the bottom pane, choose Properties (instead of Arbitrary)

- Devices: PciRoot (0x0) / Pci (0x2,0x0)

- Properties Keys:

AAPL, ig-platform-id = 00001219

frame buffer-patch-enable = 01000000

frame buffer-stolenmem = 00003001

- Click the + sign below this panel and add framebuffer-fbmem for the key and 00009000 for the value.

- You need to do this to install USB and final installation on the main drive.


1.4 - Copy the contents of the Extensions folder (pre-installation) to usb EFI / CLOVER / Kexts / Other.

1.5 - Replace the config.plist (preinstallation) file on EFI / CLOVER / config.plst from the USB boot disk.

1.5.5 - (Alternate Procedure: Mount EFI from the usb installation with Clover Configuration and Replace EFI Folder with EFI Folder (Post Installation)

1.6 - Install Mojave or High Sierra


2 - INSTALLATION PROCEDURE:

2.1 - Configure BIOS as BIOS Folder

2.2 - Boot from UEFI: Pendrive This will take you to Clover Bootloader.

2.3 - Choose "Boot macOS Install from usb"

2.4 - On next reboot, Clover will display Choose "Preload FileVault Boot Preloader"

2.5 - On the third reboot choose Mojave Partition.


3.0 POST INSTALLATION

3.1 - Mount the EFI from the hard drive where Mojave with Clover Configuration was installed.

3.2 - Open Finder Preferences and display the hard drive on the desktop. (The HD EFI partition will appear on the desktop)

3.3 - Go to HD Library / Extensions delete all kexts and replace with those from Entensions folder (post installation)

3.4 - Delete the EFI folder from the hard disk in which Mojjave is installed, paste the EFI folder (post installation. Leave only the file CLOVER / kexts / Other / FakeSMC.kext and discard everything else.

3.5 - Unmount the EFI partition with Clover Configuration.

3.6 - Start Kext Utility, give the permissions and let the program run by itself.

3.7 - Restart the computer


4.0 START UP THE SYSTEM WITHOUT PENDRIVE:

4.1 - With Clover Configuration, mount Mojave HD EFI partition

4.2 - Go to the box and set up config.plist (EFI / EFI / CLOVER / config.plist)

4.3 - Go to GUI in Scan, select Custom and check (Entries, Tool)

4.4 - In Hide Volume (click + and add: Preboot, + again and add: Recovery)

4.5 - Custom Entries (edit Mac OS partition) copy Mojave HD UUID code and paste it into Volume

4.6 - Check the Title / FullTitle option and add the name of the Mac OS installation, under Type choose OSX, under Volume Type choose Internal.

4.7 - Save the changes.


Sorry for my English and I hope I helped you. Good luck
Thank you that the information you have released has saved many people.
 
Status
Not open for further replies.
Back
Top