
- Joined
- Dec 11, 2017
- Messages
- 60
- Motherboard
- ASUS ROG Maximus IX Code
- CPU
- i7 7700
- Graphics
- GTX 1080
- Mac
- Mobile Phone
Index
- Components
- The Story Behind
- The Build
3.1 The Main Parts
3.2 The Other Parts
3.3 Assembly
3.4 The installation
4. Conclusion1. Components
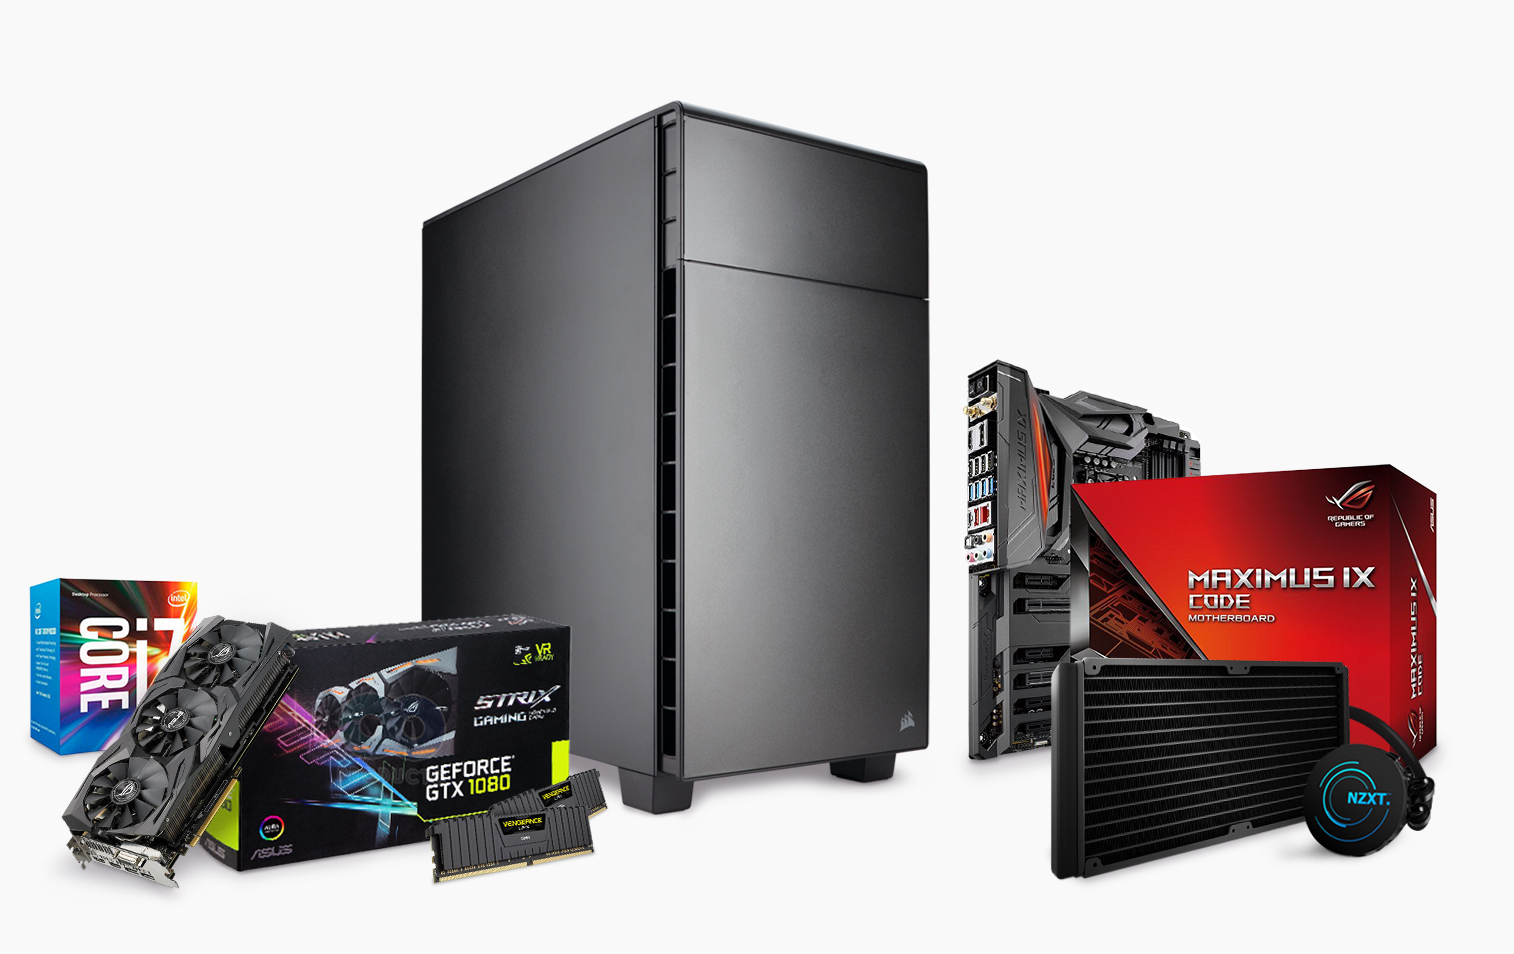
ASUS ROG Maximus IX Code Z270 Motherboard
\ Amazon
\ Newegg - Discontinued or missing from site
Intel Core i7-7700 Kaby Lake 3.6GHz Processor
\ Amazon
\ Newegg
ASUS ROG Strix GeForce® GTX 1080 8GB Base Clock 1607 MHz Graphics Card
\ Amazon
\ Newegg
CORSAIR Vengeance LPX 16gb (2x8gb) 2400MHz (CMK16GX4M2A2400C14) Memory
\ Amazon
\ Newegg
SAMSUNG 960 EVO 250gb M.2 SSD (System)
\ Amazon
\ Newegg
SAMSUNG 850 EVO 500gb 2.5” SATA SSD (Storage 1)
\ Amazon
\ Newegg
EVGA 850 GQ 80+ Gold 850W Power Supply
\ Amazon
\ Newegg
NZXT Kraken X61 AIO 220mm CPU Water Cooler
\ Amazon
\ Newegg - Discontinued or missing from site
Corsair Carbide Quiet 600Q Inverse ATX Full Tower Case
\ Amazon
\ Newegg - this links to the Black Edition, which looks a lot nicer! Newegg doesn’t have the regular gray listed
Already Owned
Dell U2713H UltraSharp PremierColor Monitor
\ Amazon
\ Newegg
Logitech Craft keyboard
\ Amazon
\ Newegg
Logitech MX Master 2S mouse
\ Amazon
\ Newegg
Seagate 2TB BarraCuda HDD (It’s just an old HDD for movies, temporary downloads and stuff I can afford to loose if it fails)
\ Amazon
\ Newegg
Drobo 5D + 17TB of Western Digital RED SATA HDD Drives (3x3TB + 2x4TB) - This guy is my main storage for important stuff!
\ Amazon + Amazon
\ Newegg + Newegg
Yamaha HS5 Active Studio Monitor
\ Amazon
\ Newegg
Comments
2. The Story Behind
I started to get intrigued about the Hackintosh world when people started talking about the cost/performance ratio. For me, that’s something that matters a lot, because I live in Brazil and things here cost almost 4 times the price they do in the US. When it comes to Apple stuff, bump it up to 7x. Talking numbers, not conversion.
So, I wanted something fast, and I was not willing to spend almost 20k Reais - Brazilian currency - which is approximately US$ 5.700, in direct conversion, for an iMac that actually costs US$ 2.600 in US stores.
I’m an independent video producer and freelance motion graphics artist. Now that we are in an era of 4K video all around, and VR is coming in hot, I needed a computer to handle it all, since my Late ’15 MacBook Pro seems to be struggling to even play these new files. Poor guy.
3. The Build
Like many others, I’ve found safe haven in this forum and specially in the builds section! Golden Builds is where the deep knowledge is, because it comes from people who know what they are doing. But if you want anything that is deep, you’ve got to dig.
Among the huge amount of info you can find, one step that was very important to me along the way was to write a install log, so I could track my moves and fix the wrong ones.
It was not easy, and I took about 2 weeks to get it up and running.
I took some time to transform the log notes into this guide (if you can call this a guide), since the build itself was ready right after Christmas 2017. This 30+ day period was actually very good to test the system while working and gaming, and get back to this guide with certainty that everything is stable. But the downside is that I wrote a guide of a outdated system. New OSX updates have already been released and some parts are not even available to purchase anymore. But the important part is that my system is working like it should, and I am proud of it.
The fact that I wrote a build log while putting everything together and now I wrote a guide based on that has made me learn a lot with my own discoveries and installation process.
So, if anyone is actually reading this to build a new Hack, I highly recommend that you write down everything that you do for your own personal organization and, of course, to help others afterwards.
The opportunity to give back with what you learned is something I admire a lot in this forum and site! This place really is a community working for the best interest of all, and I’d like to congratulate @tonymacx86 for creating this site and all the highly skilled and devoted members like @RehabMan @Stork and many others that I will still mention or that haven’t even had the opportunity to read about because of the volume of information this site already has.
Well, talking about volume of information, I needed to narrow down the possibilities and choose something to give me a path to follow. So my build uses basically Stork’s MyHero as a baseline and @JCMunsonII Heroica, which uses a similar 200 series motherboard and Kaby Lake processor. There are some other builds that I got some very useful information from, like @pastrychef and his Maximus VIII Gene build and @thealika with the straight-to-the-point Z270G build.
3.1 The Main Parts
So, did I have any prior experience on building computers? Not really. The last PC I had messed with internals was my mom’s. It had Windows 98 on it and I believe it was around year 2000. Things haven’t changed much in terms of what to plug where, from what I remember, but one thing is certain – modular PSUs were a great invention!! I remember endless cables coming out of that box.
Speaking of which, I’ve chosen the 850W EVGA GQ 80plus Gold to energize everything. From my calculations using outervision.com, my build should consume about 340-400W on 90% load, so 850W should be enough and there’s even some to spare for some upgrades in the future. With OuterVision, you can even predict overclocking and stuff. They offer a pretty complete calculator, so I highly recommend a visit for anyone still researching parts for a new build.
Now that everything can be powered on, let’s move on to the next components.
Quoting Stork here – the core component of a build is the motherboard followed by the processor, memory and graphics card.
Prices on HEROs and CODEs were the same at my online options, and I’ve read that the CODE is a bit better than the HERO, so I got a ASUS ROG Maximus IX CODE Motherboard.
Since my Hackintosh is actually based on ASUS HERO builds, I named it Tina Turner – hope you get it without the need to click this link. If you don’t get it, it’s a sign I’m getting old.
Well, the CODE is a Z270 Series, full ATX, has the MAXIMUS series “goodies”, buttons, good looking covers, ASUS Q-Connector and stuff.
One of the things I liked about this board was the two M.2 slots and the option to use two NVMe drives in RAID0 and achieve even faster speeds. Since High Sierra now has native support for NVMe drives, I thought it would be a nice feature to have.
I later realized that you need to use an included “tower” adapter to install a second NVMe drive. It keeps the blade in perpendicular position related to the motherboard, but that shouldn’t get in the way of anything. It’s just strange.
It’s a nice board! It’s really a lot like the Hero, so you can read Stork’s guide to get to know a bit more about the Maximus series.
The processor is a Kaby Lake Intel i7-7700 with native HD 630 Graphics. It is the locked version, 3.6GHz, since I have no intentions of overclocking it (I sincerely have no idea of how to do it, as of now) and it was cheaper than a i7-7700K.
For RAM, I got a 16GB kit (2x8GB) of Corsair Vengeance LPX DDR4 2400MHz, to start with. I plan to get some more in the very (very) near future. They have good reviews, look nice (I got’em black to complete the black internal look of my build), and are compatible with my other parts.
And finally, graphics! My goal here was a working horse, but I also like playing some games now and then. Of course, I didn’t want to spend too much, so I thought that a GTX 1080 would be “too much”, but what the heck…computers evolve so fast these days. I wanted something to last at least three or four years. So I got a ASUS ROG Strix GeForce GTX 1080 at Base Clock speed.
I hope my predictions are correct!
Lucky fact #1 - A friend brought it to me on a visit, so it was the only part I was able to get it with an American price tag.
(Very) Lucky fact #2 - I got the card before the cryptocurrency maniacs bought them all and the prices skyrocketed. I got mine for US$ 570 in Nov ’17 and now (Jan ’18) they cannot be found for less than US$ 1200.
Oh, and I’ve heard Graphics Cards can be overclocked too. That’s new for me, so I’ll dig into that later.
Any beginner and safe overclocking tips are appreciated! CPU and Graphic Cards, since I’ve heard that even the i7-7700 (without the K) can be overclocked.
3.2 The Other Parts
The case and cooling where chosen together. I knew some modern computers had liquid cooling, and I always thought that to be awesome. With my little-to-none knowledge on computer building, when I knew I could buy a All-in-One kit of water cooling to build my Hackintosh, I wanted one!! Of course, I did my research, and among many yeas & nays, I still decided to go liquid.
Since my case is Corsair, I wanted to keep in the same brand just for the sake of compatibility, because I wasn’t sure about sizes and fitment yet, but I’ve read some bad reviews on the Corsair liquid coolers and decided to go with the NZXT Kraken X61.
The only two Kraken units available in Brazil were used, so I scored the least used one for half the price of a new one. Good deal!
The thing about the Corsair Carbide 600Q Inverted case is that it has a, well, inverted motherboard installation position (the names are all upside down), so the graphics card and all other PCI-e peripherals are above the processor. The Q variant is closed so the upside-down naming does not bother me at all, but the 600C version has a acrylic side panel. I’ve seen some people complaining about that, but that’s just a name, right?
So, apart from breaking your neck to read “Republic Of Gamers” on the GTX 1080, is there anything good about that inverted thing? Think for a moment, have you ever dropped any liquid on electronics? If so, they stopped working, right?
Well, when you go with liquid cooling, there’s a chance that the coolant leaks, and guess what – you’ll have liquid on your computer components, and they’re gonna stop working too!
The “inverted” case keeps the Kraken (or any other AIO CPU cooler, for that matter) hoses clear and below all electronic parts. So, if the coolant leaks, it only leaks on itself – at least in my build, since I installed the fans and radiator facing down at the bottom of the case. This way, the damage can be considerably less critical than a non-inverted (a.k.a normal) case, where the coolant hoses are on top of everything that’s plugged to the MoBo.
3.3 Assembly
The hardware assembly was quite easy actually, when I was comfortable with the bits and pieces.
I’ve found two videos that I consider to contain important info on building skills and part fitting. The first was found in Stork’s MyHero guide, and he points to this post.
The second video I found was by searching YT, but the author explains everything very thoroughly. It has some good info, too.
I totally agree that YouTube videos saves the day, but they do not contain every info you need. Never.
Here goes a golden tip for a beginner (but not only), like myself – READ THE USER MANUAL OF EVERYTHING YOU GOT, specially your case and motherboard – and do not underestimate this tip just because you’ve got a professional electronics toolkit.
So, with hardware part set and done, let’s start with the software stuff.
3.4 The installation
Finally, let’s dig into what matters and the main subject of this post.
I’ll try to be straight-to-the-point and not only tell about my experience, but also fill the gaps with complimentary info for first timers. Also, it’s important to point out that this was a clean install.
You should know that everything that is written here is actually a reproduction or combination of info from the guides I mentioned above, so be sure to read them carefully if you have any doubts, or feel free to ask.
You are gonna need a Mac computer and a 16gb USB thumb drive. I used one that was USB 3.0 with no problems, even though I was warned I needed to use a USB 2.0 device. If you want to be extra safe, get a USB 2.0 stick.
These first steps were made using my almighty MacBook Pro, but you can do it with any other Mac.
— ON ANOTHER MAC —
Step 1. Access this link and download these tools – UniBeast 8.1.0 or latest, MultiBeast and KextBeast
Step 2. Access this other link to download CloverConfigurator
Step 3. Download NVIDIA WebDriver related to your MacOS version from here.
Step 4. Save them to a folder on your desktop for easy access and …
Step 5. Make the UniBeast USB Thumb Drive following this guide - Install maxOS High Sierra 10.13.2
Step 6. Download and replace the APFS EFI - download and instructions here
- I used macOS High Sierra 10.13.2 (17C88)
Step 7. Copy/Paste custom KEXTS into USB > CLOVER > KEXTS > OTHER folder
- IntelGraphicsFixup.kext
- Lilu.kext (1.2.1)
- Shiki.kext (2.2.0)
- USBinjectAll.kext
- XHCI-200-series-injector.kext
Step 8. After the Thumb Drive has been created, create a new folder in it’s root (I called it Post Install) and place MultiBeast, KextBeast, CloverConfigurator, NVIDIA Driver and the Kexts folder in there so you don’t have to download them all again.
To make life easier, I’ve uploaded these kexts to my Google Drive on a single package. You can download them from there. (There’s an extra CodecCommander we’ll use later on)
Moderators, if I am breaking any forum rules, please let me know and I take the link down!
Let’s move on to your new system.
— ON YOUR HACKINTOSH —
For the first install, I recommend that you keep any graphic card physically disconnected from the computer. That was the difference between a successful USB boot and a black screen for me, even using the onboard HDMI to connect to my monitor.
Also, nothing was attached to my computer apart from keyboard, mouse and monitor. No ethernet, no external drives, not even extra internal drives were connected at this time.
I wanted to keep things as clean as possible, to make sure I would not screw anything up. Better safe than sorry, right?
That said, plug that USB stick into a USB 2.0 port (bottom port, as Stork said) and press that big power on button.
On the very first screen, if it is the first time you are turning on your computer, it’s going to ask for an action to enter BIOS Setup. (Press F1, if I recall correctly)
If it’s not the first power-up, press F2 for…
Step 1. BIOS Setup
Follow Step 3 of the base guide for general setup along with MyHero and Heroica guides for board specific details - special thanks to @thealika video on explaining the ‘delete keys’ procedure to disable Safe Boot.
NOTES about things I found confusing at first or are worth mentioning:
- You should always update your BIOS to the most recent version
- On more recent BIOS versions, starting from 1009 to the most recent 1203* (my case), the XHCI Handoff has been removed and now you need to disable USB and Keyboard Simulator instead, and adjust the Legacy USB to Auto.
- Anything “AWARD BIOS” related does not apply to Maximus boards
- IO SerialPort does not apply, because this motherboard does not have Serial Ports
*BIOS Version 1203 (2018/01/09) addresses the Specter & Meltdown bugs (a.k.a. CPU MicroCode)
This has nothing to do with the build, but it’s good to inform that you should update to firmware 1203 at least, just to be a step farther from this vulnerabilities.
If you don’t know what that is all about, do a quick search and you’ll find a lot of news and coverage about it, including how to patch everything.
Also, there are some news stating that some patches being released are flawed, and therefore needs to be further updated. So keep an eye out for updates regularly, in case ASUS screws up too.
Step 2. Save and Exit BIOS Setup
The computer should restart, just wait until you reach the…
Step 3. Clover Boot Screen
Here goes some quick steps to make it easier, but check the guides for further info
- From Clover Boot Screen, use arrows to navigate to “options” and check for boot flag “nv_disable=1” (It was already there in my case, just check it)
- Return to boot screen and choose “Boot OS X Install from Install maxOS High Sierra” - that means your USB Drive
- Wait for loading bar
- Open Disk Utilities
- Format your desired system hard drive*
- Follow steps to install
- Auto Reboot
- Clover Boot screen again
- Choose “Boot macOS Install from [drive]” - now it boots from your drive and continues the installation
- Wait for progress bar
- Setup system, user, etc, DO NOT set up iCloud, and cancel “send diagnostics” and things like that
- Reach your desktop
*My system disk is a Samsung NVMe M.2 SSD. It worked OOB with High Sierra, no issues there.
If all went well, your thumb drive also works as a recover option in the future if things go south. So keep it safe, and don’t delete or format it.
Now, you have a working Hackintosh with core functions, but there’s work to be done since you still need to install your ‘drivers’ (a.k.a. kexts) and some other pieces of the puzzle for everything to work as it should.
Step 4. Post Install
First of all, backup AppleHDA.kext from System/Library/Extensions/ (commonly referenced as S/L/E) to a safe place.
If your audio install goes wrong later on, you’re gonna need this file to start all over again.
- Open your USB drive
- Copy the Post Install folder to your desktop.
– Run MULTIBEAST and setup as follows
Quick Start > Clover UEFI Boot Mode
Drivers > Misc > FakeSMC
Drivers > Misc > FakeSMC Plugins
Drivers > Misc > FakeSMC HWMonitor Application
Drivers > Network > Intel > IntelMausiEthernet v2.3.0
Drivers > USB > Increase Max Port Limit 200 Series
Bootloaders > Clover UEFI Boot Mode + Emulated NVRAM
Customize > System Definitions > iMac > iMac 14,2
Drivers > Graphics > NVIDIA Web Drivers Boot Flag
– [OPTIONAL] Install NVIDIA WebDriver
If you have a NVIDIA Graphics Card, you must install a driver for it to work.
The version that worked for me was 378.10.10.10.25.102, since .103 was not yet compatible. I had the two versions on the USB drive, just in case.
- Install the one that opens, from newest to oldest (if the installers opens, it works)
- Don’t click restart at the end, just leave the window open.
– Install CodecCommander using KextBeast
- Drag KextBeast and Rehabman’s CodecCommander.kext to your desktop
- Make sure you don’t have any other .kext file hanging around your desktop
- Run KextBeast
Now, click restart on NVIDIA WebDriver installer, and turn it off when you get to Clover Boot Screen.
After the machine was off, I installed the NVIDIA card back into the computer, connected the HDMI to NVIDIA card and booted. If you have a graphic card, do the same.
If you don’t have a graphic card, you can do a simple restart after CodecCommander is installed.
– iCloud/iMessage Setup
To make iCloud work, I used An iDiot's Guide To iMessage
This is a guide for, well, iMessage, but Apple checks iCloud for the same security “IDs”, so it works for both.
Here goes a quick recap, but read the full guide for detailed info
Part 1 - Clear things up.
- Check if you have strange devices and clear them from iCloud account
- Disconnect from iCloud and internet (most likely, unplug your ethernet cable)
- Restart
- Clear Caches
- Restart again
Part 2 - Do the magic!
- Connect Ethernet
- Open Clover Configurator (CC)
- Mount EFI (Be sure to mount EFI for the startup disk)
- File/Open/EFI/CLOVER/config.plist
- Edit RtVariables (this step is also important for audio later on since this is what disables SIP)
- Edit SMBIOS
- Do the ‘serial number’ thing
- Check everymac.com (It has to OK)
- Check checkcoverage.apple.com (It has to be NOT OK - you read that right)
- Save
- uuidgen copy-paste at terminal
- Save
- Restart
- Done
I don’t use iMessage from my computer, but iCloud worked like a charm. App Store, Mail, accounts, everything synced and downloaded like it was supposed to do on a shiny aluminum iMac – except it’s not quite that.
Okay, now let’s hit…
– Audio Setup
This here is a complicated and random problematic step, so brace for impact. My install method worked for me, and it may very well not work for you, but I hope it does!
Just to register, Asus Maximus IX Code/Hero/Formula boards are all 200 series using ALC 1220 audio codecs.
At the time of installation, Christmas 2017, this system was not yet compatible with macOS HD Audio Controller. Thus, I needed the Quick Fix…more on that below.
On Stork’s guide, he installed the audio kexts using MultiBeast. I’ve tried that, and it did not work. The audio outputs showed up, but only noise came out of them.
Before installing these audio kexts, things played on mute, of course, but then everything stopped playing after the install, no matter where - Quicktime, VLC, YouTube, iTunes.
This is a common error for many installs, and by reading the threads below, I knew I had screwed things up, so I decided I had to start over and take the long way. Glad @toleda made these in-depth guides with different approaches and procedures!! Thanks a lot man!
I’ve personally found them confusing at first because there are a lot of numbers and specs for the newcomers and first timers (like myself), but I’ve read these threads (be sure to check replies and answers too) over and over until I finally felt I was able to give it a go. They are very precise, when you understand them, so read them thoroughly.
Access theses links in this order:
I’ve chosen to output audio from my TRS jacks, so it is AppleHDA Realtek Audio that I wanted. If you want audio to come out from HDMI, there’s a thread for that, and if you want both, you should enable onboard (aka Realtek) first and then HDMI, so said the man himself, here.
In quick steps
Part 1 - Clear things up
- Remember you backed up AppleHDA.kext right when you first got to the desktop? Good boy…if you didn’t and tried to install according to Stork’s guide (like myself), then go get the original kext back. Go check the “Before You Install Audio”, also there’s a guide for that. NOTE: Requirements A and B are two different procedures. Choose one of them. Pacifist is the best if you don’t want to start all over.
- Verify your BIOS setting under Advanced>Onboard Devices Config>HD Audio Controller - Enabled
- Identify your codec - ALC 1220 in my case
- Set Audio ID - had been already set by MultiBeast - Just check with Clover under Clover/config.plist/Devices/Audio/Inject/(it has to show 1)
- Disable SIP - we did it to fix iCloud, but check it under Clover/config.plist/Rt Variables/CsrActiveConfig/(it should show 0x67)
I’ve chosen the cloverALC procedure because it is actually pretty straightforward. You can go with vit9696/AppleALC procedure or even MultiBeast procedure.
Part 2 - cloverALC
- Open Clover Configurator and mount EFI
- Make sure you’re connected to the internet
- The link in the guide was broken at the time I tried to download it, so I found the full development folder and it is available here. Unzip it to your desktop, inside you will find a lot of files, but you just need one of them.
- Unzip audio_cloverALC-130.command-x.zip and run the .command.
- It will open terminal. As the guide suggests, type your password (the characters don’t show up, so pay attention to what you’re typing), hit enter, and terminal will ask you some questions. Answer y>enter for yes or n>enter for no.
- If you did everything right, the answers will be all yes and will be a success.
- Restart
- Done? No…not done. There’s no sound, it’s mute!
Part 3 - Quick Fix, a temporary solution.
- Download Fake PCI ID Kexts from @RehabMan (I’m officially his fan, he works hard for the Hackintosh community)
- Throw FakePCIID.kext and FakePCIID_Intel_HDMI_Audio.kext to desktop
- Clean any other kexts from your desktop and run KextBeast one more time
- Restart
- Now it’s done.
And also, the basic install is done.
It is a working Hackintosh, with every basic component working as it should, for my taste.
Of course, there are a few extra things you could install, like bluetooth and wi-fi cards, and things that are very common among Hackintoshers, but for me, this build goes as far as I need.
4. ConclusionTo finish up, I’ve installed iStat Menu (not the Mini, the real deal) and Intel Power Gadget (you need this for iStat to be fully functional) to monitor things, which I like better than HWMonitor that was installed with MultiBeast.
I believe they both work, it’s just a matter of personal taste and customization options.
And this past month, I’ve been using my new build on a daily basis, and it works almost perfectly – 4K videos run smoothly, Cinema4D renders fine, After Effects workflow is good (but I need more RAM) and I’m happy!
– What Works
- Ethernet
- Audio - Realtek and HDMI, but only when using DP Cable
- USB 3.0
- HDMI
- Nvidia Card / Web Driver / CUDA
- iCloud
- Temperature Monitoring and other sensors
– What Doesn’t Work / What Glitches
- DisplayPort Cable is still very unstable. It boots/wakes with wrong resolutions almost every time and forces me to disconnect-connect to work properly.
- There are some moments, under heavy load, that the computer suddenly restarts on it’s own. I’ve observed that it happens most of the times when working with a heavy project or file stored in the Drobo (connected through USB 3.0), but it has happened while rendering a file that was stored in the internal storage SSD, but still had the Drobo connected. Now, I am working with all my work files locally, and the problem seems to have stopped. Maybe it has something to do with USB 3.0 transfer rate or energy.
UPDATE - 21/02/2019
Transition from High Sierra 10.13.4 to 10.13.6
So, I've been having issues related to Premiere Pro crashing down because of the way Lumetri works with GPU rendering, and I've found out that Adobe has released some updates to Premiere and other CC videos apps that changes the GPU driver requirements for the apps to run smoothly – and hopefully fix my problem.
The key thing is in CUDA driver. It needs to be at it's most recent version (410.130). To do that, I needed to update Nvidia drivers also to 387.10.10.10.40.105 (or later).
And to do that, I needed to update macOS. So here we go!
UPDATE PROCEDURE
- Updated Clover Configurator to 5.0.0
- Updated Clover to r4871
- Restart and ... CRASH!!
After the Clover boot screen, everything stays black and nothing happens.
Running verbose mode (-v), it gets stuck at "End RandomSeed +++++"
FIXING HER
Thanks to this community, I was able to pinpoint the problem. The main kext that was missing was OsxAptioFix2Drv-64.efi (followed this post, but later also found this thread regarding this issue). Here it goes:
- If you have USB thumb drive with HS installer, enter BIOS boot options and choose your USB drive. It's gonna load the Clover boot loader stored in the USB and then you choose to boot from your main boot disk.
- So, there are a some options here:
- Run MultiBeast (most recent version) to install the kexts again into your EFI
- Manually copy and paste the missing driver from a EFI backup on the disk (thankfully, Clover creates a backup every time you update it)
- Use Clover Configurator to install the missing driver under Tools - Install Drivers
HERE is how to fix it without the USB thumb to boot
HERE, at the end, he mentions what can be a replacement for OsxAptioFix2Drv-64.efi
BACK TO PROCEDURE
So, everything in place and my Hackintosh was alive - again.
- Replaced APFS.efi with the new one for 10.13.6
- Updated Lilu and other kexts
- Went to Apple Store to update macOS
- System automatic restarts and runs the installation procedure
- When finished, I updated the Nvidia Drivers to a version prior to the one I needed
- Restart to complete Nvidia update
- Updated CUDA drivers...but...Apple Store still had more updates to do to the system (Security)
- So into the second row of automatic restart and system updated procedure
- Second row of Nvidia driver update, now it's on the version I needed.
- Restart
- And, the USB 3.0 ports have stopped working
- So I followed this + updated USBInjectAll.kext from here
Used Carbon Copy Cloner to do a bootable backup of my new startup system, and life moves on...
Last edited: