- Joined
- Oct 2, 2014
- Messages
- 8
- Motherboard
- Gigabyte Z87X-UD4H - Yosemite
- CPU
- i7 4790k
- Graphics
- Nvidia GTX 660Ti
- Mac
- Classic Mac
- Mobile Phone
Components
Gigabyte GA-Z87X-UD4H //
Intel Core i7-4790K //
16GB Corsair Vengeance Ram //
Nvidia GTX 660TI //
Samsung 840 Evo //
Corsair H80i //
Before the build.
This is my first hackintosh build I have done, and coming from a gaming built AMD machine I would like to think I know what I am doing with computers. As I do a lot of video and audio production I thought I would take the plunge into a Hackintosh as I have most of the parts already. With just having to change the MotherBoard and CPU I was already 3 times better off that buying an iMac
Just a warning before just so you don't run into as many problems as I do. Make sure that your board is booting to Bios with your 4790k. If not get an Intel G3220 and update the Bios to F10 of your Motherboard. After doing this your processor will be recognized and you are ready to start the build and install Yosemite.
The Build
Bios Settings:
Before you do anything make sure all the settings on the BIOS are correct for you to install Mac OS X on your system.
For my build I changed the following options:
1. VT-d -> disabled
2. Wake on LAN -> disabled
3. Intel Turbo Boost -> disabled
4. Audio Controller -> Auto
5. Intel Processor Graphics -> disabled
6. XHCI Mode -> Auto
7. XHCI Hand-Off -> Enabled
8. ECHI Hand-Off -> Enabled
This is what I found to work best with no hiccups and to have a clean running system.
Installation:
Now we are able to start the install of OS X Yosemite (or you chosen system) and this is where the fun begins.
I would recommend using Tony's Guide with UniBeast and fingers crossed with these chosen parts you should get an easy boot up into the installer with no need for and flags, and a clean install which should boot up first time!
I came from Mavericks 10.9.5 and used Tony's Upgrade guide, the only problem I ran into was that it couldn't find the Mach_Kenerl when booting from the hard drive. All you need to do is go to Extra/org.chameleon.Boot.plist, and remove these two lines:
Code:
<key>Kernel</key>
<string>mach_kernel</string>
Or change the string to the correct directory, like so:
Code:
<key>Kernel</key>
<string>/System/Library/Kernels/kernel</string>
Make sure you follow letter casing as well.
Post Installation:
Now you have installed Mac OS X Yosemite on your hackintosh...YAAAAY!? Just one final step and you have a fully bootable Mac computer.
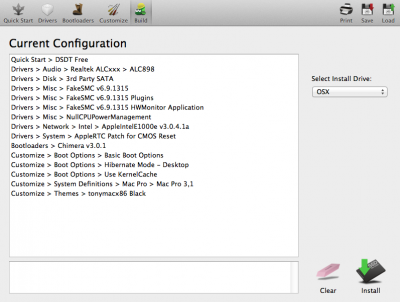
Run Mulitbeast Yosemite edition once you have booted into your system and install the bootloader and your drivers onto your main hard drive where you install the operating system.
My load out looked like this...

Now you should be able to reboot, and boot from your hard drive with no problems. If you run into any problems please feel free to ask me any questions and I will help best I can.
Gigabyte GA-Z87X-UD4H //
Intel Core i7-4790K //
16GB Corsair Vengeance Ram //
Nvidia GTX 660TI //
Samsung 840 Evo //
Corsair H80i //
Before the build.
This is my first hackintosh build I have done, and coming from a gaming built AMD machine I would like to think I know what I am doing with computers. As I do a lot of video and audio production I thought I would take the plunge into a Hackintosh as I have most of the parts already. With just having to change the MotherBoard and CPU I was already 3 times better off that buying an iMac
Just a warning before just so you don't run into as many problems as I do. Make sure that your board is booting to Bios with your 4790k. If not get an Intel G3220 and update the Bios to F10 of your Motherboard. After doing this your processor will be recognized and you are ready to start the build and install Yosemite.
The Build
Bios Settings:
Before you do anything make sure all the settings on the BIOS are correct for you to install Mac OS X on your system.
For my build I changed the following options:
1. VT-d -> disabled
2. Wake on LAN -> disabled
3. Intel Turbo Boost -> disabled
4. Audio Controller -> Auto
5. Intel Processor Graphics -> disabled
6. XHCI Mode -> Auto
7. XHCI Hand-Off -> Enabled
8. ECHI Hand-Off -> Enabled
This is what I found to work best with no hiccups and to have a clean running system.
Installation:
Now we are able to start the install of OS X Yosemite (or you chosen system) and this is where the fun begins.
I would recommend using Tony's Guide with UniBeast and fingers crossed with these chosen parts you should get an easy boot up into the installer with no need for and flags, and a clean install which should boot up first time!
I came from Mavericks 10.9.5 and used Tony's Upgrade guide, the only problem I ran into was that it couldn't find the Mach_Kenerl when booting from the hard drive. All you need to do is go to Extra/org.chameleon.Boot.plist, and remove these two lines:
Code:
<key>Kernel</key>
<string>mach_kernel</string>
Or change the string to the correct directory, like so:
Code:
<key>Kernel</key>
<string>/System/Library/Kernels/kernel</string>
Make sure you follow letter casing as well.
Post Installation:
Now you have installed Mac OS X Yosemite on your hackintosh...YAAAAY!? Just one final step and you have a fully bootable Mac computer.
Run Mulitbeast Yosemite edition once you have booted into your system and install the bootloader and your drivers onto your main hard drive where you install the operating system.
My load out looked like this...
Now you should be able to reboot, and boot from your hard drive with no problems. If you run into any problems please feel free to ask me any questions and I will help best I can.