I’ve built this system and have been using it as my daily driver for the last 2 months. This has been running 6 to 12 hours a day every day and has been completely stable. The system consists of:
- Gigabyte Z490 Aorus Elite MB (non AC version)
- i9-10850K
- AMD Radeon RX 5700 XT
- Rosewill RNX-AC1900PCE WiFi card (from prior hack)
- IOGEAR Bluetooth 4.0 Micro Adapter (from prior hack)
- SATA SSDs (from prior hack) for storage so am not using NVMe storage.
This is an OpenCore 0.6.3 setup as that was current when I set this up. This uses the iMac20,2 SMBIOS definition.
Currently tested and working:
- Ethernet
- Sleep/Wake
- Audio
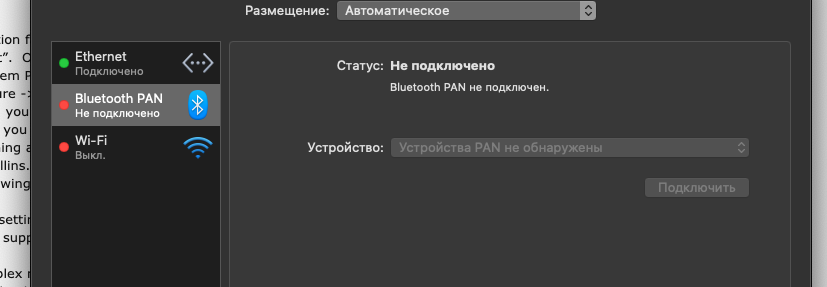
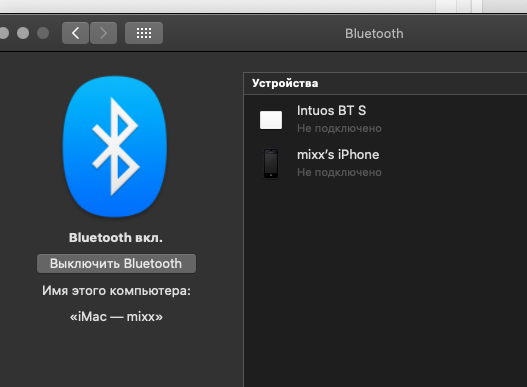
- WiFi / Bluetooth (via adapters)
- Power Management (CPU frequency/power setting by OS)
- Continuity (Use Camera / Handoff / iPhone calls / SMS messaging / AirDrop)
- Messages (formerly iMessage) / Music (formerly iTunes)
Tested DRM playback per
OpenCore, but this is not something I use on my computer so I didn’t do any fixes here.
- FairPlay 1.x - Working
- FairPlay 2.x/3.x - Amazon and Netflix play via Chrome
- FairPlay 4.x - Apple TV+ starts to play then stops. The initial ratings screen for whatever is selected displays, then the window closes.
I followed the OpenCore guide using pre-build DSDTs and configurations where possible. I built a USBMap.kext for my use and am including one with all ports mapped that can be edited to your preference. In order for handoff to USB device during macOS install to work, the USB drive (and Keyboard) must be plugged into one of the back panel USB 3 ports that is early in the sequence of ports. These are the White, Blue above the White or Red ports. Also during the initial install with the starting OpenCore configuration, only the Display Port furthest from the MB worked.
I chose this motherboard because it is one that is a middle ground unit, it is modern in that it only has USB and SATA ports (no serial/COM/PS-2 nor PATA) but also does not have built-in WiFi or Thunderbolt requiring them to be disabled. Also, the PCIe slots are laid out so that with a 2+ slot video card installed, the 3 remaining PCIe slots are all usable, allowing maximum expansion. It also had solid reviews online.
You will have to make assorted edits before using the EFI directory:
- Select the USB ports you want to use per the information below. In the EFI directory is an extra directory "USBMap". From that directory, copy either the "USBMap InUse.kext" file or "USBMap All Ports.kext" file to "USBMap.kext". If you start with the All Ports file, edit its plist by using Show Package Contents and editing Contents -> Info.plist. I suggest ProperTree. See OpenCore USBMapping for details. Remove the ports you don’t want to use. Each SS port removed must have its corresponding HS port removed. Each port has a comment identifying it on the motherboard. Finally, move the resulting USBMap.kext to the EFI->OC->Kexts directory. You may want to set aside the "USBMap" directory for future use if you change which ports you want working.
- In EFI->OC->config.plist you will have to set the PlatformInfo per your CPU and unique information. Again, use ProperTree to edit this. See OpenCore guide PlatformInfo under Comet Lake for details of these settings. The settings are the SystemProductName (aka SMBIOS), the SystemSerialNumber, MLB (Board Serial number), and SystemUUID all of which should be unique to your system. You will also need to set the ROM value to the MAC address for your NIC. These values have been cleared in the EFI file I have supplied.
USB Ports
The MB has a total of 26 USB ports defined on the Z490 chipset that I found during the setup. Of these 10 are USB 3.0 with 10 paired 2.0 variants, with 2 USB 2.0 ports each driving a 4 port hub, 1 USB 2.0 port for Mother Board RGB lighting control, and 3 USB 2.0 ports I could not identify. The usage of these breaks down as:
- A Type-C motherboard header that has 2 USB 3.0 and 2 paired 2.0 variants assigned to it, for a total of 4 ports.
- A USB 3.0 motherboard header supporting 2 USB 3.0 sockets with each socket assigned a 3.0 and 2.0 port for a total of 4 ports.
- The 6 USB back panel sockets of various 3.x versions each with a 3.0 and 2.0 port assigned to it for a total of 12 ports.
- One USB 2.0 port wired to a motherboard hub supporting the 2 USB motherboard headers (each with 2 ports)
- One USB 2.0 port wired to a motherboard hub supporting the 4 USB 2.0 sockets on the back panel.
In order to meet the macOS 15 port limit per controller, you will have to select which ports you want to use. To support this, I have supplied two USBMap kext files, one that I am using that selects some of the ports and one with all them defined that you can edit per your preference. The ports I have defined are: USB 3.0 motherboard header, 4 USB 3.x back panel sockets (white, blue adjacent to the white, and both red) and both USB 2.0 ports wired to the motherboard hubs.
Audio
ALC 1200 Layout ID 1. (The ALC 1200 is similar to the ALC 888 and dates from that time period.) Back panel “Line Out/Front Speaker Out” maps to macOS Sound control panel ‘Built-in speaker’ with the headset (via MB audio header) overriding its output with sound listing ‘Headphone port’. Back panel Center Speaker Out and Rear Speaker Out jacks each correspond to a Sound Line Out. I have not tested Digital Out (Optical) nor Inputs but there is both an Internal Microphone and Line In listed in Sound matching the Mic and Line In jacks.
OpenCore configurations made.
The following is the list of configurations made per the OpenCore guide. I’m providing this so people will have some guide as to where to go to change settings if needed. This follows the OpenCore Install Guide order.
- 64-bit Release
- Minimum .efi files: HfsPlus.efi and OpenRuntime.efi
- Kexts: AppleALC, Lilu, LucyRTL8125Ethernet, SMCProcessor, SMCSuperIO, USBMap (modified per above), USBWakeFixup, VirtualSMC, WhateverGreen
- SSDT: SSDT-AWAC, SDT-EC-USBX-DESKTOP, SSDT-RHUB, SSDT-USBW, SSDT-PLUG-DRTNIA
- Config -> DeviceProperties: PciRoot(0x0)/Pci(0x2,0x0) is patched so the iGPU is used for computing tasks and doesn’t drive a display. PciRoot(0x0)/Pci(0x1F,0x3) is patched to set ALC to use Layout ID 1.
- Config -> NVRAM -> 7C436110-AB2A-4BBB-A880-FE41995C9F82 -> boot-args has 3 entries: debug=0x100 keepsyms=1 agdpmod=pikera The debug=0x100 keepsyms=1 are for macOS to not immediately reboot on a kernel panic. The agdpmod=pikera is for the Radeon 5700 (for all Navi cards) to prevent a black screen on boot.
- Config -> Platforminfo -> Generic: SystemUUID, MLB, SystemSeriralNumber all set using the GenSMBIOS application. The SystemProductName (SMBIOS) set to iMac20,2 for the i9-10850K. The ROM set to the NIC Mac address of my computer.
The remaining settings follow the recommended ones for this hardware.
BIOS Setup
I flashed the BIOS to the latest version F6b dated 11/03/2020. The following are the settings to be changed or verified per the OpenCore guide.
- Save & Exit
- Load Optimized Defaults - Why is this on the last screen you can get to, not the first?
- Favorites
- Extreme Memory Profile -> Profile 1 (or as appropriate for your RAM)
- CSM Support -> Disabled (default)
- VT-d -> Enabled (default) (I disable this in the OC config.plist)
- Settings
- IO Ports
- Aperture Size -> 256MB (default)
- Above 4G Decoding -> Enabled
- USB Configuration
- Legacy USB Support -> Enabled (default)
- XHCI Hand-off -> Enabled (default)
- SATA and RST Configuration
- SATA Mode Selection -> AHCI (default)
- Aggressive LPM support -> Disabled (default)
- Miscellaneous
- Software Guard Extensions (SGX) -> Disabled
- Trusted Computing:
- Security Device Support -> Disabled
- Boot
- CFG Lock -> Disabled
- Fast Boot -> Disable Link (default)
- Windows 10 Features -> Windows 10 (default)
- Secure Boot
- Secure Boot Enable -> Disable (default)
- Save & Exit:
- Save settings as a profile
- Save & Reboot
Ethernet
On macOS install, the Ethernet connection may not be working. This is due to an issue where the LucyRTL8125Ethernet.kext driver does not auto negotiate correctly depending on your network. To check this at the start of the install, when the macOS Utilities is displayed, select Utilities -> Terminal then enter the following command to determine you ethernet connection name:
And it should return a line like:
Code:
en0: flags=8863<UP,BROADCAST,SMART,RUNNING,SIMPLEX,MULTICAST> mtu 1500
The en0 is the ethernet connection, so using that run the command:
And in the return will be a line for ‘media’ and several with status. If the output has lines something like:
Code:
inet6 fe80::1c75:156a:4461:8e74%en0 prefixlen 64 secured scopeid 0xe
inet 192.168.4.118 netmask 0xffffff00 broadcast 192.168.4.255
media: autoselect (100baseTX <full-duplex,flow-control>)
status: active
You have connected to your router, been assigned an ip, and are good to install. If it is:
Code:
media: autoselect (<unknown type>)
status: inactive
Which is without the inet6 and inet lines, the auto negotiation failed. If this is the case, during the install you can either use a wireless connection or select “Does not connect to Internet”. Once macOS is installed if it does not auto setup the Ethernet connection, configure it to do so manually. Do this in System Preferences, Network preference, select Ethernet from the list, click ‘Advanced…’, select the ‘Hardware’ pane, then set: Configure -> Manually; Speed -> Per your network; Duplex is per your network but generally ‘Full-duplex, flow-control’ works and you can back off to simpler settings if it does not. Click ‘Ok’ and wait a few seconds to see if you get an IP Address assigned. If you need the network during the install you will have to first enable root in the setup assistant, reboot, and when setup is running access the terminal and manually set the link speed. See the artical
Using Terminal At macOS Setup Assistant | chris-collins.io to enable root. After enabled you have to set the link speed manually. From the terminal running as root, run the following to determine the settings available:
Which will list a number of lines with media and mediaopt setting combinations. The speed you select is dependent upon the router/switch you are using with all modern LAN hardware supports full-duplex and flow-control. Select the line based on your network and enter the command
Code:
ifconfig en0 media <your speed> mediaopt full-duplex mediaopt flow-control
To confirm, run the ifconfig en0 command again and you should see the status active and inet lines indicating a successful connection to your router. It may take a few seconds after you enter the config command for the link to establish. If after some time you don’t have a link, try the same speed without the mediaopt options.

") Appreciate the easy hackintosh for this motherboard, saved me the headache of doing all the boring stuff haha
Appreciate the easy hackintosh for this motherboard, saved me the headache of doing all the boring stuff haha