
- Joined
- Oct 5, 2017
- Messages
- 192
- Motherboard
- Z370 AORUS Gaming 7
- CPU
- i7-8700K
- Graphics
- RX 580
- Mac
- Mobile Phone
HackaShaq's "2018 Mac Pro Replacement" Build:
Gigabyte Z370 AORUS Gaming 7 - i7-8700K - RX 580
ComponentsGigabyte Z370 AORUS Gaming 7 - i7-8700K - RX 580
Gigabyte Z370 AORUS Gaming 7 Motherboard (Amazon)
Corsair Vengeance LPX 32GB (2x16GB) Memory (Amazon)
Intel Core i7-8700K Processor (Amazon)
be quiet! BK019 Dark Rock Pro 3 Processor Cooler (Amazon)
Sapphire Radeon PULSE RX 580 8GB Graphics Card (11265-05-20G) (Amazon)
Samsung 960 EVO 500GB NVMe M.2 SSD - macOS Boot Drive (Amazon)
Syba Low Profile PCI-Express 1394b/1394a (2B1A) Firewire Card (Amazon)
EVGA 750 BQ, 80+ BRONZE 750W Power Supply (Amazon)
Phanteks Enthoo Evolv PH-ES515E_GS Computer Case (Amazon)
2x Dell P2715Q 27" Ultra HD 4K Monitors (Amazon)
GMYLE Bluetooth Adapter Dongle (Amazon)
SanDisk 16GB 2.0 Flash Cruzer Glide USB Drive (Amazon)
Sour Patch Kids Sweet and Sour Gummy Candy (Original, 3.5 Pound Bag) (Amazon)
OPTIONAL: (For a dual boot Mac & Windows System to share one set of audio speakers)
Monoprice 6inch 3.5mm Stereo Jack/Two 3.5mm Stereo Plug Cable (Amazon)

IMPORTANT NOTE: This guide was written with a fresh install of macOS High Sierra 10.13.4.
(I have since updated to High Sierra 10.13.5 without any issues whatsoever.)
I just wanted to stress that it's key to start with a later version of macOS High Sierra 10.13.4 or later to ensure compatibility, especially with native drivers included for the RX580, etc. High Sierra 10.13.5 is the latest version as of this writing and that will ensure compatibility.
Starting with a clean install of an older version of High Sierra 10.13.1 for example, may result in compatibility and/or stability issues, etc. And installing macOS Sierra (not High Sierra) is not recommended for this build.
Comments
My main computer for the past seven years or so has been a “cheese grater”, classic Mac Pro (5,1). This model that has served me very well, being a fantastic machine that I have updated over the years with a new video card, SSD, USB 3.0 card, etc. However, it was getting old and slow by today’s standards, and I kept waiting and waiting for Apple to release a new/similar tower Mac Pro. Instead they released the “trash can” Mac Pro, and I was not a fan.
So my main goal for creating this hackintosh was to create a 2018 version of the Mac Pro that I wish Apple would make.
I want to really extend a word of thanks to @trs96 who created his HP 8300 Elite CustoMac guide. The last time I built a computer was in the 90’s, and the thought of creating a hackintosh from scratch was initially daunting. But his guide allowed me to get my feet wet with the tools necessary to run macOS on PC hardware, and after building a nice cheap Mac running off an HP 8300, my next goal was a hackintosh from scratch. So thanks again @trs96 for your fantastic guide. Without that guide, this build doesn’t happen.
So I’ll do my best to play it forward and be as detailed as possible for beginners alike so they can hopefully build a machine like this if need be. This machine attempts to be as easy to assemble as possible, with virtually everything working right out of the box with High Sierra. I’m also providing a Geekbench number at the end so you can see what to expect in terms of benchmarks if you want to attempt this build. Here goes…
Notes on Components above:
- GPU: If you only need/want a single 4K monitor setup, you can save money by changing the GPU above to the MSI RX 560 4GT LP OC (R5604TPC) Graphics Card (Amazon). I also tested my machine with this exact card, and it worked great with a single 4K monitor setup. But for dual-monitors, I did not get great color accuracy from the HDMI output, and the HDMI-connected monitor would only do 30Hz which resulted in chopping mouse movements, etc. I wanted a card with two DisplayPort outputs, and thus, I went for the RX580 card. RX580 works perfectly for a dual-display setup.
- WiFi: This is my production machine, and I personally don’t need WiFi. Thus, I have no wireless card installed. I also don’t use Facetime or iMessage on this production machine, and just use wired Ethernet. If WiFi is needed, there are numerous plug-and-play cards out there that are supported.
- Audio with optional selection for front headphone jack (Needs patch/kexts)
- DisplayPort x2 for dual 4K Monitors (both 60Hz!)
- Sleep & Wake (including fans turned off)
- Shutdown
- Ethernet
- Bluetooth
- USB 2.0 & 3.0 (I don’t have any 3.1 devices so can’t test but likely fine)
- Firewire (Plug-and-play) accepts Firewire target disk mode, etc.
Optional: Overclocked CPU (needs BIOS settings tweak)
Build Items
First, let’s start with the essentials.
Here are the interior components that make up this build. And the Sour Patch Kids are an Amazon add-on item only, so when you’re buying the gear, this is the time to buy these as well.
")
The Case
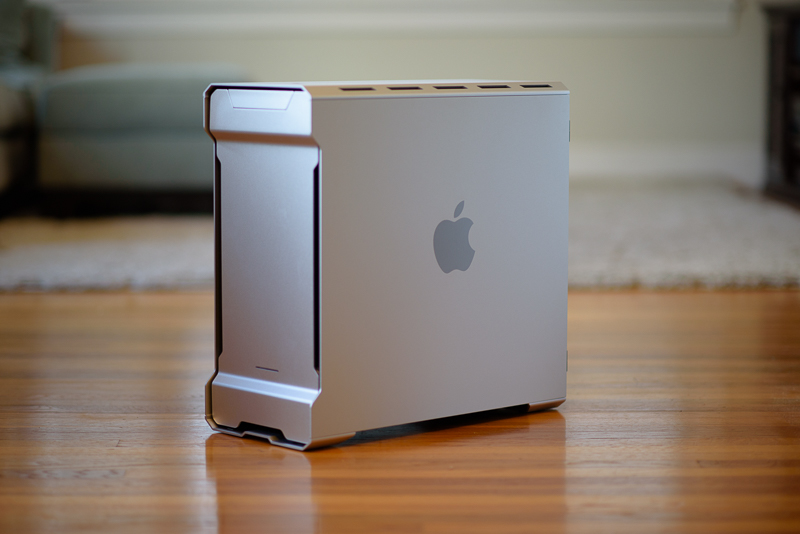
I’m very big on visuals, and frankly, I feel that the Apple Mac Pro (5,1) is the best tower computer case Apple has ever built. Maybe the best tower computer case anyone has ever built, so I took quite a bit of time before deciding on the case to use.
For my build, multiple internal hard drives within the tower are a must, and, thus, I needed a full tower machine that had the specs to meet or exceed the hard drive capacity of the Apple Mac Pro (5,1). After much wavering, I selected the Phanteks Enthoo Evolv case in “Galaxy Silver” and I’m glad I did. It’s a phenomenal case and meets my needs perfectly. This case comes in three colors, Galaxy Silver, Black, and Anthracite Grey (a dark gray). Since I was going for a case that rivaled my Mac Pro, I went with the “Galaxy Silver”. And although it’s listed as a “Mid Tower” case, this is basically a full-size tower that matches the Mac Pro perfectly. Here are some shots to show a side-by-side comparison between my Apple Mac Pro and the Phanteks Enthoo Evolv case:


As you can see, it’s a beautiful compliment to the Mac Pro case. The build quality of this Phanteks Enthoo Evolv case is excellent, and although one side panel is plexi-glass to show the interior components, (I would rather have a case without a side window) I am still extremely impressed with how excellent of a size and design match this is.
Step One: The Hardware Build
Assemble all of the interior components into the case.
NOTE 1: One big item to keep in mind is that, if you also want a large amount of internal SATA storage devices, you need to install the 500GB NVMe - M.2 boot drive into the middle slot on the motherboard. There are three slots on the motherboard for NVMe - M.2 drives. Let's call them the top (closest to the processor), middle, and bottom. This ideal middle slot is labelled as slot M2A_32G. The motherboard comes with a pre-installed heat sink in located in the top (closest to the processor) M2M_32G slot, and you can use this, but this slot shares lanes with the SATA connectors. The middle M2A_32G does not share any SATA lanes, and allows for all SATA devices to be used. So I removed the heat sink from that top slot, and applied it to the middle M2A_32G slot so I had access to all SATA drives. (See Page 33 of the Z370 Aorus Gaming 7 Manual for more information.)
NOTE 2: If you’re going to install a Firewire card like I did, note that this will cancel out one of the six available internal SATA3 ports since they too share the same channel. There are six available internal SATA3 connections ready to go off the board. For example, I installed my PCI Firewire card in slot PCIEX1_3, and this resulted in the SATA3 1 connector being unavailable. Note the orientation of these plugs in case you have many internal drives and you wonder why they won’t mount. (See the bottom of page 10 in the motherboard manual for more info.)
NOTE 3: This be quiet! BK019 Dark Rock Pro 3 processor cooler is working great, but the installation instructions make it impossible to install if you follow them. I have no idea who wrote the instructions, but they are wrong and horrible. Thankfully, there is a simple and quick You Tube video that makes installing this cooling fan a breeze (no pun intended). Due to the amount of pics and videos I have this build thread, I've hit the video/link limit to embed it directly, but please see the instructional video in my subsequent post following this build thread, otherwise you can search for the you tube title "How To Install A Be Quiet! Dark Rock Pro 3 Cooler" which is video id = pcdM8lGG-H8
Inside the Case / Additional Assembly Thoughts:It might help others to actually see inside the case, and get some feedback on the actual hardware build. Here are two shots from inside the case on each side:
Left Side:

This is the side of the case with the plexiglass window. My cable management skills are not the greatest, but thankfully it looks fairly clean on this side since it has a see-thru window. I've highlighted some areas above with notes:
Red: The case comes with three 3.5" spinning hard drive sleds. You can order more sleds if need be, as this area in red (and above) can accommodate up to five 3.5" spinning hard drives. As you can see in my setup, I have two 3.5" drives connected in this area.
Yellow: This area can accommodate one SSD with the included "pop-and-lock" adapters. It's made to be a showcase SSD in case you want to show off your SSD through the plexiglass, but for me, this was not needed.
Green: This is where I attached my PCI Firewire card.
Purple: Ok, this is where I think the motherboard has a bit of a design flaw as noted above, but it's not bad. This purple area under the video card is the middle slot #2 for my 500GB NVMe - M.2 boot drive. This NVMe - M.2 slot is called M2A_32G. As noted above, I needed to place this M.2 boot drive here in this middle slot in order to have more SATA drives, but that means this area is directly underneath the video card. Not idea for heat purposes, and the top NVMe - M.2 would have been ideal. But if you move the heat sink along with the NVMe - M.2 boot drive, then I'm guessing it's fine. So far so good.
Blue: Since my processor cooler is pretty massive and kind of a pain to install, this cooling fan unfortunately covers up the RAM slots, and the RAM slots are under the cooling fan in blue. It's fine that they have enough clearance, but that means if I want to add/change the amount of RAM for this machine, I'll have to first remove the cooling fan, and then reinstall this cooling fan again, which is kind of a pain. Argh. Not a major issue, but worth noting. Fingers crossed that 32GB of RAM will be enough for the life of this machine.
Right Side:
This is the side with the solid metal sidewall, and it's a good thing because my cable management skills are extremely poor. Thankfully, this is never seen since it's a solid metal panel. But here is a layout of this side of the case and the components installed:

Red: The case comes with two 3.5" spinning hard drive sleds for this area. They are incredibly easy to mount and you basically just pop them into the plastic clips, and then clip them into the case. Fast and easy. You can see I have two 3.5" spinning hard drives in this area. (This area has two drives max)
Yellow: This area can accommodate two SSD's in this area with the included "pop-and-lock" adapters. I have only one installed, but you can see that they just clip in nicely and then you can easily feed power to the drives and SATA cables to board through a variety of spots. This case is extremely well thought out.
Light Blue: Case comes with multiple fans included, along with a fan hub that is preinstalled in the case. It works great and it's already setup for you once you plug the fan cable into the motherboard. You can also attach additional fans off this fan hub here.
Orange: This is the back of the processing cooling fan. This fan is big, pretty heavy, but it works fine. I just wanted to show the back of this area since the included instructions for this cooling fan are not great. Once again, please see the You Tube video in my subsequent post for a video tip on installing this fan as it's the most difficult item in an otherwise very easy build.
As you can see above, this case has lots of room and options for installing drives, etc. It also comes with a toolbox of screws that are clearly labeled for each purpose. I couldn't be happier with this case and the options it allows for with the build.
RAM Slots:
Just in case anyone is a complete dummy like cough me cough if you're only installing two sticks on RAM, be sure to install them in the following two RAM slots (Far Right slot) aka DDR4_1 then a blank slot and then install in DDR4_2:

I mean, only a complete moron would read the manual above and install them in the first two slots on the left for Channel A, then wonder why I, er, I mean "someone" would only get ~25,000 geekbench scores for over a month when others were getting ~30,000.
Special thanks to @jb007 @SebErr and @jimmakos01 for highlighting that something must be wrong with me. They were right.Step Two: BIOS Settings
Save & Exit >Load Optimized Defaults
M.I.T. >Advanced Memory Settings Extreme Memory Profile (X.M.P.) : Profile1
BIOS > FastBoot: Disabled
BIOS > LAN PXE Boot Option ROM: Disabled
BIOS > Storage Boot Option Control: UEFI
Peripherals > TrustedComputing > Security Device Support:Disable
Peripherals > Network Stack Configuration > Network Stack:Disabled
Peripherals > USB Configuration > Legacy USB Support: Auto
Peripherals > USB Configuration > XHCI Hand-off: Enabled
Chipset > Vt-d: Disabled
Chipset > Wake on LAN Enable: Disabled
Chipset > IOAPIC 24-119 Entries: Enabled
Peripherals > Initial Display Output: PCIe 1 Slot
Chipset > Integrated Graphics: Disabled
Step Three: Creating your High Sierra USB Installer
On my working Apple Mac Pro, I followed the exact High Sierra guide here step-by-step to create my USB installer.
MultiBeast
Quick Start > UEFI Boot Mode
Audio: Leave All Unchecked.Skip installing any audio kexts for now (more on that later)
Disk: Leave All Unchecked.
Misc: Leave the FakeSMC (greyed out) option as the only install
Network: I selected IntelMausiEthernet.kext
USB: I selected 7/8/9 USB Support
Bootloaders >Clover UEFI Boot Mode
Customize: System Definition > iMac14,2
Build Away. Step Four: Install MacOS
I went with APFS. I did notice that when installing with APFS, there is a brief cosmetic issue with verbose text on the screen that flashes for about 1-2 seconds before the bootloader installs. It’s only a cosmetic issue, and you can leave it if you don't mind, but to me it is ugly. If you go with APFS and see this verbose text at startup and want to remove it (like me), here’s how:
Find your apfs.efi:
- Boot macOS High Sierra
- Mount your EFI partition with Clover Configurator
- In the Finder menu select Go > Go to Folder…
- Paste or type /usr/standalone/i386/
- Copy apfs.efi over to /Volumes/EFI/EFI/CLOVER/drivers64UEFI/ after mounting your EFI partition
- Open Utilities > Terminal and type paste or type the following:
Code:
sudo perl -i -pe 's|\x00\x74\x07\xb8\xff\xff|\x00\x90\x90\xb8\xff\xff|sg' /Volumes/EFI/EFI/CLOVER/drivers64UEFI/apfs.efiOn your next reboot, that verbose text will be gone and your Mac should reboot cleanly into Clover boot loader.
Step Five: Fix Shutdown (LEDs are always off)
At this point you may experience the machine will shutdown when you select Shutdown in macOS, but then 1-2 seconds later it will startup again. This fix is easy.
- Launch Clover Configurator and select your config.plist file.
- Enable ACPI > Fix Shutdown
I personally don’t want any LEDs at all, so to fix this, reboot into your BIOS by tapping the “Delete” key at startup and selecting: Peripherals > RGB Fusion > OFF. This will turn off all LEDs inside the case while the machine is off or running. Otherwise if you like LEDs, just leave them on and they will remain on after shutdown.
Step Five: Fix Shutdown (Optional with LEDs that are on but power down when shutdown)
This tip is thanks to users @BoomR and @yellocab who discovered it!
- Launch Clover Configurator and select your config.plist file.
- ACPI > Uncheck FixShutdown
- Boot > Change the pulldown menu from "darkwake" to darkwake=8
Peripherals > LEDs in sleep, Hibernation, and Soft Off States: OFF
Power > ErP: Enabled
Step Six: USB
My system works perfectly with the USB ports. (Once again, I don’t have any 3.1 devices so can’t test but likely fine) but I've seen quite a few messages online of people having sleep/wake issues with different builds, or USB 3.0 ports not mounting devices at all with some builds, but I can happily say that his build doesn't have any of those issues and devices not only sleep/wake perfectly, 3.0 devices work at 3.0 speeds, etc. In other words, it all just works perfectly.
These are the three kext patches I have setup in in config file:
Kext Placement
1. OpenClover Configurator
2. Select Mount EFI under TOOLS
3. Click Mount Partition for your boot drive
4. Click Open Partition to open your EFI folder.
5. Open your config.plist from your EFI folder using Clover Configurator
7. Click Kernel and Ket Patches
8. Under the KextstoPatch tab, make sure you have the following three patches (you can copy/paste below):

Patch #1
- Name*: AppleAHCIPort
- Find*: 45787465 726E616C
- Replace*: 496E7465 726E616C
- Comment*: External Icons Patch
Patch #2
- Name*: com.apple.driver.usb.AppleUSBXHCI
- Find* [HEX]: 837d940f 0f839704 0000
- Replace* [HEX]: 837d940f 90909090 9090
- Comment: Remove USB port limit in XHCI kext
Patch #3
- Name*: com.apple.driver.usb.AppleUSBXHCIPCI
- Find* [HEX]: 837D8C10
- Replace* [HEX]: 837D8C1B
- Comment: Change 15 port limit to 26 in 10.13 XHCI kext
USBInjectAll.
This kext is required to get USB devices running smoothly.
1. Download and install the latest version of USBInjectAll.kext.
2. You will want to copy this text into the Hard Drive > Library > Extensions. The best way to do this is to place the USBInjectAll.kext on your desktop and then run the kextbeast 2.x.app to install USBInjectAll.kext to Hard Drive > Library > Extensions
(It's not recommended to simply drag and drop a kext into Hard Drive > Library > Extensions)
Note the location for this kext is NOT System > Library > Extensions, and not in the EFI folder. This kext will ultimately be placed into the Library > Extensions folder of the boot drive. For example, my location for this kext looks like this:

The location of the USBInjectAll.kext file above is highlighted in blue.
For reference, here are the total number of kexts I have with this build:

As you can see above in blue, I have AppleALC.kext and Lilu.kext twice, one set in both the 10.13 folder and another set in the "Other" folder. I'm sure this is wrong and only needed once, and I copied them to both folders incorrectly at the start, but everything is working fine and as the old saying goes, if it ain't broke, don't fix it. I see no adverse effects from this, so I just left it. But I included this because you can see there are very few kexts needed for this build since many of the items from my build are natively supported in macOS High Sierra.
Step Seven: Fix Audio
The GIGABYTE Z370 AORUS Gaming 7 uses the ALC1220 audio chipset. It needs to kexts to work properly. Namely two files called AppleALC.kext and Lilu.kext.
Audio Fix Step 1. Download these two kexts
Download AppleALC.kext
Download Lilu.kext
Kext Placement
1. OpenClover Configurator
2. Select Mount EFI under TOOLS
3. Click Mount Partition for your boot drive
4. Click Open Partition to open your EFI folder.
5. Copy the files called AppleALC.kext and Lilu.kext found within each respective RELEASE folder into the location EFI/Clover/kexts/Other of your EFI partition.
6. Open config.plist using Clover Configurator
7. Click Apci
8. Add HDAS to HDEF patch DSDT -> Patches box. Click the add “+”button and enter:
Comment: Rename HDAS to HDEF
Find* [HEX]: 48444153
Replace [HEX]: 48444546
9. Next click Devices on the left column
10. Check ResetHDA checkbox
11. Now we will Inject the audio ID number based on the ALC1220 audio chipset from this motherboard. The list of supported codecs is here, but for this motherboard audio chipset the magic number is 11. Enter the number 11 in the audio field and hit enter. It will look like this:
12. Reboot your machine
Step Eight: Setting/Selecting Audio Output
Your Mac will now accept line in audio in both the back and the front headphone jack ports.
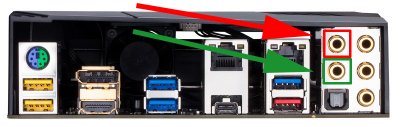
Line Out Audio (Back Ports):
For stereo audio line out, use the red input jack highlighted above.
For headphone audio line out via the back port, use the green input jack highlighted above.
macOS > System Preferences > Sound:
You will see two “Line Out” listings above. The corresponding audio Line Out for for the port you have selected above.

I personally like having my headphones plugged into the back of my case, to keep the front cover closed and clean. So I simply toggle between to the top and bottom "Line Out" audio inputs in the very top of the Finder's menu bar, when selecting speakers or headphones.
Line Out Audio (Front Headphone Jack):
The Phanteks Enthoo Evolv case has a headphone jack on the front (along with two USB 3.0 ports) under the flip down cover. Flip up the cover to reveal the headphone jack here:

Use the headphone jack selected above.

macOS > System Preferences > Sound:
For the headphone jack, you will select the option for “Internal Speakers”. Cosmetically, it would be nice if this said “headphones” and I saw a fix for this online that was fairly complex, and rather than doing that, I just live with it. It’s fine.
NOTE: Unlike the actual Apple Mac Pro (5,1), the Internal Speaker (headphone jack) will not be automatically selected when you insert your headphones. You will need to select this, and the easiest way is to simply toggle the sound output in the menu bar under the Sound settings.
Audio Connections only for a dual-boot macOS & Windows Machine using the 3.5mm audio line out:
(If you don't plan on installing windows, then you can skip this section)
After creating this hackintosh, I also added an SSD with a fresh install of Windows 10. This is an ideal setup for me and I simply select the Windows 10 boot drive at the Clover Bootloader screen at startup when needed.
However, there's an audio related issue if you have 2.1 speakers connected to your machine via the audio line out on the back. In the diagram below, I have shown previously that the ideal line out ports for macOS are the two back ports labeled in red and green. However, for the 3.5 audio cable line out, Windows requires use of the exact audio port labelled in blue:
As you can see above, if your audio is connected correctly via the MacOS ports, then when you reboot your machine into Windows, you will not have audio unless you manually disconnect the speaker connection from the red port to the blue port, and then back again when you reboot back into macOS. That's not going to be fun. So here's a really cheap and excellent fix:
Monoprice 6inch 3.5mm Stereo Jack/Two 3.5mm Stereo Plug Cable (Amazon) - $3.31
As of this writing, this cheap fix is less than $4, and an Amazon Add-on only. It's also worth nothing that this splitter is somewhat hard to find and most of these "Y" audio splitters are the exact opposite with two female ports, and one male port. This is the one you want. To fix the audio port issue for a Mac and Windows dual-boot machine, just plug the male ports of this splitter into the posts labelled in red and blue above, and then plug your speaker system into this "Y" audio splitter's female port. You're done! Now each time you reboot your machine, your speaker system will be connected, regardless of the operating system. No need to manually disconnect the plug or buy a second set of speakers for Windows!
Step Nine (Optional): Overlclocking the CPU
This is optional, unnecessary, and that’s exactly why I wanted to do it.
I found a video online outlining the steps to take to overclock the CPU. The previous version of my guide included following the exact steps to overlock the CPU. However, I did some testing, and honestly, the simple "dummy" approach of just using the Gigabyte Overclock option is easier and actually yielded better results.Restart into your BIOS and select:
M.I.T > Advanced Memory Options Memory Enhancement Settings > Enhanced Performance
Then choose CPU Upgrade

Here you can select the max CPU overlock in these "dummy" settings, so overclock as you wish. Is it dangerous to select 5.0Ghz? No. Live it a little.
Besides overclocking just your CPU, you can also choose to Overclock your RAM. This too is extremely simple, and yes, there are more advanced options, but I went with the simple approach again.
In the BIOS select:
M.I.T. > Advanced Memory Settings > Memory Enhancement Settings :
Here you are presented with the following options:
Relax OC
Enhanced Stability
Normal
Enhanced performance
All of these options are self-explanatory, but a max performance combo is obviously to set the CPU overclock to 5.0Ghz and the memory overlock to "Enhanced Performance".
There's one more BIOS option that is optional to implement. It's a setting to set your RAM speed to 3200MHz.
(This tip was added by "The RAM Guru" himself, user @jimmakos01 Thank you @jimmakos01!)

OPTIONAL:
(I actually experienced a delayed 45 wake from sleep with this option enabled, so I no longer use it, but YMMV and it's a easy change back if you experience any delay when waking from sleep)
In the BIOS under M.I.T. > Advanced Frequency Settings > System Memory Multiplier
Change Auto to 32.
NOTE: There isn't a pull-down menu here, so just enter "32" on your keyboard here.
This will change your Memory Frequency to 3200Mhz. If you enter this in, and reboot and have any system issues at all, you can always reboot into the BIOS and change this back to Auto or try to enter "30" for 3000MHz speed, and so on.
Test things out and go with what you are comfortable with, knowing that if you check temps and they're high or have a CPU reboot, you can always dial back the overclocking easily via BIOS. YMMV.
OVERCLOCKING BENCHMARKS:
So from my overclocked build, I downloaded the fantastic (and free!) Intel Power Gadget app for Mac here:
https://software.intel.com/en-us/articles/intel-power-gadget-20
OVERCLOCKED CPU At Max Load (while exporting an iMovie I created):
Frequency: 5.00Ghz
Temp: 60°C

OVERCLOCKED CPU At Idle (about 1 min after I exported the iMovie):
Frequency: 1.18Ghz
Temp: 36.9°C

I really don't see these specs as being outside the norm at all, and for my usage, I don't see airflow as an issue at all with this case. But as always, YMMV based on each person's needs and tools they heavily use on the machine.
Step Ten (Optional): Display Menu
One little quirk of this machine is that when I startup the computer from a cold startup (not a wake from sleep) the dual monitor setup defaults to 1920x1080 resolution when booted up into the Finder. A quick and easy workaround is to simply download an app called Display Menu:

This app is totally free, and it allows you to easily just select your desired monitor resolution for each display from the top of the Finder menu. I'm sure there are other free apps that do this as well, but this was the one I selected.
If you register it for two bucks, you have the option to bookmark specific screen resolutions which will appear at the top. I like my displays at 2560x1440, so I did, and bookmarked this resolution for each display. Looks like this at the top to easily pull down the screen resolution for each display:

Step Eleven (Optional): Picked up some cheap silver Apple Logo Decals on eBay
Necessary? No. Awesome? Yes.


Here is the direct link to the 4" Apple logo decals I purchased on eBay.
They were $3.20 for two decals (perfect but now they are $3.60) and free shipping at the time I'm posting this. Can't beat that. And just in case the eBay link dies or changes, the seller is jameyturner. (I am not affiliated with this seller in any way, these were just the cheapest for two, and they arrived exactly as I wanted them.)
There are various sizes and colors for these decals. You will want the 4" silver. There is a gray option as well, and just in case, I bought these too since they were so cheap, but the gray is darker. If you want to match the same Apple logo look of the 5,1 Mac Pro, the silver color is the ideal option.
Step Twelve (Optional): Clean Up the "About The Mac" menu
Again, not necessary at all, but I like these little touches that make a hackintosh even more Mac-like.
After this build you will notice that under the "About This Mac" menu, the machine will be incorrectly be labelled as an "iMac (27-inch, Late 2013)". Also, if you overclocked the CPU, the info listed for the processor will also be incorrect and the Processor will be listed as "3.7 Ghz Unknown." These both look a bit ugly to me, so let's update these with an easy fix.
Fix the Computer Name in "About The Mac":
1. In the Finder, hold down the option key and select the "Go" menu at the top and then navigate to:
Library > Preferences
Alternatively, in High Sierra you can select [command-shift-.] to show all hidden files, and then navigate to:
/Users/YOUR_USERNAME/Library/Preferences/
2. Locate the file com.apple.SystemProfiler.plist and copy it to your desktop.
3. Open com.apple.SystemProfiler.plist in a text editor (I use BBedit)
4. You will see text that looks like the following:
Code:
<key>F8JC-en-AF_AF</key>[/INDENT][/INDENT][/INDENT]
[INDENT][INDENT][INDENT]        <string>iMac (27-inch, Late 2013)</string>[/INDENT][/INDENT][/INDENT]
[INDENT][INDENT][INDENT]        <key>FLHH-en-AF_AF</key>[/INDENT][/INDENT][/INDENT]
[INDENT][INDENT][INDENT]        <string>iMac (27-inch, Late 2013)</string>[/INDENT][/INDENT][/INDENT]
[INDENT][INDENT][INDENT]        <key>FLHH-en-US_US</key>[/INDENT][/INDENT][/INDENT]
[INDENT][INDENT][INDENT]        <string>iMac (27-inch, Late 2013)</string>
5. Simply replace all instances of "iMac (27-inch, Late 2013)" with your desired text here, I used "Hackintosh (Mac Pro, Early 2018)" and save the file. But you can enter anything you wish here.
6. Copy the com.apple.SystemProfiler.plist file from your desktop back into the /Users/YOUR_USERNAME/Library/Preferences/ directory to replace the original.
7. Reboot your computer to see this change.
Fix the Processor Info in "About The Mac":If you overclocked the CPU, then you will have incomplete/inaccurate CPU info listed here and it will show "Unknown" as the processor type. To fix this, do the following:
1. Navigate to Hard Drive > System > Library > PrivateFrameworks > AppleSystemInfo.framework > Versions > A > Resources > English.lproj
NOTE: This is not the hidden Library directory, but rather starting from the System folder on the root directory of your hard drive. Also, I selected "English.lproj" since this is the language for my US-based machine. If you're using an alternate target language, please select your language here.
2. Inside English.lproj locate the file AppleSystemInfo.strings and copy it to your desktop.
3. Open AppleSystemInfo.strings in a in a text editor (I use BBedit)
4. You will see the following code:
Code:
<key>UnknownCPUKind</key>[/INDENT][/INDENT][/INDENT]
[INDENT][INDENT][INDENT]    <string>Unknown</string>
5. Under UnknownCPUKind, in the <string> line with the string tags only, replace Unknown with your desired text. I replaced Unknown with Intel Core i7-8700K @ 5.0 Ghz (Overclocked). Then I saved the file. (But you can enter anything you wish here.)
6. Copy AppleSystemInfo.strings from your desktop back into the English.lproj folder.
7. Reboot your computer to see this change.
When you have applied both of these edits, you will see the following:Step Thirteen (Optional...but not really. Do This, Seriously): Create a bootable backup.
Now that you're done, you're probably happy and just want to enjoy your new Mac, and that's great! But if you're new to building a Hackintosh, remember that this isn't exactly a standard Mac. You'll want to create a bootable backup before applying any system updates to this machine.
Let me repeat: You'll want to create a bootable backup before applying any system updates to this machine.
There is an excellent video on how to exactly make a bootable backup for your Hackintosh. Since I've already maxed out on the number of videos I can embed in this write up, please search you tube for the video called "Easiest Way to Create Bootable Hackintosh Backups!" with the YT video id: v=l_XuXdJ53iY
The way I personally do this is to do the following:
1. Use a backup tool like SuperDuper or Carbon Copy Cloner to mirror your boot drive to a backup SSD or Hard Drive.
(I personally use SuperDuper, but either tool works great.).
NOTE: On a standard Mac, you would be done creating a backup, but for a Hackintosh, you need to also backup the EFI folder from your boot drive, and manually copy this EFI folder to your backup EFI partition.
2. After mirroring your boot drive to a backup drive, launch Clover Configurator and mount your boot drive's partition. (Find this in the Mount EFI sidebar with Clover Configurator, and then select the EFI for your book disk)
3. Making sure this is the EFI folder for your boot drive, select Open Partition, and you should see an EFI folder in the finder. (Just to confirm, this will have a folder inside your EFI folder called CLOVER along with other folders and subfolder. If you do not see a CLOVER folder inside your EFI folder, then you have not properly selected your boot drive.
4. Once you have your boot drive's EFI folder open on the desktop, you'll want to repeat the process in Clover Configurator and mount your backup drive's partition and EFI folder. Open this in your Finder as well and set it aside.
5. You now simply want to drag the EFI folder from your boot drive to the EFI folder on your backup drive.
(You will replace the backup drive's EFI folder and entire contents.)
6. After you have mirrored your boot drive, you now how a bootable backup. This is crucial if something goes wrong, and you need to recover your system.
7. You can test this by starting and selecting your bootable backup drive from the startup boot loader screen.
8. Before attempting any macOS updates of any kind, it's wise to check the forums to ensure the update will not be problematic. And just to test this, on a mission critical machine, I would personally recommend booting into the backup OS first, and then applying any update. If the update bricks the machine, your original machine's OS and EFI folder will not be affected and you can use the bootable backup as a test. In fact, it's not a bad idea to have two bootable backups, where one backup is a "guinea pig" drive to test any OS updates to ensure something doesn't break. Then if it works, you can proceed with a real update on your boot drive, and still have your backup untouched and intact.
9. If these instructions are confusing in anyway, I would highly recommend watching the short 5 minute you tube video called "Easiest Way to Create Bootable Hackintosh Backups!" with the YT video id: v=l_XuXdJ53iY
Benchmarks
I thought it would be nice to compare benchmarks from my stock 2010 “Cheese Grater” Mac Pro, with this new machine I’m calling my "2018 Mac Pro Hackintosh". Here are some benchmarks for comparison:
(OLD) 2010 “Cheese Grater” Apple Mac Pro "Six Core" 3.33 (2010/Westmere):

(New) My 2018 “Mac Pro” Hackintosh:

(OLD) 2010 “Cheese Grater” Apple Mac Pro "Six Core" 3.33 (2010/Westmere):

(New) My 2018 “Mac Pro” Hackintosh:


Final Thoughts
I love this machine. Seriously. I’ve been waiting years to have Apple create the type of Mac Pro I wanted, and was tired of waiting. This machine has everything I need and nothing I don’t. I can’t rave about the Phanteks Enthoo Evolv case enough. I want to thank this community and @trs96 for his help and assistance with his HP 8300 guide as that led me to have the confidence to build this machine. I was honestly expecting this to take weeks to build and troubleshoot, but I was actually done from start to finish within 3-4 hours time, going slow and taking my time with every step. I was expecting some serious hardware or software issues, but there were none. With macOS High Sierra natively supporting the RX580, Firewire card, and Bluetooth dongle right out of the box, this install was a smooth. Thanks to this community for the info, and hopefully this guide can help someone else in the future.
Update 09-14-22
Updated the guide for updating this exact build to macOS Monterey 12.6. It's currently showing this guide as Post #2061.
Update 02-22-21
Updated the guide for updating this exact build to macOS Mojave 10.14.6. It's currently listing as Post #1985 here, but maybe a mod can move this up.
Update 07-30-18
Added an additional optional step five for those who want to fix the shutdown issue and have LEDs that are powered on and turn off when shutdown. Special thanks to users @BoomR and @yellocab for making this tip available.
Update 07-12-18
Added an additional simple RAM overclocking step. Tip given by "The RAM Guru" himself, user @jimmakos01 ! Thank you @jimmakos01!! Thus, revised my Geekbench number screen shot as per this new overclock setting.
Update 07-12-18
Updated the info in the guide about the overclock option. It's easier to overlock using the "easy" Gigabyte method in the BIOS which is one click. Also updated the guide with my updated Geekbench scores, and an added note at the start on the exact slots to install RAM for this motherboard. (See above for the reason I made a bonehead rookie mistake on this one.)
Update 07-07-18
Updated the note at the top of the build to include a screen shot of the About This Mac, along with a note that this build guide requires macOS High Sierra 10.13.4 or later. (10.13.1 is not recommended for example.)
Update 07-07-18
Updated this build from macOS 10.13.4 to 10.13.5 and it went perfectly without any hitches at all. Perfect! No issues at all and it was a smooth update.
Since it does update the apfs.efi file it does re-introduce the cosmetic issue of seeing verbose text at startup. So I just re-did the verbose text correction from Step 3 in my guide here to remove verbose text at startup.

Update 06-15-18
Added CPU temp benchmarks and the Intel Power Gadget download link in the Overclocking section.
Update 06-03-18
Added info on purchasing a cheap audio "Y" splitter for connecting a 2.1 speaker system to this hackintosh where speakers are shared via macOS or Windows.
Update 06-02-18
Added info on creating a bootable backup which should basically be a required step.
Update 05-29-18
Added info to cosmetically change the "About The Mac" info to better reflect the machine look and specs.
Update 05-28-18
USB: I updated the USB section of my build. I forgot to include the step-by-step for getting USB ports to work with this build, so they are now included, along with screen shots of the steps needed to get all USB ports working for this build.
Displays: I added info here for a free tool I use to select monitor resolution from the Finder's menu bar since this build defaults to 1920x1080 at startup each time. Easy fix from the menu bar.
Interior of Case Photos: Added some photos of the inside of the case post-install to give people a visual of what it looks like inside after the build.
Attachments


Last edited: