Contribute
Register

[Success] GIGABYTE Z370 Gaming 7 + Intel Core i7-8700K + RX 580 + (2x) Dell P2715Q 4k @ 60Hz

Heya just followed your build basically to a T.
I was wondering do you also have the issue that only the Intel Ethernet Port (the lower one) works and the Killer Ethernet Port doesnt?
That's weird, both ethernet ports work perfectly fine for me.
I only have the need for one ethernet port, and I'm using the lower one.

But I'm sitting at my computer right now, just plugged it into the top ethernet port and it took about 5 secs before it was working fine as well. No difference really, but I have things connected via the lower port.

Hi both

Just occurred to me that the Killer chipset Ethernet is made by Atheros and needs an extra kext installing alongside any Intel one (IntelMausi etc). May be why @mandobuute is only getting one port working? Could be wrong. Just a thought ...

:)
 
Hi both

Just occurred to me that the Killer chipset Ethernet is made by Atheros and needs an extra kext installing alongside any Intel one (IntelMausi etc). May be why @mandobuute is only getting one port working? Could be wrong. Just a thought ...

:)
That's really interesting though. As noted in the build, for reference, here are the total number of kexts I have with this build:

288085-26ed42a165b406a7b2ae7e632dbac535.jpg


I didn't install any additional Ethernet kexts for this build, and both ethernet ports work as options. Hmmm...weird.
 
Also, just to assist anyone who may be worried about overclocking and/or airflow of this case I thought this post might be helpful and I could add this to the guide itself in the Overclocking section..

I know the Internet can be an argumentative place at times, but I think the airflow concerns of this exact Phanteks Enthoo Evolv case are completely overblown. (No pun intended) :). It won't be an issue for most, but again, YMMV and I'll have to wait and see after quite some time to see if my system explodes or burns through the center of the Earth, etc.

Just to note: When I was researching my build, I also considered the Corsair Obsidian 750D Full-Tower Case. It included a standard 750D edition which had a solid front panel with no large front vent, and the same case as an "Airflow Edition" with a mesh front for seemingly much better airflow. Makes total sense that logically a case with a mesh front would allow more air in, and thus cool things down easier, right? Well, not exactly. The guy from this video took temperature readings of both the airflow and non-airflow editions of this case, and the results, were, let's just say, not what you might think. The solid panel showed absolutely no significant increase in CPU temps, and oddly, the temp went down under high CPU load.

So from my overclocked build, I downloaded the fantastic (and free!) Intel Power Gadget app for Mac here:

https://software.intel.com/en-us/articles/intel-power-gadget-20

OVERCLOCKED CPU At Max Load (while exporting an iMovie I created):

Frequency: 5.00Ghz
Temp: 60°C


before.png


OVERCLOCKED CPU At Idle (about 1 min after I exported the iMovie):

Frequency: 1.18Ghz
Temp: 36.9°C
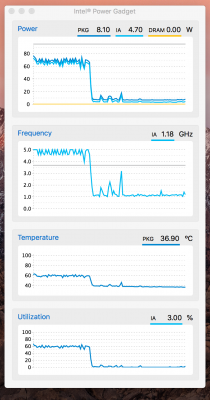


after.png

I really don't see these specs as being outside the norm at all, and for my usage, I don't see airflow as an issue at all with this case. But as always, YMMV based on each person's needs and tools they heavily use on the machine.

Hope these benchmarks might assist others considering overclocking or this build, considering this case, etc.
 
Also, just to assist anyone who may be worried about overclocking and/or airflow of this case I thought this post might be helpful and I could add this to the guide itself in the Overclocking section..

I know the Internet can be an argumentative place at times, but I think the airflow concerns of this exact Phanteks Enthoo Evolv case are completely overblown. (No pun intended) :). It won't be an issue for most, but again, YMMV and I'll have to wait and see after quite some time to see if my system explodes or burns through the center of the Earth, etc.

OVERCLOCKED CPU At Max Load (while exporting an iMovie I created):

Frequency: 5.00Ghz
Temp: 60°C


View attachment 336228


OVERCLOCKED CPU At Idle (about 1 min after I exported the iMovie):

Frequency: 1.18Ghz
Temp: 36.9°C


View attachment 336227

I really don't see these specs as being outside the norm at all, and for my usage, I don't see airflow as an issue at all with this case. But as always, YMMV based on each person's needs and tools they heavily use on the machine.

Hope these benchmarks might assist others considering overclocking or this build, considering this case, etc.

If you've ever used an iMac with a core i7 CPU like the 7700K you will often see the CPU temps hitting 90 degrees C or more. Then the CPU throttles because of the dangerously high temps. That happens even without an overclock. This issue is why Apple had to completely redesign the cooling system for the iMac Pro. It's in the same enclosure as regular iMacs just with much better cooling. So it's easy to conclude that the cooling in this Phanteks case is much better than a conventional iMac. Hitting 60-70C temps on a desktop PC while rendering is not a problem at all. It's not going to harm an i7 or any other Intel CPU.

One thing that anyone that owns the Enthoo Evolv can do if temps get too high is to remove the front AL panel during hours long video renders or other stressful activities. It won't make a huge difference in temps but every bit helps. It also makes a large difference which CPU cooler you have installed on your 8700K. HackaShaq has made a very good choice in this build so that certainly helps keep temps lower. An NH-D15 from Phanteks will also do an equal or even better job than the Dark Rock Pro.
 
Last edited:
I got it up. It works great, except every once in a while when I restart I get the dreaded stop screen. If I cold boot, it boots fine.

Any ideas, see Multibeast below.

Q58Fh5t.png
 
Last edited:
One thing that anyone that owns the Enthoo Evolv can do if temps get too high is to remove the front AL panel during hours long video renders or other stressful activities. It won't make a huge difference in temps but every bit helps. It also makes a large difference which CPU cooler you have installed on your 8700K. HackaShaq has made a very good choice in this build so that certainly helps keep temps lower. An NH-D15 from Phanteks will also do an equal or even better job than the Dark Rock Pro.
Not only that but each side panel of this case "locks" in place and has a hinge in the back allowing for the side panels to be removed completely without any tools in a few seconds. So one could also just remove the side panels too if needed. But I honestly think the lack of airflow is a non-issue with this case personally, but as always YMMV. :)
 
I got it up. It works great, except every once in a while when I restart I get the dreaded stop screen. If I cold boot, it boots fine.

Any ideas, see Multibeast below.

Q58Fh5t.png
For the record, I've never seen the stop sign ever at startup.
I can only attest to things working by following the exact steps I outlined, in the exact order as I wrote them in the guide:

MultiBeast
Quick Start > UEFI Boot Mode
Audio: Leave All Unchecked.Skip installing any audio kexts for now (more on that later)
Disk: Leave All Unchecked.
Misc: Leave the FakeSMC (greyed out) option as the only install
Network: I selected IntelMausiEthernet.kext
USB: I selected 7/8/9 USB Support
Bootloaders >Clover UEFI Boot Mode
Customize: System Definition > iMac14,2

Looks like you're jumping ahead with some USB stuff, etc. but I would just follow the steps as I outlined them first, and then tackle each steps in order from my guide.

When I did the install, using your method completely, everything worked well.

I could not get good USB 3.0 speeds on transfers and sometimes the USB would freeze during a file transfer.
I installed USBInjectAll after my install as outlined, and Port Limit afterwards and USB functions normal.

I do think I solved the problem with a BIOS update with memory compatibility, that seems to be what crops up with every MSI user. I am going to tinker with it, do some stressing before I install software and then I will post pics and steps I had to take for anyone else with a Z370 Tomahawk board.

Thanks for your guide. It made my build go smoother than most! :)
 
Back
Top