
- Joined
- Sep 18, 2014
- Messages
- 25
- Motherboard
- Gigabyte GA-H97M-D3H
- CPU
- Intel i5-4690
- Graphics
- HD4600 (onboard)
- Mac
- Classic Mac
- Mobile Phone
baineteo's Build:Gigabyte GA-H97M-D3H + i5-4690 + Intel HD4600
Components
Gigabyte GA-H97M-D3H (Rev 1.0, BIOS F4)
http://www.newegg.com/Product/Product.aspx?Item=N82E16813128718
Intel i5-4690
http://www.newegg.com/Product/Product.aspx?Item=N82E16819116989
Kingston HyperX Blu 2 x 8GB
http://www.amazon.com/Kingston-Modules-1600MHz-KHX1600C10D3B1K2-16G
Crucial M500 240GB SSD
http://www.amazon.com/Crucial-240GB-2-5-Inch-Internal-CT240M500SSD1
Comments
This build follows closely the guide by daemontus (which is similar to mga1981's build) and Stork's guide. Be sure to read the "official guide" too. I would suggest reading those guides/posts before starting if you're new. This is my first time building a Hackintosh, and I did get a few kernel panics (and myself panicking), but I think it'll still work out in the end.
I wrote this to document my own journey and also to help the other new users out because I realized some of the steps were omitted (took me a while to figure it out). I'll try to be as detailed as possible here.
Installation Notes:
In general, follow the standard guide as much as possible. However, here are the areas to take note:
STEP 0. Create the bootable USB
Follow the official guide to the T, till end of Step 2 (no need to proceed to step 3).
HARDWARE PREPARATION
STEP 1. Unplug EVERYTHING.
Be sure to disconnect everything - leave only 1 stick of RAM and the SSD/HDD you are going to install the OSX on. I kept my windows HDD in there and I got kernel panic when trying to boot from the USB stick.
STEP 2. Plug in the USB Drive that you created in Step 0 (now referred to as "USB Drive").
STEP 3. SETUP BIOS: Power ON your system and press DEL key until you reach BIOS Setup
Configure your BIOS as follows (taken from daemontus):
UEFI: Load Optimized Defaults
Disable VT-d
SATA mode = AHCI
Initial Display Output = IGFX
Set BootModeSelection = Legacy Only
(Screenshots on BIOS F3 by mga1981. Not much difference between F3 and F4.)
Save and Exit
STEP 4. Boot from USB Drive
You can either choose to
1. boot from the USB Drive in the Bios (under "Save & Exit" > "Boot Override" > "PX.....", where "PX...." = your USB thumb drive. If you followed mga1981's screenshots, it should be P0.) OR
2. Save and Exit the BIOS and then press/hold F12 during reboot and select to boot from the USB Drive.
STEP 5. CHIMERA SCREEN
When you boot from your USB drive you'll see the following screen:

STEP 6: BOOT INTO INSTALLER IN SAFE + VERBOSE MODE
In the screen above, press "-v -x" on your keyboard (without the quotation marks) and then Enter to boot into verbose and safe mode. This prevents any kernel panic for me.

Stork suggests the following if you still get a kernel panic:
 Reboot and, at the Chimera screen, press the keyboard's SpaceBar to open the boot flag window at the bottom of the screen; Enter "maxmem=4096" (without the quotes), where 4096 is your memory size div by two; and
STEP 7: INSTALL OSX AS PER THE OFFICIAL GUIDE
Refer to Guide Step 4.5.
STEP 8: POST INSTALLATION SET UP
After rebooting (restarting) your system in Step 7 above, you will still need to boot via USB because your OSX is not ready. Hence, press F12 to boot via USB again. You will see the screen below. Make sure you boot in safe and verbose mode! Type "-v -x" as you did previously.

STEP 9: MULTI BEAST
1. Install MultiBeast:
Once you're in OSX, go to Finder and copy the Multibeast 6.5.0 (correct as of 27 Sep 2014) zip file to the "Applications" folder.
2. Changing System Preferences (taken from Stork's post)
Before running MultiBeast for Mavericks, open the Security & Privacy Preference Pane in System Preferences, which is located in your Dock, and:
In the lower left corner, click on the padlock and type in your Admin username & password;
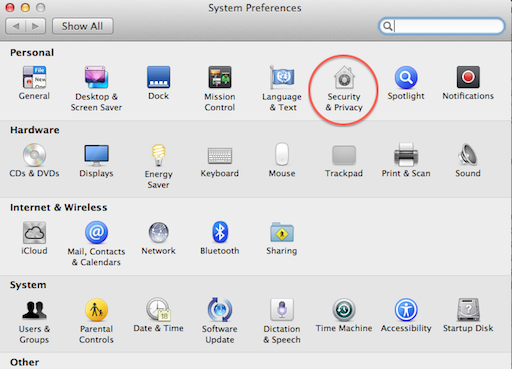
 Click on the General tab if it isn't already highlighted; Click on the "Anywhere" radio button under "Allow applications and downloaded from:" and Close the System Preferences window.
3. Run MultiBeast
Then, navigate to your "Applications" folder and double click on the zip file - this will extract the contents into the Applications folder. Open the "MultiBeast - Mavericks Edition" and double click "MultiBeast".


Image from http://www.tonymacx86.com/374-unibeast-install-os-x-mavericks-any-supported-intel-based-pc.html
4. Install the necessary drivers (partly taken from Stork)
- Quick Start -> DSDT Free
 Drivers -> Audio -> Realtek ALC8xx > ALC892 Drivers -> Audio -> Intel 9 Series Motherboard Support Drivers -> Disk -> Intel Generic AHCI SATA Drivers -> Graphics -> Intel 9 Series HD 4600 Graphics Fix Drivers -> Disk -> Trim Enabler <--- Optional for SSDs (most SSDs will need it) Drivers -> Network -> Realtek -> AppleRTL8169Ethernet 2.0.6 (for H97M D3H) Customize > System Definitions > iMac > iMac14 (",1" for i3/i5 processors and ",2" for i7)
Note: toleda has suggested that we use the following:
iMac14,1 - HD4600 only, or
iMac14,2 - HD4600 and discrete graphics card or discrete graphics only
Note: Optional > Use a processor specific SSDT, independent of SysDef. See toleda's guidefor more information: Mavericks: Native CPU/IGPU Power Management
Build <--- To see your full configuration Click Save if you would like. Click "Install" at the bottom right corner and wait for it to complete.
STEP 10. RE-CONFIGURE YOUR BIOS (taken from Stork)
- Reboot into the BIOS.
- Change BIOS Features > Boot Options Priorities > set this to the P0 setting for the Mavericks drive
- F10 to save the BIOS update and reboot.
And that's it!
Update:
Known issues:
I am using a "windows" Logitech keyboard combo (MK520) and I encountered some problems when the dongle was plugged into the USB2.0 port. The mouse and keyboard would often loose connection and stopped responding. Turning it on/off sometimes help, but it was almost non-usable. Switching to a USB3.0 port rectified the problem.
Here's an update on my USB situation: I have since experienced none of the above problems after switching to the USB3.0 port. It seems like there are some issues with the 2.0 ports?
Edit: It seems like the problem appears when I plug in my ext hdd. Mouse/keyboard working fine -> Plugs in ext HDD -> Mouse doesn't respond -> Unplugs ext hdd -> mouse comes back to life!
Last edited by a moderator:
