
- Joined
- Dec 24, 2012
- Messages
- 7
- Motherboard
- Gigabyte H270N-WIFI
- CPU
- i3-7100
- Graphics
- Intel HD 630
- Mac
- Mobile Phone
Hello! This is my third build after a long break. I checked a number of guides but could not really find one that worked 100% for my specific hardware and level of expertise. What I am attempting here is a simple to follow guide requiring minimum effort and time. I was finally successful with this build by replacing the Intel WiFi/Bluetooth mini PCI card that came with the mother board and obtained native support. In other words, my OSX in the hard disk is practically identical to the one found on any native Mac. Hope this help and happy reading.
Hardware
- GIGABYTE GA-H270N-WIFI LGA1151 Intel H270 Mini ITX DDR4 Motherboard
- Intel Core i3-7100 7th Gen Core Desktop Processor 3M Cache,3.90 GHz
- Samsung 860 EVO 500GB 2.5 Inch SATA III Internal SSD (MZ-76E500B/AM
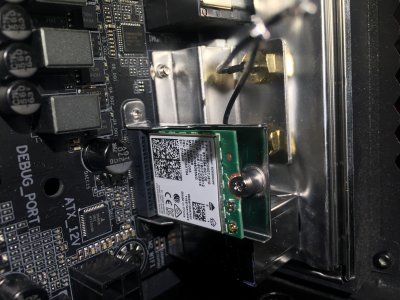
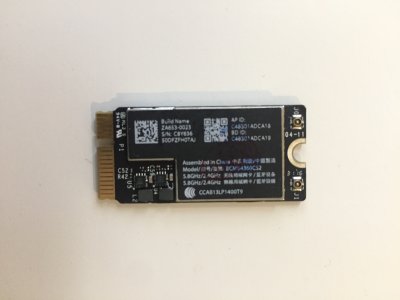
- Airport Bluetooth 4.0 WIFI card (BCM94360CS2)
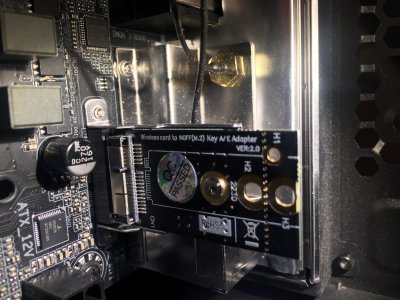
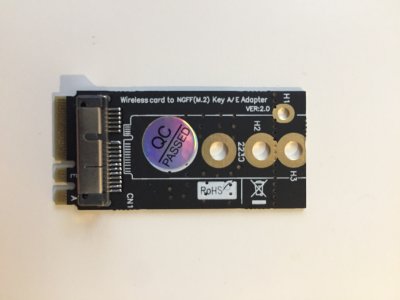
- NGFF(M.2) Key A/E Adapter
- Mac OS Sierra 10.12.06 from the App Store
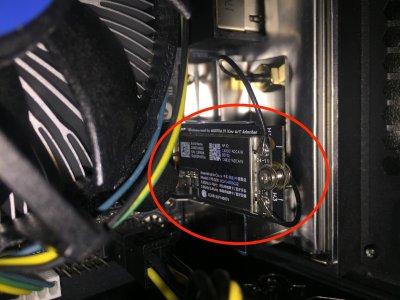
I could not get the Intel WiFi/Bluetooth mini PCI to work, no matter for Kexts I loaded. That is where I gave up and started to look at something natively supported by Sierra. This is when I located the BCM94360CS2 by Broadcom. The card is smaller than the mini PCI slot and requires an adapter (see above). Here are few quick steps to follow to replace the original card with the adapter and the BCM94360CS2.
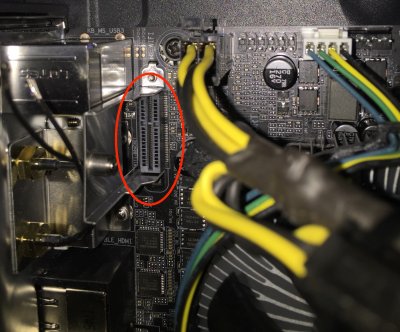
- Locate the original Intel mini PCI card, remove the top plastic cover, unplug the two antenna wires unscrew the mounting screw.
- In doing so you are exposing your mother board mini PCI slot
- Install the adapter to the mini PCI slot and secure the original screw that was holding the Intel mini PCI card in place.
- Install the Broadcom card (BCM94360CS2) into the adapter, secure it with the screw that came with it and plug the motherboard antennas to it.
- Connect the external antenna that came with the motherboard and your done with hardware modification!
- Load Optimized Default
- Under BIOS Tab:
- Windows 8/10 Features = Other OS
- Storage Boot Option Control = UEFI
- Under Peripherals Tab:
- Initial Display Output = IGFX
- In USB Configuration:
- XHCI Handoff = Enabled
- Under Chipset Tab:
- VT-D = Disabled
- Internal Graphics = Enabled
- DVMT Pre-Allocated = 64M
- Save and Exit
- Create a Sierra install USB following this guide
- Boot your computer and press F12
- Select your USB EFI partition from the list.
- This will allow the newly create USB to get you at the Sierra installation screen
- If for any reasons the BIOS won't recognize your EFI partition, simply try a different USB stick to recreate your installer
- This will allow the newly create USB to get you at the Sierra installation screen
- Upon installation completion, the computer will reboot from the USB installer (Clover)
- From the Clover screen select the internal hard drive where you just installed OSX
- Wi-Fi internet and Bluetooth should be working already as the Broadcom card that you installed is a Apple supported product
- This card is originally installed inside most Apple computers
")
- This card is originally installed inside most Apple computers
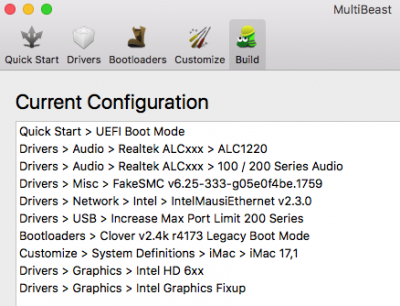
- Download and run MultiBeast - Sierra 9.2.1
- Configure MultiBeast as such:
- Select your main hard drive and click Install
- Remove your USB installation drive and reboot from the hard drive
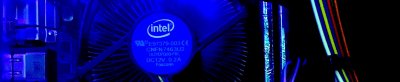
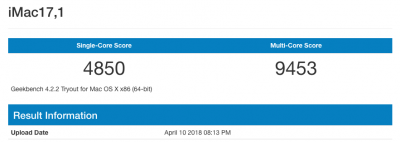
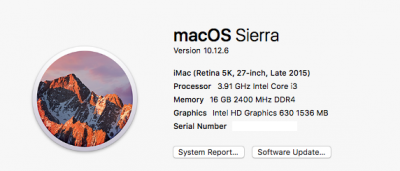
As far as I tested, everything seem to work just fine, the system is very stable, sleep/wake works well too. Here are few screenshot including the Geekbench results. Enjoy it!
Attachments
-
 port.jpeg1.5 MB · Views: 644
 -
 2018-04-10_13-21-13_446.jpeg176.5 KB · Views: 4,075
 -
 2018-04-09_18-09-14_363.jpeg2.1 MB · Views: 4,510
 -
 2018-04-09_18-12-58_423.jpeg2.1 MB · Views: 559
 -
 installed.jpeg2 MB · Views: 4,173
 -
 card.jpeg845.2 KB · Views: 646
 -
 adapter.jpeg888.5 KB · Views: 717
 -
 original.jpeg925 KB · Views: 684
 -
 Screen Shot 2018-04-10 at 4.18.13 PM.png65.7 KB · Views: 3,849
 -
 Screen Shot 2018-04-10 at 1.14.26 PM.png33.2 KB · Views: 3,746
 -
 Screen Shot 2018-04-10 at 4.22.37 PM.png82.2 KB · Views: 3,794
Last edited: