
- Joined
- Dec 25, 2015
- Messages
- 321
- Motherboard
- Gigabyte Z690 UD AX
- CPU
- i5-12400F
- Graphics
- Readon RX 6600
- Mobile Phone
Components
Gigabyte GA-H170-D3H
https://www.newegg.com/Product/Product.aspx?Item=9SIAE7U6184426
Intel i3-6100 3.7GHz Sky Lake Processor
https://www.amazon.com/dp/B015VPX2EO/?tag=tonymacx86com-20
https://www.jdoqocy.com/click-49024....com/Product/Product.aspx?Item=2MN-0004-00002
Corsair Vengeance 2400MHz RAM
https://www.amazon.com/dp/B01ARHBBPS/?tag=tonymacx86com-20
TOSHIBA 500GB Internal Hard Drive
https://www.amazon.com/dp/B00B6A8VFY/?tag=tonymacx86com-20
https://www.newegg.com/Product/Product.aspx?Item=N82E16822149380
Foxin FPS 600 PSU
Foxin ATX Cabinet
Already Owned
LG Monitor
https://www.amazon.com/dp/B00HWHRHH8/?tag=tonymacx86com-20
Comments
The Build
My old macMini with 1.4GHz & 4 GB RAM became terrible for running Xcode & other applications together. It takes 5 mintues to open all needful applications like Xcode 8, Simulator, Chrome/Firefox. Then only I can start start work. Sometimes it hangs too much that I have to restart it. And now watching Xcode 9 beta on WWDC 2017 with multi simulator functionalities I decided to keep the macMini in my garage.
Now my focus of this custom build was cost & performance effective both at the same time. I know I can insert more RAMs at any time.
BIOS Settings
1. To access BIOS/UEFI Setup, press and hold F2 on a USB Keyboard while the system is booting up.
2. Load Optimized Defaults
3. VT-d - Disabled
4. Fast Boot Mode - Disabled
5. OS Type to Other OS
6. IO SerialPort - Disabled
7. XHCI Handoff - Enabled
8. Save and exit.
Unibeast 7.1.1
Used a 8GB flash drive with macOS Sierra 10.12.6 installation file and selected UFEI options to make it bootable.
Then I used F12 to got boot options and booted from flash drive.
Multibeast 9.1.0
After fresh installation I used the following configuration shown below.[/SIZE]
And after restarting...BOOM! Its ready for use except...the Audio.
Then I used this renowned file: https://github.com/toleda/audio_CloverALC/blob/master/audio_cloverALC-120.command.zip to enable audio. But Again another problem raised. No Audio after sleep/wake
Then I found this link: https://www.tonymacx86.com/threads/...ly-other-realteks.170063/page-12#post-1444052
I followed:
Update 1: Upgraded to mojave 10.14.6
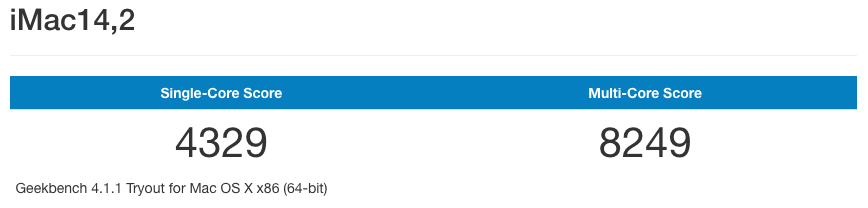
GeekBench
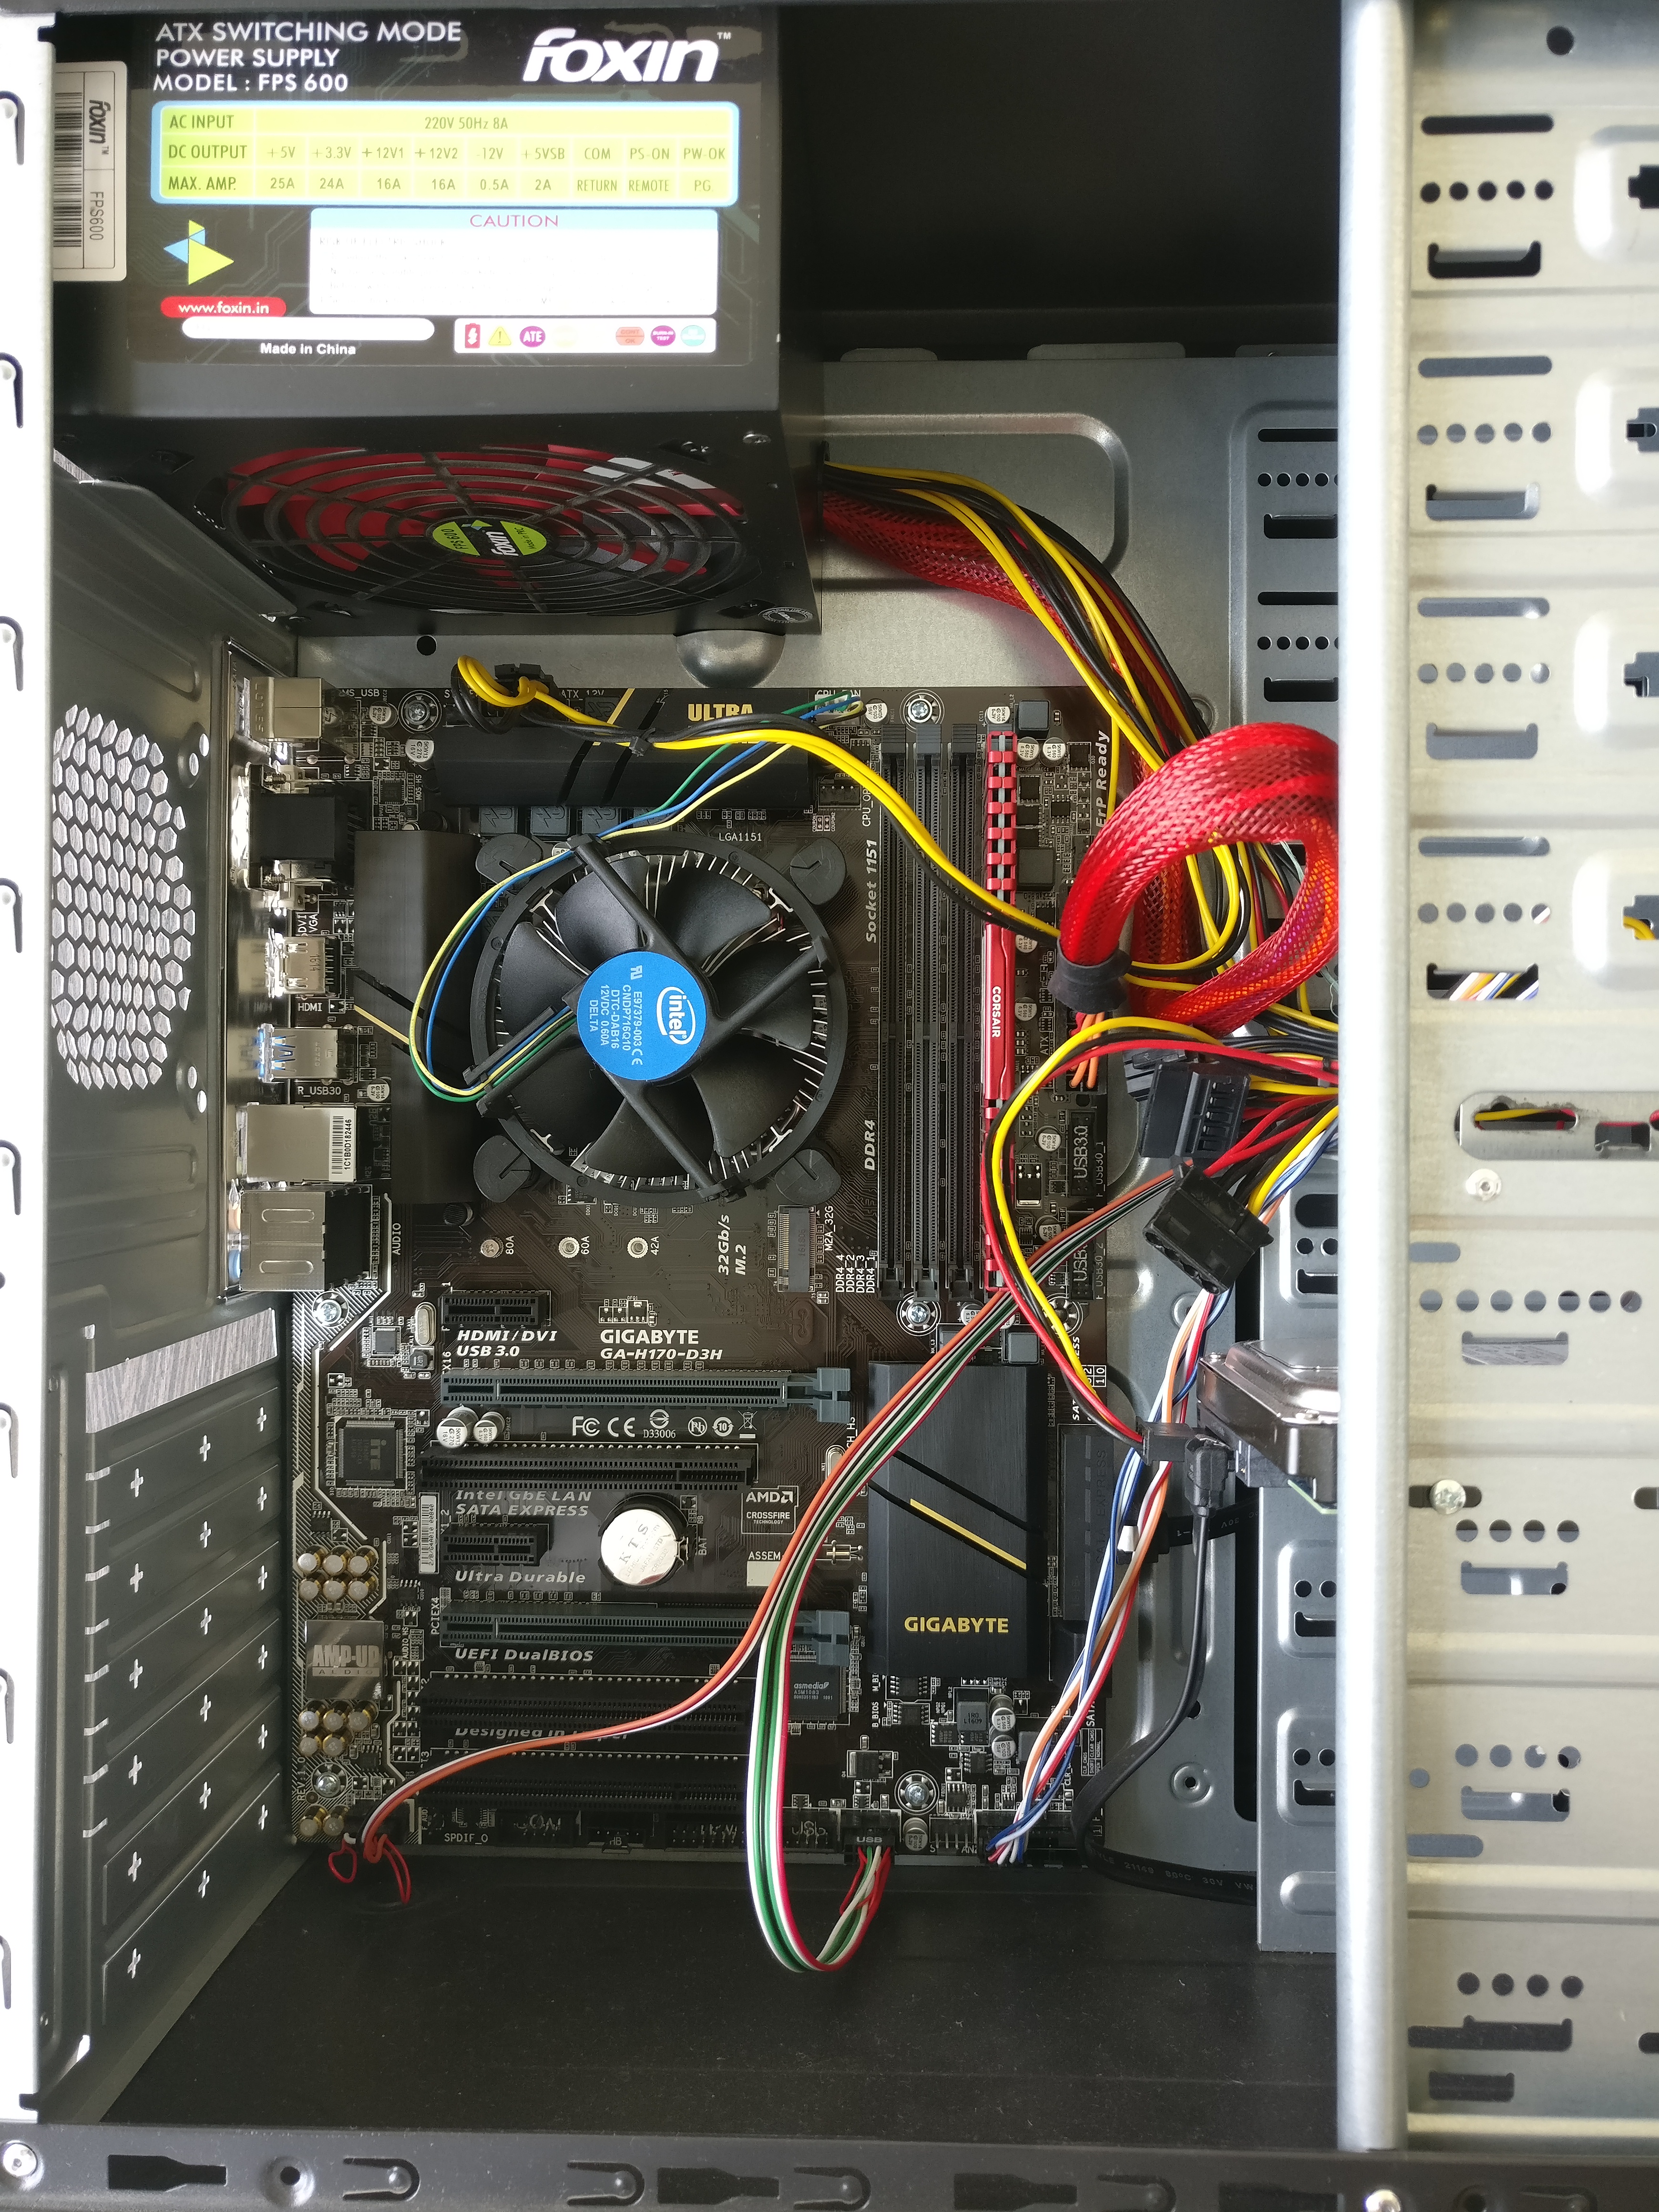

Gigabyte GA-H170-D3H
https://www.newegg.com/Product/Product.aspx?Item=9SIAE7U6184426
Intel i3-6100 3.7GHz Sky Lake Processor
https://www.amazon.com/dp/B015VPX2EO/?tag=tonymacx86com-20
https://www.jdoqocy.com/click-49024....com/Product/Product.aspx?Item=2MN-0004-00002
Corsair Vengeance 2400MHz RAM
https://www.amazon.com/dp/B01ARHBBPS/?tag=tonymacx86com-20
TOSHIBA 500GB Internal Hard Drive
https://www.amazon.com/dp/B00B6A8VFY/?tag=tonymacx86com-20
https://www.newegg.com/Product/Product.aspx?Item=N82E16822149380
Foxin FPS 600 PSU
Foxin ATX Cabinet
Already Owned
LG Monitor
https://www.amazon.com/dp/B00HWHRHH8/?tag=tonymacx86com-20
Comments
The Build
My old macMini with 1.4GHz & 4 GB RAM became terrible for running Xcode & other applications together. It takes 5 mintues to open all needful applications like Xcode 8, Simulator, Chrome/Firefox. Then only I can start start work. Sometimes it hangs too much that I have to restart it. And now watching Xcode 9 beta on WWDC 2017 with multi simulator functionalities I decided to keep the macMini in my garage.
Now my focus of this custom build was cost & performance effective both at the same time. I know I can insert more RAMs at any time.
BIOS Settings
1. To access BIOS/UEFI Setup, press and hold F2 on a USB Keyboard while the system is booting up.
2. Load Optimized Defaults
3. VT-d - Disabled
4. Fast Boot Mode - Disabled
5. OS Type to Other OS
6. IO SerialPort - Disabled
7. XHCI Handoff - Enabled
8. Save and exit.
Unibeast 7.1.1
Used a 8GB flash drive with macOS Sierra 10.12.6 installation file and selected UFEI options to make it bootable.
Then I used F12 to got boot options and booted from flash drive.
Multibeast 9.1.0
After fresh installation I used the following configuration shown below.[/SIZE]

And after restarting...BOOM! Its ready for use except...the Audio.
Then I used this renowned file: https://github.com/toleda/audio_CloverALC/blob/master/audio_cloverALC-120.command.zip to enable audio. But Again another problem raised. No Audio after sleep/wake
Then I found this link: https://www.tonymacx86.com/threads/...ly-other-realteks.170063/page-12#post-1444052
I followed:
- Download RehabMan's latest file
- Move to the CodecCommander.kext from Release folder to Desktop
- Right click on CodecCommander.kext file. Then Show Package Contents -> Contents
- Edit Info.plist (I used plistEditorPro or Xcode)
- Search the LAST <key>Realtek ALC1150</key>
- Change "Update Nodes" from false to true
- <key>Update Nodes</key>
- <true/>
- Add to /S/L/E with kextbeast
- reboot
Update 1: Upgraded to mojave 10.14.6
GeekBench
Last edited: