Contribute
Register

[SUCCESS] Gigabyte Designare Z390 (Thunderbolt 3) + i7-9700K + AMD RX 580

@NorthAmTransAm
Tb bus/Local Node finally appeared. Port 5 Active in Asus TBEXIII AlpineRidge :thumbup:
Reflashed NVM18, TB_H attached, multiple restarts with power disconnect, adjust configuraction in bios with reordering of devices (my PCIe4x_2 shares resources with some Sata ports), reset Nvram and ignore caches (just incase).
(My system seemed persistent without tree even after initial cold reboot) :confused:
Now working in RPxx with the repository's SSDT :)

The only small issue i have is that with a cold boot without the connected devices, the system does not load them when doing HotPlug (You have to reboot and then it works).
Curiously, the port on the screen of the Thunderbolt Bus varies its speed when attach the device (10Gb/s with the Lacie or Antelope), with which it seems that the card does see the change, but the system does not capture the event. Thus maybe an Clover/SSDT issue (i think i have read that others can do it with Opencore?)

Now fix boot delay, customize DROM, tune SSDT for PCIe16 slot, investigate cold boot issue with any settings or changes in SSDT and investigate Antelope with AlpineRidge EXIII:
ANTELOPE -> @qthegaijin, @CaseySJ Unfortunately with AlpineRidge Asus TBEX3 initially the result is exactly the same as with GC-TitanRidge AIC -> Incomplete load (and without self-assigned IP). NO way... :shifty:

(Edited previous posts to not generate spam in @CaseySJ thread)

Pop over here for now. When the update bubble burst we can bring any useful info back.
 
Hello @CaseySJ like I said before, here is the firmware for the Titan Ridge onborad TB3 on the X299X GB Designare 10G! Hope you guys can make this work, finding the chip was nightmare till I gave up and looked for a board diagram on line lol.

You'll see 3 files since I compared checksums like you told me.

Thank you so much in advance!
Awesome -- this is Gigabyte's own NVM 43 for an on-chip Titan Ridge controller! We'll send a patched version to you soon.

Was it difficult to read the on-board flash chip on your X299X Designare?
 
Hi @CaseySJ,
I have installed macOS Mojave starting from 10.14.4 version and updated to 10.14.6 on my System Drive following your post-installation guide (thanks forever!:thumbup:) about installation of necessary kexts and the suggested settings for the config.plist file:
Schermata 2020-03-26 alle 14.35.02.pngSchermata 2020-03-26 alle 14.36.35.png

now i'm planning to install macOS Catalina in a second volume on the same drive following Your "Mini-Guide for Fresh Installation of Catalina 10.15.1 or Newer" which suggests a different post-installation method about kexts installation and a new config.plist file:
Schermata 2020-03-25 alle 16.23.04.png
what changes should i apply for kexts installation and/or the new config.plist file settings in my system to have the possibility to starting the two versions of macOS in multiboot mode?
Thanks in advance
 
Last edited:
There are 3 disks in those screenshots and 3 EFI partitions. Have you check all 3 EFI partitions to ensure that CLOVER is only installed in one of them?
Casey thank you , In my post I have included a screen shot of both of those other two disks mounted none contains clover , and as of today I disconnected everything and tried again same thing.. so after that I decided to do a clean install following the Catalina mini guide , I have not yet been successful, there are too many points of failure with 10.15.4 I am afraid , mine also stops at 2 minutes remaining and I have tried booting to finish the installation despite that but again unsuccessfully , I am going to keep trying a few things and I will report back
 
Hi @CaseySJ,
I have installed macOS Mojave starting from 10.14.4 version and updated to 10.14.6 on my System Drive following your post-installation guide (thanks forever!:thumbup:) about installation of necessary kexts and the suggested settings for the config.plist file:
View attachment 457200View attachment 457201

now i'm planning to install macOS Catalina in a second volume on the same drive following Your "Mini-Guide for Fresh Installation of Catalina 10.15.1 or Newer" which suggests a different post-installation method about kexts installation and a new config.plist file:
View attachment 457204
what changes should i apply for kexts installation and/or the new config.plist file settings in my system to have the possibility to starting the two versions of macOS in multiboot mode?
Thanks in advance
Hello @SardusX,

To install both Mojave and Catalina side-by-side on the same computer requires some careful planning:
  • Follow the Catalina Mini-Guide and make all changes to the Catalina SSD.
  • Don't make any changes to your existing Mojave EFI SSD.
Now you must ask yourself this question:
  1. Do you want to use the same CLOVER configuration to boot both Mojave and Catalina?
    • This is much more convenient than Option 2.
  2. Do you want to press F12 at BIOS Splash Screen every time the computer boots in order to choose between Mojave and Catalina?
    • If the Clover configuration for Mojave is different from Clover configuration for Catalina, then you will have to press F12 to choose either Mojave or Catalina.
If you select Option 1, then these are the post-installation steps:
  • Make a full bootable backup of the Mojave SSD (yes, the Mojave SSD).
  • Use the new Catalina disk as the primary boot disk. Now we'll configure Clover to boot both Mojave and Catalina from the Clover Boot Menu.
  • First: Because you're installing both Mojave and Catalina on the same physical hardware, copy all of the SMBIOS entries from Mojave config.plist to Catalina config.plist.
    • In other words, use same serial numbers for both Mojave and Catalina.
  • Second: Now we need to modify the Mojave installation like this:
    • Boot into Mojave (press F12 during BIOS splash screen and choose the Mojave SSD).
    • Mount EFI partition of Mojave SSD.
    • Copy all Hackintosh kexts from /Library/Extensions to CLOVER/kexts/Other in the Mojave EFI partition. What are the Hackintosh kexts? They are the kexts you installed during Mojave post-installation. If you need help, post a screenshot of your /Library/Extensions folder and I'll highlight them.
    • After copying is done, delete all of the Hackintosh kexts from /Library/Extensions and run Kext Utility to rebuild the kernel cache.
    • Now we have moved all Hackintosh kexts out of the macOS system and into Clover.
    • Reboot into Mojave (press F12 during BIOS splash screen and choose the Mojave SSD) and make sure everything is still okay.
      • This ensures that the Mojave SSD can still boot itself.
  • Third: Now the Catalina Clover folder should be able to boot both Mojave and Catalina.
    • Go to BIOS Setup and make Catalina SSD the primary boot disk.
    • When Clover Boot Menu appears, it will show you both Mojave and Catalina. You can choose here.
 
Casey thank you , In my post I have included a screen shot of both of those other two disks mounted none contains clover , and as of today I disconnected everything and tried again same thing.. so after that I decided to do a clean install following the Catalina mini guide , I have not yet been successful, there are too many points of failure with 10.15.4 I am afraid , mine also stops at 2 minutes remaining and I have tried booting to finish the installation despite that but again unsuccessfully , I am going to keep trying a few things and I will report back
One more thing:
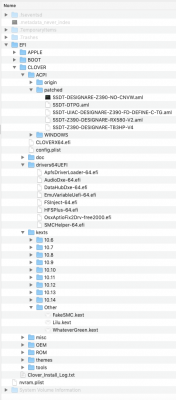
  • Please open your CLOVER/kexts folder (in EFI partition of macOS SSD) and expand all of its subfolders.
  • Post a screenshot.
Screen Shot 2020-03-26 at 8.38.13 AM.png
 
Good question:
  • If you initially used the Catalina Mini-Guide to install Catalina, then you're all set. Nothing more to do because all Hackintosh kexts are only installed in CLOVER/kexts/Other.
  • If you upgraded to Catalina from Mojave, you might have Hackintosh kexts in /Library/Extensions. Those should now be deleted, then rebuild kernel cache by running Kext Utility, and copy the kexts from Catalina Mini-Guide (Zip file attached to that guide) into your CLOVER/kexts/Other folder.

Thank you!
 
Awesome -- this is Gigabyte's own NVM 43 for an on-chip Titan Ridge controller! We'll send a patched version to you soon.

Was it difficult to read the on-board flash chip on your X299X Designare?
Nope, I only had trouble with placing the clip right on the chip, it's just next to the ram slots and the clip barely fits, after 5 trials it just went fine.

NOTE: The power button on the board did slightly lit when the clip was correctly placed on top.
 
Back
Top