Contribute
Register

[SUCCESS] Gigabyte Designare Z390 (Thunderbolt 3) + i7-9700K + AMD RX 580

Please try the attached config.plist -- just copy serial numbers back into SMBIOS/RtVariables. Not much is different in this version, so if the problem continues, we can try adding other options such at DVMT Pre-Alloc.
  • What is the make/model of your monitor?
  • Are you using any video adapters or straight HDMI-to-HDMI connection?
Thanks Casey, I've tried your config but with no luck. The HDMI monitor stays black while the TB-DP monitor exhibits flickering lines if booted with the HDMI monitor plugged in. The system reports the UHD 630 correctly though.
 
Hello,

It's been 2 hours that I'm trying to activate the AVB/EAV mode. Forum, network forum, web reedit...no luck
It supposed to be straight forward but I miss the AVB/EAV mode tick box on the SystemPref/network/advanced!
So I wonder if I need some kext to make it work with this z390 build?
The thunderbolt 3 works perfectly on my Apollo Twin mk2 (so you can add to the supported list if you want)
But today I'd like to connect my 64 tracks Presonus console with AVB...

Thanks in advance
 
** Mini-Guide for Flashing SPI ROM Chips using CH341A Programmer **
Please do not quote the entire mini-guide. Post a link instead.

11 Aug 2020:
Please refer to this new guide that uses a proper 3.3V low-cost USB-based CH341a Programmer

19 Dec 2021:
Warning!
Thunderbolt 4 Docks will not connect to flashed Thunderbolt 3 controllers.​

Disclaimer:
  • The procedure described here can brick / damage the device being modified.
  • You assume all risk and liability for carrying out any of the steps listed here.
  • You further understand that the steps listed here may or may not be accurate or applicable to your particular components.

IMPORTANT UPDATE:
Pin 1: 5V (/CS) Pin 8: 3.3V (VCC)
Pin 2: 5V (DO or MISO) Pin 7: 3.3V (/HOLD)
Pin 3: 3.3V (/WP) Pin 6: 5V (CLK)
Pin 4: Ground Pin 5: 5V (DI or MOSI)

Because of 5V output on SPI I/O pins, I cannot recommend the CH431a for writing to the Winbond W25Q80DV chip. However, a number of users have been successful nevertheless (i.e. without modifying the CH341a programmer in any way). You assume all risk for any damage that might occur.

While it is possible to desolder pin 28 of the large 28-pin chip and jumper it to a 3V3 line, this procedure is not recommended unless you have prior experience with soldering and desoldering. If you have the requisite experience, the modification to be made is as follows:
  • Desolder pin 28 (VCC) from the CH341A chip. This will break the existing connection, which is necessary before we can connect it to a 3.3V source.
  • Solder a jumper wire from pin 28 of CH341A to the bottom left capacitor (C3 in this case, but C4 in other models) and then from that capacitor to pin 2 of AMS1117 (Advanced Monolithic Systems) voltage regulator.
  • Please see this blog for more details:


Pro Tips:
  • Consider purchasing a USB Type A extender cable such as this one to bring the CH341a closer to the chip to be read. This can be a huge convenience.
  • Avoid USB hubs and connect the CH341a directly to a USB port on the front of the case or on the rear IO panel. Disconnect any unnecessary external USB devices to allow the USB port to deliver stable voltage and the full amount of electrical current to the CH341a.

Step 1: Install flashrom on MacOS:
  • First install Homebrew by copying-and-pasting the following command in Terminal:
    • /bin/bash -c "$(curl -fsSL https://raw.githubusercontent.com/Homebrew/install/master/install.sh)"
  • Now install flashrom as follows:
    • brew install flashrom

Step 2: Use a Multimeter to Check Output Voltage:
  • Connect your CH341a to an available USB port.
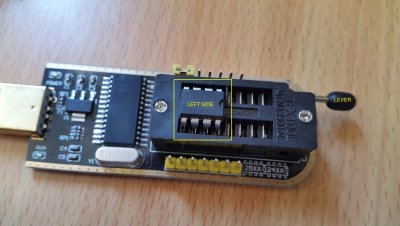
  • The black receptacle contains two rows of 8 for a total of 16 pin connections. Series 25 SPI ROM chips are always connected to the left side (away from the lever) as shown here:
    f16t4287p69146n5_HPAlDMjZ.jpg
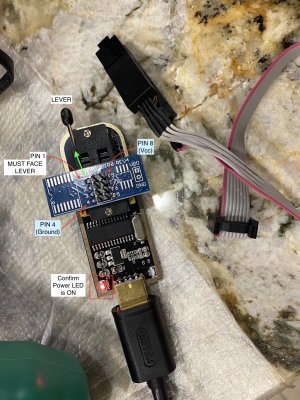
  • Install the bare 8-pin connector to the left side (farthest away from lever) and note the pins. Raise the lever up to open the receptacle, insert the 8-pin connector, then lower the lever to lock the receptacle.
    IMG_1057-small.jpg
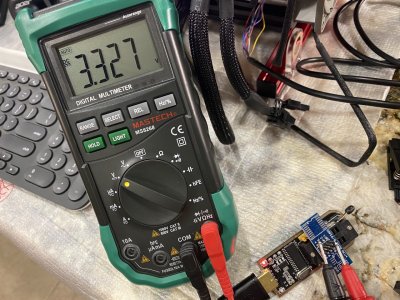
  • Use Multimeter to check voltage across Pins 4 and 8. Use DC Voltage setting on the multimeter. If you see 3.3V as shown, you are okay to proceed. Otherwise STOP.
    IMG_1058-small.jpg

Step 3: Prepare GC-Titan Ridge Card
  • Remove 4 screws on the back of the card in order to disconnect the faceplate.
    IMG_1056.jpg
  • Disconnect the CH341a from the computer (i.e. turn it OFF), attach the 8-pin SOI clip. Make sure the red wire is connected to PIN 1 -- it must face the lever:
    IMG_1052.jpg
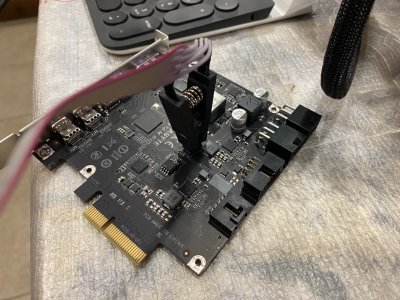
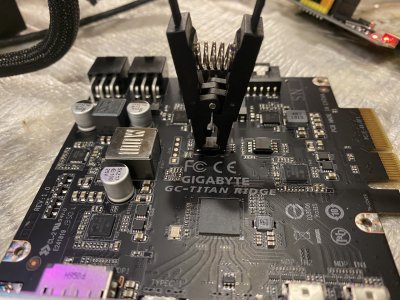
  • Carefully attach the clip to the Winbond chip with the BLUE DOT. Squeeze and unsqueeze the spring-loaded clip slowly and gently. Never rush. Make sure PIN 1 on the clip (RED wire) is connected to the tiny blue dot or dimple on the chip.
    IMG_1053.jpg IMG_1054.jpg
  • Now connect the CH341a to a USB port and check that the power LED turns on.

Step 4: Read the Flash Chip.
  • First we read the contents of the flash chip and store a backup of the original ROM. We use flashrom within Terminal to read the contents 3 times and verify that all three files are identical. This gives us confidence that the chip was read correctly.
sudo flashrom -p ch341a_spi -r Give_the_Contents_a_Name.bin

Code:
% sudo flashrom -p ch341a_spi -r GC-Titan-Ridge-New-NVM-43-1.bin
Password: <enter your password>
flashrom v1.2 on Darwin 19.3.0 (x86_64)
flashrom is free software, get the source code at https://flashrom.org

Calibrating delay loop... OK.
libusb: info [darwin_claim_interface] no interface found; setting configuration: 1
Found Winbond flash chip "W25Q80.V" (1024 kB, SPI) on ch341a_spi.
Reading flash... done.
Code:
% sudo flashrom -p ch341a_spi -r GC-Titan-Ridge-New-NVM-43-2.bin
flashrom v1.2 on Darwin 19.3.0 (x86_64)
flashrom is free software, get the source code at https://flashrom.org

Calibrating delay loop... OK.
Found Winbond flash chip "W25Q80.V" (1024 kB, SPI) on ch341a_spi.
Reading flash... done.
Code:
% sudo flashrom -p ch341a_spi -r GC-Titan-Ridge-New-NVM-43-3.bin
flashrom v1.2 on Darwin 19.3.0 (x86_64)
flashrom is free software, get the source code at https://flashrom.org

Calibrating delay loop... OK.
Found Winbond flash chip "W25Q80.V" (1024 kB, SPI) on ch341a_spi.
Reading flash... done.
  • Then compute and compare checksums for all 3 files to ensure they match:
Code:
% shasum GC-Titan-Ridge-New-NVM-43-1.bin
3c1e2555a8203a0dc20b7cfe2577636112a82367  GC-Titan-Ridge-New-NVM-43-1.bin

% shasum GC-Titan-Ridge-New-NVM-43-2.bin
3c1e2555a8203a0dc20b7cfe2577636112a82367  GC-Titan-Ridge-New-NVM-43-2.bin

% shasum GC-Titan-Ridge-New-NVM-43-3.bin
3c1e2555a8203a0dc20b7cfe2577636112a82367  GC-Titan-Ridge-New-NVM-43-3.bin
  • We see that all 3 checksums match so we can be confident that data was read correctly.
Step 5: Program Modified Firmware into the Flash Chip.
  • Be sure that you have followed Step 4 and kept a copy of the original firmware.
  • Locate the modified firmware and program it into the chip as follows:
Code:
% sudo flashrom -p ch341a_spi -w Name_of_Modified_Firmware.bin
  • This will (a) erase the chip, (b) program new firmware into the chip, and (c) verify the new content.

(All photos except the first taken handheld on iPhone 11 Pro Max.)
 
Last edited:
Hello,

It's been 2 hours that I'm trying to activate the AVB/EAV mode. Forum, network forum, web reedit...no luck
It supposed to be straight forward but I miss the AVB/EAV mode tick box on the SystemPref/network/advanced!
So I wonder if I need some kext to make it work with this z390 build?
The thunderbolt 3 works perfectly on my Apollo Twin mk2 (so you can add to the supported list if you want)
But today I'd like to connect my 64 tracks Presonus console with AVB...

Thanks in advance
You might have seen this already...

If anyone has successfully enabled Audio/Video Bridging (AVB), please let us know. I vaguely recall a discussion of this earlier in this thread.

UPDATE: Please see this post.
Screen Shot 2020-03-03 at 5.37.18 AM.png
 
Here is a quick guide to using the low-cost CH341a chip reader/programmer with macOS.

Pro Tip:
  • Consider purchasing a USB Type A extender cable such as this one to bring the CH341a closer to the chip to be read. This can be a huge convenience.

So I should not use the USB hub that is on my desk?

What is the final step after you have checked that everything is being read correctly and is the same?

Glad you wrote the little guide because I am not one to triple check stuff without being told.

Also SSDT to edit it would I just need to edit it to RP21 similar to the other SSDT for TB3?
 
Thanks for the extensive and efficient guide....
After a major crash on my hack, I've lost a Radeon VII and the ASUS motheboard. Got an Gigabyte Aorus Ultra and for a month couldn't get stable. Manage to get the designare and in hours everything was up and running on. Long time doing Hackintosh and first time I had to give up on a MB (Aorus).
So, the thunderbolt in fact can only been used as USB C or not??...as per what I understood from the posts above on the iPad Pro only charges...no way to use as normal?
Thanks again CaseySJ for the hardwork in put the guide up....

Due to the 15 USB port limit imposed by Apple, the USB C port has been disabled as a USB port via the SSDT. If you want to use it as USB then you need to either edit or create your own SSDT to enable USB on that port. The Thunderbolt part has not been disabled, but only certain functionality is enabled. Hence why CaseySJ, and others, are working on getting a fully functional SSDT for it.
 
Hello,

It's been 2 hours that I'm trying to activate the AVB/EAV mode. Forum, network forum, web reedit...no luck
It supposed to be straight forward but I miss the AVB/EAV mode tick box on the SystemPref/network/advanced!
So I wonder if I need some kext to make it work with this z390 build?
The thunderbolt 3 works perfectly on my Apollo Twin mk2 (so you can add to the supported list if you want)
But today I'd like to connect my 64 tracks Presonus console with AVB...

Thanks in advance

I dont think the NICs on the Intel motherboards support AVB.
Check this NIC out.. I think this would get you there...

 
Please double-check all steps, especially the sections of modifying config.plist in Clover Configurator. Don't forget the changes needed in RtVariables. If you run into trouble, just let us know.

Did the new rtvariables. Tried installer. The installer progress bar went half way. Screen reboot. Or looks like system reboots. But I guess its only the video output. Doesnt do anything. After a while really a black screen as if system powered down. (+/-10 minutes) Hit the power button. And there is the Mac installer. This is weird right? Or is this normal behaviour? From there I can acces disk utillity. The installer is called mac recovery which also is weird. Thanks!

Installer doenst go into verbose mode. Which also is weird. Is installing so ill report back.

Booted from: Boot macOS Install from Catalina --> Screen is blacked out. HD led is flashing so see that there is activity.

First reboot --> Welcome screen.

Installed fine. Now do the necessary post installation

Guess its succes. Moved EFI usb folder to EFI NVME. Boots up fine. Post intstall next. Still weirdest install I had. Thanks for the help. Report back when done.

All seems well. Doesnt boot up automaticly. So have to look in clover settings. Shutdown is slow. 10 seconds or so. Mojave shuts down under 1 second.

Thunderbolt works: Auto detects audiocard.
 
Last edited:
You might have seen this already...

If anyone has successfully enabled Audio/Video Bridging (AVB), please let us know. I vaguely recall a discussion of this earlier in this thread.

UPDATE: Please see this post.
View attachment 452798

I just tried my Belkin USB-C to ethernet adapter. No cigar. Googling, I found this:

AVB is only supported by the Thunderbolt chipset, so you require a Thunderbolt to Ethernet adapter.

The Belkin USB-C to Ethernet enumerates as a USB to Ethernet adapter, and the USB interface on the Mac cannot handle AVB.

I have tried both the white and black versions, they are exactly the same.

I have searched for a true thunderbolt 3 (USB-C) to Ethernet adapter but have not found one. The only way currently is to use a Thunderbolt 3 to Thunderbolt 2 adapter and Apple’s Thunderbolt to Ethernet adapter. This allows me upto 128 x 128 audio channels in the MacBook Pro 15 2016.

I am not sure if one of these Thunderbolt 3 docks with Ethernet will work, haven’t tested it.


I see the (greyed out) AVB/EAV switch only when I attach Startech TB3->TB2->Ethernet adapters. No idea if it works properly, I've no devices to test it with.
 
Back
Top