Contribute
Register

[SUCCESS] Gigabyte Designare Z390 (Thunderbolt 3) + i7-9700K + AMD RX 580

It looks like You no longer need all that 'remove 5700 and use IGPU' workarounds with 10.15.2, The fresh install process went smoothly on my GA-Z390-UD+Sapphire-5700x without jumping through those hoops
 
Voilà !!! :
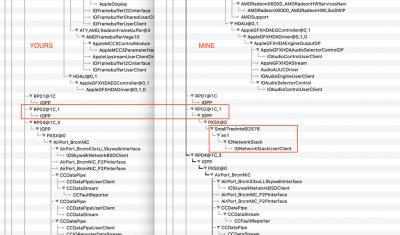
The i211 Ethernet port is attached to RP02, but on your system (left side) we can see that the device is missing. On my system (right side) it is present and the SmallTreeIntel driver is attached.

Screen Shot 2019-12-15 at 7.23.04 AM_resize.png

It's possible that there's firmware problem. Please try the following:
  • Shutdown and remove power cable for 10 seconds. Reboot.
    • Does the Ethernet port appear?
  • If not, shutdown and perform a CMOS Reset as described in the Designare Owner's Manual.
    • This will reset all BIOS parameters to factory defaults, so configure all the parameters again starting with Load Optimized Defaults.
    • Boot the system.
    • Does the Ethernet port appear?
  • If not, re-flash the BIOS and configure BIOS parameters again starting with Load Optimized Defaults.
    • Boot the system.
    • Does the Ethernet port appear?
 
**Mini-Guide for Fresh Installation of Catalina 10.15.1 and Newer **
** Please do not quote this guide in any post -- use a link instead **

URGENT: To install Catalina 10.15.4 or newer, please follow the new mini-guide here.
9-Apr-2020: Do not use Clover 5109


Warning for MSI RX 5700 XT Owners (only the MSI version):
  • If you have an RX 5700 XT made by MSI, it might not work with this guide so please follow the previous guide (click here). All other brands of RX 5700 / 5700 XT can follow the guide below.
Warning for RX 5700 and RX 5700 XT Owners:
  • Catalina 10.15.1 through 10.15.3 has a known problem with the Photos app that causes random system crashes due to a background service that performs face detection in photos.
  • Please see (a) this post and (b) this post right now.
This Guide...
  • Supports installation via a discrete AMD GPU or internal iGPU (Intel UHD 630).
  • Uses OcQuirks, OcQuirks.plist and FwRuntimeServices (from ReddestDream GitHub site, Revision 12) instead of OsxAptioFix2Drv-free2000.
  • Uses VirtualSMC from the beginning.
  • Applies all custom SSDTs from the beginning. No USB Port Limit patches are needed.
    • Hides Intel CNVi WiFi/BT card from macOS.
    • Enables Thunderbolt hot plug.
    • Configures USB ports and enables high-current delivery.
  • Sets shikigva and shiki-id to allow DRM content playback in TV, Music, and Podcast apps.
  • Uses Clover 5xxx (v5098 or newer).
  • Uses the modified SmallTreeIntel82576 kext that directly supports Intel i211 Ethernet. No need for FakePCIIID.kext and FakePCIID_Intel_GbX.kext.
  • Sets boot parameter agdpmod=pikera to prevent black screen problem with some RX 5700 series GPUs.
  • Sets AppleALC layout ID to 11. This allows the front headphone jack to work just as well as the rear green jack.
  • Assumes there's a Broadcom 94360-based WiFi/BT card (such as Fenvi FV-T919) in the bottom short PCIe x1 slot. If you don't have such a WiFi/BT card, you should still be able to use this guide.
  • Uses Clover kext injection instead of installing kexts in /Library/Extensions. This is subject to change.
Preparation:
  • The complete macOS installer can be downloaded by following the video in this post.
  • If you only have the internal iGPU (Intel UHD 630):
    • You must use the on-board iGPU to install Catalina.
    • You must use an HDMI cable from the rear IO panel to your HDMI monitor (do not use a TV).
    • In BIOS, iGPU must be enabled.
    • In BIOS, Initial Display Output should be set to IGFX.
  • If you have a supported AMD GPU (AMD RX 560, RX 570, RX 580, RX 590, Vega 56, Vega 64, Radeon VIII, RX 5700, RX 5700 XT):
    • The card can and should be installed.
    • Connect your monitor (not TV) to the AMD GPU.
  • Set BIOS parameters according to main guide in Post #1.
  • Refer to NOTES 1 through 7 at the top of Post #1 for important compatibility issues.
  • If you are using 32GB DIMMs you must either:
    • Use Clover 5103 or newer (which supports 32GB DIMMs, so no need to specify DIMMs in SMBIOS --> Memory section).
    • If using older version of Clover (older than 5103):
      • Switch temporarily to 4GB, 8GB, or 16GB DIMMs or
      • Modify the SMBIOS --> Memory section as described later in Step 1.
  • Please use Clover Configurator 5.8.0.0 or newer when making changes to config.plist later in this guide.
Notes:
  1. When installation is completed, Thunderbolt status can be checked by looking at System Information --> PCI instead of System Information --> Thunderbolt.
  2. If using a Samsung EVO 970 Plus NVMe SSD, please ensure it has the latest Samsung firmware. Please see NOTE 5a at the top of Post #1.
  3. Review all 7 NOTES at the top of Post #1.
  4. USB 2.0 devices will not work when connected to any of the USB-C ports. This includes the two Thunderbolt ports on the rear IO panel and a USB-C port on the computer case if your case supports it. USB 3.x devices, however, will function properly. This was done intentionally in order to avoid exceeding the macOS limit of 15 USB ports per controller.
  5. USB-C devices will work when both of these criteria are met:
    • USB-C device natively supports USB 3.x.
    • USB-C cable itself explicitly supports USB 3.x. Most USB-C cables do not support USB 3.x so please check carefully. Here's an example from Amazon.
Step 1: Create USB Install Disk
  • Use a 16 to 32 GB flash drive.
  • Format the USB drive in Disk Utility. Select View --> Show All Devices and click the parent name of your USB drive on left sidebar. Failure to do so will be catastrophic. Then select Erase and enter:
    • Name: Catalina-USB (use exactly this name)
    • Format: MacOS Extended (Journaled) --- do not use APFS here
    • Scheme: GUID Partition Map
  • Download Catalina installer (see bullet 1 under Preparation above). Check that it's in the Applications folder.
    • Also check that the USB disk has been mounted and its name is Catalina-USB
    • Open a Terminal window and type:
      sudo "/Applications/Install macOS Catalina.app/Contents/Resources/createinstallmedia" --volume /Volumes/Catalina-USB
    • Enter your Mac password when requested.
    • This step will cause your USB install disk to be renamed to Install macOS Catalina.
    • If you encounter any errors, stop and report those errors.
  • Download Clover v5098 or newer from GitHub by clicking here and downloading the xxxx.pkg file.
    • Launch the Clover installer and allow the app to run (System Preferences --> Security & Privacy --> General).
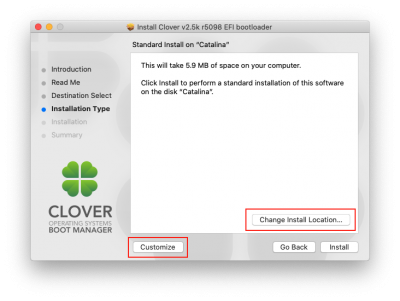
    • Click Continue, Continue, Change Install Location... and select the USB flash disk!
    • Then click Customize -- don't overlook this.
    • These 2 buttons are located here:
      Screen Shot 2019-11-17 at 4.32.34 AM.png
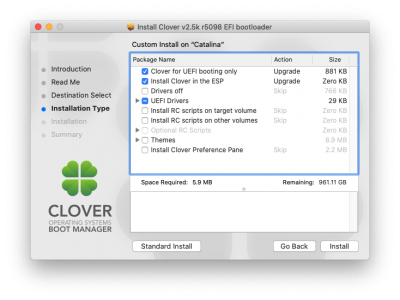
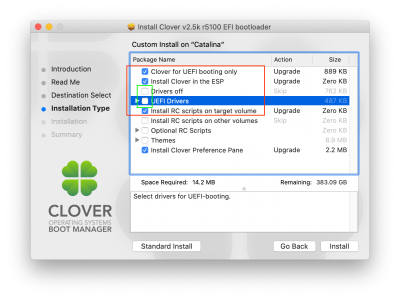
    • Check that the Customize page looks exactly like this:
      Screen Shot 2019-11-17 at 4.33.04 AM.png
    • Notice that Install RC scripts on target volume is unchecked. Because we are installing Clover to the USB flash disk, we must not install RC scripts. We'll do this in Post-Installation in Step 3.
    • Click the Install button.
  • Copy Clover Configurator to the standard partition of the USB flash disk (not the EFI partition).
  • The EFI partition of the USB install disk will already be mounted (Clover installer will do this automatically).
    • Open the EFI Folder on the EFI partition of USB disk. You'll see a CLOVER folder, of course.
    • Open the CLOVER folder.
    • Download the attached Catalina Fresh Install.zip into your Downloads folder on the Mac (not on the USB disk).
      • Open the CLOVER/drivers/UEFI folder on the USB disk (EFI partition) and:
        • Delete all files in that folder and empty the trash.
        • Locate the folder Copy-to-drivers-UEFI in the above ZIP file you downloaded.
        • Copy all .efi and .plist files from this folder into CLOVER/drivers/UEFI
      • Open the CLOVER/kexts/Other folder on the USB disk (EFI partition) and:
        • Delete all files in that folder and empty the trash.
        • Locate the folder Copy-to-kexts-Other in the above ZIP file you downloaded.
        • Copy all .kext files from this folder into CLOVER/kexts/Other
      • Open the CLOVER/ACPI/patched folder on the USB disk (EFI partition) and:
        • Locate the Copy-to-ACPI-patched folder in the above ZIP file you downloaded.
        • Copy all .aml files from this folder into CLOVER/ACPI/patched
      • There are two plist files in this ZIP:
        • config-Internal-GPU.plist
        • config-AMD-GPU.plist
        • If you only have the internal iGPU (Intel UHD 630):
          • Copy the file config-Internal-GPU.plist to the CLOVER folder on the USB disk (EFI partition) and rename it to simply config.plist.
        • If you have a supported AMD GPU (AMD RX 560, RX 570, RX 580, RX 590, Vega 56, Vega 64, Radeon VIII, RX 5700, RX 5700 XT):
          • Copy the file config-AMD-GPU.plist to the CLOVER folder on the USB disk (EFI partition) and rename it to simply config.plist.
        • Now run Clover Configurator and open your config.plist from the CLOVER folder on USB disk.
        • We will make changes to the SMBIOS and RtVariables sections as shown in the two screenshots below.
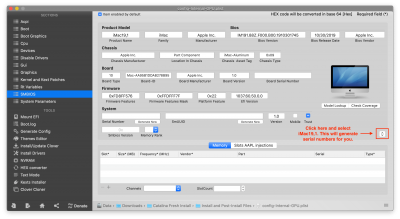
          • First, click the pop-up button in SMBIOS and select iMac19,1 in order to generate serial numbers. This is shown below:
            Screen Shot 2019-12-08 at 10.17.48 AM.png
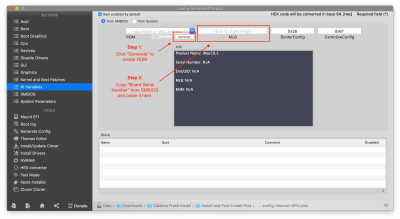
          • Next, click RtVariables and follow the two steps shown. Step 1 requires you to press Generate to create a ROM ID. Step 2 requires you to copy the Board Serial Number from SMBIOS and paste it into MLB.
            Screen Shot 2019-12-08 at 10.18.06 AM.png
        • If you are using 32GB DIMMs you must either:
          • Use Clover 5103 or newer (in which case, no need to fill out SMBIOS --> Memory section).
          • If using older version of Clover (older than 5103), then:
            • Switch temporarily to 4GB, 8GB, or 16GB DIMMs or
            • Make the following change to SMBIOS --> Memory section.
              Screen Shot 2019-12-12 at 8.25.59 AM.png
            • If you have two 32GB DIMMs for a total of 64GB, you must specify slots 0, 1, 2, 3 each with 16GB memory as shown above for a total of 64GB. (This has been tested in Catalina.)
            • If you have four 32GB DIMMs for a total of 128GB, you must specify slots 0, 1, 2, 3, 4, 5, 6, 7 each with 16GB memory for a total of 128GB. (This has not been tested recently.)
        • Everything else is already set in this file. So save it and quit Clover Configurator.
  • Eject the USB flash disk.
Step 2: Install Catalina (note the difference between BIOS Boot Menu and Clover Boot Menu)
  • Insert the USB install disk into the Hackintosh and boot.
  • Press F12 at BIOS Splash screen to bring up the BIOS Boot Menu and select the USB flash disk.
  • When Clover Boot Menu appears, select Boot macOS Install from Install macOS Catalina
  • Follow the onscreen progress and report any issues.
  • When the installer starts, you'll need to run Disk Utility from inside the installer, select your target Catalina NVMe SSD, and format it.
    • Be sure to select View --> Show All Devices and click on the parent name of the Catalina SSD. Failure to do so will be catastrophic.
    • Then select:
      • Name: Catalina (you can change it later)
      • Format: APFS
      • Schema: GUID Partition Map
    • Then begin the macOS installer.
  • NOTE 1:
    • Whenever the macOS installer starts, you'll see a lot of log messages on screen because verbose mode is enabled in config.plist.
    • When the last log message appears on screen there might be a 2-3 minute wait before the screen switches to graphics mode. Just be patient. If the delay is more than 7 minutes, let us know.
  • There might be one or two reboots.
    • Each time the system reboots, press F12 at BIOS splash screen to open the BIOS Boot Menu.
    • Select the USB install disk from the BIOS Boot Menu.
  • Now you'll be back at the Clover Boot Menu:
    • Whenever you see a boot option called Boot macOS Install from Catalina or Boot macOS Install from Catalina - Data, choose that option.
    • Do not select the USB disk.
  • NOTE 2:
    • MacOS installation will resume and you'll see X Minutes Remaining.
    • It may take up to 10 minutes for the number "X" to begin to count down.
    • So if you see, for example, "28 Minutes Remaining", it may stay like that for 10 minutes before the number 28 counts down.
    • If it takes more than 15-30 minutes to begin the countdown, let us know.
  • If everything goes according to plan, you'll be greeted with the Catalina Welcome screen.
    • Follow the onscreen guide.
    • You may sign in to iCloud when asked.
  • If you encounter any problems, stop and let us know.
Step 3: Post Installation
  • We'll make this really simple for now.
  • Run Clover Configurator which was copied to the USB flash disk in Step 1.
    • Click Mount EFI on left sidebar of Clover Configurator
    • Mount EFI partitions of (a) USB flash disk and (b) Catalina SSD.
    • Copy the entire EFI Folder from EFI partition of USB disk to EFI partition of Catalina SSD.
    • If you like, you can open config.plist from the Catalina EFI partition and remove the -v Boot Arguments flag. This will stop the detailed log messages at startup and shutdown.
  • Eject USB flash disk.
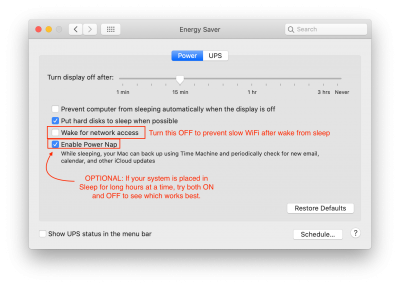
  • Open System Preferences --> Energy Saver and uncheck Wake for network access in order to prevent severely degraded WiFi performance after waking from sleep. This is shown below.
    Screen Shot 2019-12-10 at 3.53.05 AM.png
  • Reboot directly from Catalina SSD.
  • Does it work? Report any issues.
  • If everything is working, make a full bootable backup. See Post #1, Easy Bootable Backup for instructions.
  • Now that we have made a full bootable backup we'll install Clover RC Scripts to allow Emulated NVRAM to work properly. This requires running the Clover installer, so make a backup before proceeding.
  • Installing Clover RC Scripts: THIS STEP IS OPTIONAL (skip this if you wish to enable native NVRAM). If Clover Boot Menu does not seem to remember the last booted volume, then perform this step. It can be done at any time after Catalina has been installed. It does not have to be done right now.
    • Download or copy the Clover Installer Package (filename Clover_v2.5k_r5098.pkg or newer) to your Catalina SSD. You may copy it to your Downloads folder.
    • Double-click to launch the Clover package installer. Because it is from an "unknown developer", macOS will display a warning. Open System Preferences --> Security & Privacy --> General and click Allow from the bottom right.
    • Then click Continue, Continue.
    • At Destination Select, select your Catalina SSD. In my case, the disk is named simply Catalina as shown:
      Screen Shot 2019-12-10 at 4.11.09 AM.png
    • Then click Continue. On the next screen, click Customize:
      Screen Shot 2019-12-10 at 4.14.22 AM.png
    • Make the selections shown, namely:
      • Check ON: Clover for UEFI booting only
      • Check ON: Install Clover in the ESP
      • Check OFF: Drivers off
      • Check OFF: UEFI Drivers
      • Check ON: Install RC scripts on target volume
      • Check OFF: Install RC scripts on other volumes
      • Check OFF: Optional RC Scripts
      • Check OFF: Themes
      • Check ON: Install Clover Preferences Pane (optional)
    • Double-check the settings.
      Screen Shot 2019-12-10 at 3.45.26 AM.png
    • Now click Install at the bottom right of the installer window.
    • Reboot and make sure the system can start up fully.
Installation Complete. You made it!

Troubleshooting:

  • A comprehensive guide to fixing sleep/wake problems has been posted here.
  • If your system is rebooting or freezing regularly:
    • One possible solution might be to remove agdpmod=pikera (if not using RX 5700 or RX 5700 XT) and use shikigva=16. Please see the 3 consecutive posts starting with this one.
    • Another possible cause might be a power supply unit (PSU) that is too old or too weak to accommodate the peak demands of your system (under load).
    • A third possibility (particularly for RX 5700 and RX 5700 XT owners) might be to disable WhateverGreen at least temporarily by adding the boot argument -wegoff
    • Also look at this post about (a) Simplification and (b) Process of Elimination.
  • For latest information about DRM content playback and shikigva values, please see this post by @jaymonkey.
  • If you experience sleep/wake issues, please see this Sleep Aid for Designare Z390.

Optional Extras:
  • To enable native NVRAM, please refer to the mini-guide by clicking here.
  • A newer version of OcQuirks and FwRuntimeServices is available in the attached file:
    • OcQuirks Rev 15 - Designare Z390.zip
    • An older version of this is included in Catalina Fresh Install.zip, so upgrading to this version is optional.
    • To install the updated files:
      • Mount EFI partition of the Catalina SSD.
      • Unzip and copy all three included files into the CLOVER/drivers/UEFI folder.
      • Reboot.
  • If you're experiencing problems with AirPlay and Sidecar, try using shikigva=80 in Clover Configurator --> Boot Arguments.

Catalina Update Guidelines:
  • To update from an earlier version of Catalina to 10.15.4, some guidelines are posted here.

EDITS:
  • 10-Dec-2019: Updated Post-Installation steps, Step 3.
  • 15-Dec-2019: Revised and updated based on user feedback.
  • 27-Dec-2019: Added link to guide for fixing sleep/wake problems.
  • 08-Jan-2020: Switched to Layout ID 11 for AppleALC. This allows front and rear headphone jacks to work properly.
  • 09-Jan-2020: Clover 5103 and newer supports 32GB DIMMs without requiring SMBIOS --> Memory to be filled out. Added this note to "Preparation" and "Step 1" sections. Also replaced OcQuirks-4.efi with OcQuirks Revision 12 (OcQuirks.efi + OcQuirks.plist).
  • 17-Jan-2020: Added a note at the end of this guide regarding possible solution for sudden freezing or rebooting.
  • 20-Jan-2020: Added link to a post about DRM content playback.
  • 27-Jan-2020: Added link to native NVRAM mini-guide.
  • 18-Feb-2020: Added separate ZIP file containing OcQuirks Revision 15. See Optional Extras above.
  • 24-Mar-2020: Added section Catalina Update Guidelines at the end of the mini-guide.
 

Attachments

  • Catalina Fresh Install.zip
    1.5 MB · Views: 1,467
  • OcQuirks Rev 15 - Designare Z390.zip
    28.5 KB · Views: 654
Last edited:
It's possible that there's firmware problem. Please try the following:
  • Shutdown and remove power cable for 10 seconds. Reboot.
    • Does the Ethernet port appear?
  • If not, shutdown and perform a CMOS Reset as described in the Designare Owner's Manual.
    • This will reset all BIOS parameters to factory defaults, so configure all the parameters again starting with Load Optimized Defaults.
    • Boot the system.
    • Does the Ethernet port appear?
  • If not, re-flash the BIOS and configure BIOS parameters again starting with Load Optimized Defaults.
    • Boot the system.
    • Does the Ethernet port appear?
I think my designare is broken :| , because I've tried twice with clear cmos and nothing happens, I've always only one ethernet port...

Thank you very much, Mister CASEY, for your help, your search for solutions and your patience :):)

PS : may be it is Clover r5100, no ?
 
I think my designare is broken :| , because I've tried twice with clear cmos and nothing happens, I've always only one ethernet port...

Thank you very much, Mister CASEY, for your help, your search for solutions and your patience :):)

PS : may be it is Clover r5100, no ?
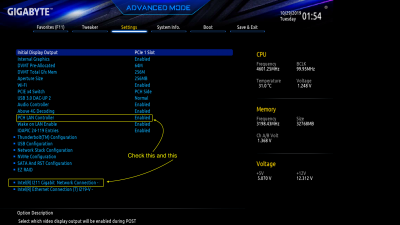
Please check this and this as indicated:

Settings-IOPorts.png
 
Please check this and this as indicated:

View attachment 440598
PCHLAN Controller is enabled, but I have not Intel(R) I211 Gigabit Network Connection, only the second line

EDIT : I have it when I am with bios optimized defaults !!!! But it is not a good configuration to boot MacOs !!
 
Last edited:
PCHLAN Controller is enabled, but I have not Intel(R) I211 Gigabit Network Connection, only the second line

EDIT : I have it when I am with bios optimized defaults !!!! But it is not a good configuration to boot MacOs !!
We start with Optimized Defaults and then we make the BIOS changes for MacOS. So please make the BIOS changes and see if i211 stays.
 
Please see this part of the Rules:

View attachment 440537

It's best to do the whole thing on a Mac and download macOS through the Mac App Store.
Ok I see. I do have a legally purchased and acquired version of macOS but I also have Windows 10 and Ubuntu so I was just wondering if I could use either of those two other systems to run the UniBeast installer to create the USB.
 
Goooooood, I must change BIOS settings one setting after one, reboot and reboot, and now 2 Ethernet connections stay. XMP causes crashes when enabled !?!!

Thank you again, Casey, you are THE BEST !!!!! :):):thumbup:
 
Last edited:
I've made Bios change, except one : if I configure memory to 2666 instead 2133 (2666 is the frequency memory installed) I have only one ethernet connection.
XMP must be disabled, if not--->crash !!
I must choose beetween memory at a normal frequency or 2 ethernet ports... :(
Which memory modules do you have? Are they 32GB?
 
Back
Top