*** Mini Guide: Using UEFITool and ifrextract to View Firmware Settings ***
Background:
The term 'BIOS' is not the technically correct term for the firmware that runs on UEFI motherboards. The proper term is simply
firmware. On most motherboards, pressing DEL key during startup will launch the Firmware Setup GUI. These GUIs have evolved appreciably over the years, and they offer a rich graphical experience. Likewise, the firmware itself has evolved in response to new on-board technologies such as USB 3, integrated GPUs, built-in Thunderbolt, 10Gig Ethernet, RGB controllers, etc.
However, not all of the configuration parameters available to the firmware are available to the user via the Setup GUI. The
CFG Lock parameter is probably the most well-known example. This parameter is set to 0x01 (enabled) in the Designare Z390 firmware and it is not available to view or change in the Setup GUI. It triggers a write-once lock on the 0xE2 MSR register, which interferes with
AppleIntelCPUPowerManagement.kext, thereby requiring Clover patches (
Plugin Type and
KernelPM) that prevent this kernel extension from touching the 0xE2 MSR register.
This mini guide is based on the
AptioFixPkg README file.
Purpose of Guide:
The purpose of this guide is to demonstrate how to view and modify the
CFG Lock and other firmware parameters. Modifying the firmware is very risky and should only be done in extreme situations when no other viable solution exists for a problem you are experiencing.
*** WARNING ***
If you decide to modify your firmware settings by following this guide, you assume 100% risk and 100% responsibility for your decision and for your action. If you corrupt the firmware in the process, your only recourse will be to re-flash the BIOS.
Preparation:
Create a folder in your
Documents or
Downloads directory called
UEFI-Check. Then download all of the following files into the
UEFI-Check directory:
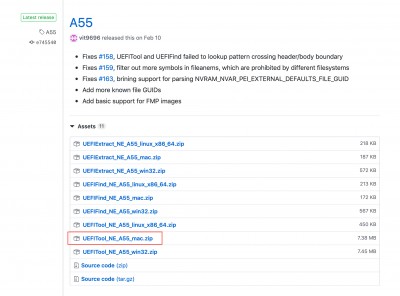
- UEFI Tool
- The only file needed is UEFITool_NE_A55_mac.zip as shown.
- This is a GUI that we'll run directly from Finder.
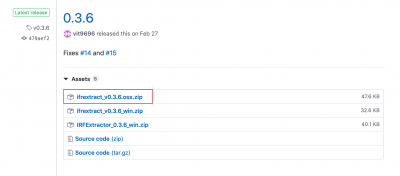
- ifrextract
- The only file needed is ifrextract_v0.3.6.osx.zip as shown.
- We will run this from Terminal. It is a command-line executable.
- Gigabyte Designare Z390 Firmware from Gigabyte Website
- Make sure that you download the correct version. If your motherboard is running F6, download the F6 firmware, etc.
Procedure:
- After downloading the three files above into the UEFI-Check folder in either the Documents or Downloads directory, start Terminal and 'cd' into that directory. If you chose the Downloads folder you would type
cd ~/Downloads/UEFI-Check. If you chose the Documents folder you would type cd ~/Documents/UEFI-Check.
- Rename the Gigabyte firmware file.
- If you downloaded the F6 version, the default filename will be
Z390DESI.F6.
- We need to give the file a ".bin" extension by typing
mv Z390DESI.F6 Z390DESI.F6.bin.
- Double-click to run UEFI-Tool.
- Select File --> Open image file...
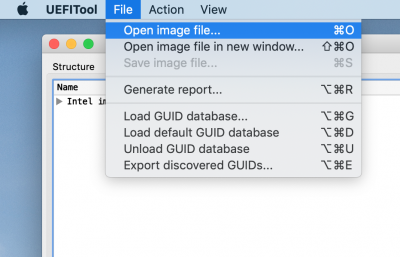
- Select the file Z390DESI.F6.bin.
- You will see something like this:

- Select Action --> Search... and click on Text in the search dialog. And enter the search text, which is CFG Lock in this example. Click OK.

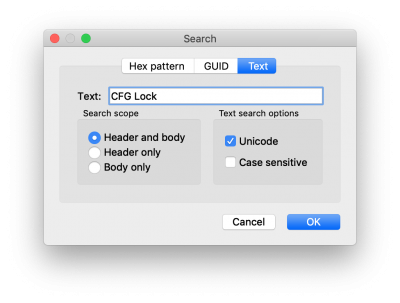
- You will see the search result(s) in the bottom pane.
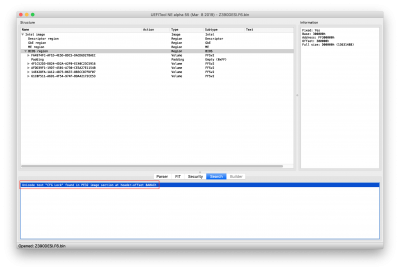
- Now double-click on the search result (the red highlighted row in the image above) so that the "container" of this text is identified as shown below.
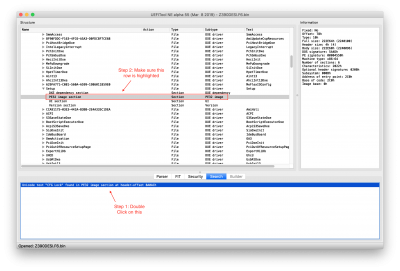
- Now CTRL-Click or Right-Click on the PE32 Image and choose Extract body... as shown.

- In the File Save dialog, replace the default name with simply Setup.bin as shown.

- And we're done with UEFI Tool. Choose UEFITool --> Quit UEFITool.
- Go back to the Terminal window. We're ready to convert the Setup.bin file into a readable text file.
- Ensure you are in the UEFI-Check directory in Terminal.
- Type
./ifrextract Setup.bin Setup.text.
- And it's done.
- Now let's have a look at the result. You may open the Setup.txt file in TextEdit, BBEdit, or even "vi" or "emacs", etc. and search for "CFG Lock". If we do this directly in Terminal by using "vi" we see CFG Lock on line 7039 as shown.
- The text in blue tells us that this parameter is at offset 0x5C1 and has a value of 0x1. If we look immediately below that, the green box tells us that the Disabled value is 0x0 and the Enabled value is 0x1 (default).
- So by default the CFG Lock is Enabled.
- To disable the CFG Lock, we would need to write the value 0x0 to offset 0x5C1.
- This is for firmware version F6 on Gigabyte Designare Z390 motherboard only.
- If you have a different motherboard or a different firmware version, you should follow this guide to identify the correct offset value and the correct enable/disable value.
Modifying the Firmware:
WARNING: This procedure is only for users who cannot install a certain device driver because of the locked 0xE2 MSR register. If your system is running properly you should not make any changes to its firmware. One careless mistake can corrupt the firmware. If you decide to modify your firmware settings by following this guide, you assume 100% risk and 100% responsibility for your decision and for your action. If you corrupt the firmware in the process, your only recourse will be to re-flash the BIOS.
Now that we know that
CFG Lock is at
Offset 0x5C1, we need to change its value from 0x1 (enabled) to 0x0 (disabled). To accomplish this, follow the procedure below very carefully.
- Find a spare USB flash disk. It may be USB 2 or USB 3 with a capacity of 1GB or more. Everything on the USB disk will be deleted.
- Boot Mojave and insert the USB disk into a port on the front of the PC or the rear IO panel.
- Run Disk Utility and follow the 5 steps shown.
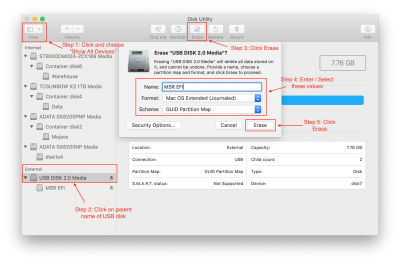
- When the formatting is complete, the USB flash disk will be mounted with the name MSR EFI.
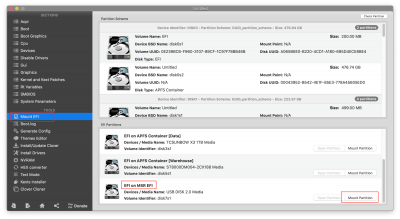
- Use Clover Configurator or EFI Agent to mount the EFI partition of this USB disk as shown. A new disk will be mounted on the desktop, with the name EFI.
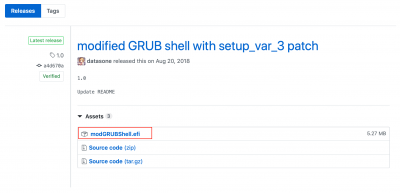
- Download the special build of grub from here. In particular, download the file modGRUBShell.efi as shown.
- Locate the downloaded file in Finder and rename the file to bootx64.efi
- Open the EFI disk (Step 5) in Finder and create a folder named EFI and a subfolder named BOOT. Then copy bootx64.efi into the BOOT folder. The resulting structure should look like this:

- Leave the USB disk plugged into the Hackintosh and reboot.
- At the BIOS splash screen, press F12 to bring up the Gigabyte Boot Selection menu.
- Choose the USB flash disk.
- You will now be presented with the grub> prompt.
- You can press the TAB key to see a list of the available commands. You'll see that this particular grub shell supports a large set of commands, including:
- setup_var
- setup_var2
- setup_var_3
- We will use the last one, setup_var_3, to modify the CFG Lock parameter. But first, type the following command to check the current value:
setup_var_3 0x5C1- WARNING: Replace 0x5C1 with the actual offset value for your own motherboard and firmware.
- You might see two replies.
- Reply 1 will be from a Setup variable that is over 5000 bytes.
- Reply 2 will be from a Setup variable that is only 9 bytes long. This reply will be followed by a message indicating that this particular variable will be ignored. This is what want. We don't want to change this 9-byte variable. Instead, we want to change the bigger 5000+ byte variable.
- If everything looks good so far, you are ready to make the change. Type this very carefully:
setup_var_3 0x5C1 0x0- WARNING: Replace 0x5C1 with the actual offset value for your own motherboard and firmware.
- This stores the value 0x0 into the CFG Lock parameter, which disables it.
- Verify that the change was made by typing:
setup_var_3 0x5C1- WARNING: Replace 0x5C1 with the actual offset value for your own motherboard and firmware.
- The returned value should be 0x0 instead of 0x1.
- Type exit to reboot. Remove the USB flash disk. You are done.
- Boot into Mojave now.
- Use Clover Configurator or EFI Agent to mount the EFI partition of the Mojave SSD.
- Use Clover Configurator to edit your config.plist and make the following changes:
- Kernel and Kext Patches --> KernelPM --> uncheck
ACPI section --> PluginType --> uncheck [Update: Leave this checked ON]
- Save the config.plist.
- Reboot and log back into Mojave.
Procedure Complete.

