Contribute
Register

[SUCCESS] Gigabyte Designare Z390 (Thunderbolt 3) + i7-9700K + AMD RX 580

*** Mini Guide: How to Customize Device Names and Properties ***

In most cases macOS identifies your PCI devices and shows them to you in System Information --> PCI. But there are always some devices that are not listed or devices whose names we wish to change. In most cases, the information presented in the System Information --> PCI page is informational only and has no functional effect. This means we can choose our own property values (within reason).

But some applications such as Adobe Premiere (and possibly others) are sensitive to the device names -- but only in certain specific cases. If you have two or more graphics cards, regardless of whether they are iGPU or dGPU or eGPU, some applications prioritize the graphics card whose name comes first alphabetically. So if you wanted these applications to prioritize Vega over the Intel UHD 630, you would have to rename one or the other, or both. Because the letter I comes before V, the Intel UHD 630 will be prioritized by default. To prioritize the Vega over the Intel, we could rename it to "AMD Vega" because, well, A comes before everything else!

The procedure for customizing device names and properties is rather straightforward. We'll go through an example.

Preparation:
Download DarwinDumper 3.0.4 from any of several locations. Here's one download location.

Procedure:
  1. Launch Darwin Dumper. If you encounter a security warning, open System Preferences --> Security & Privacy --> General and allow macOS to run the application.
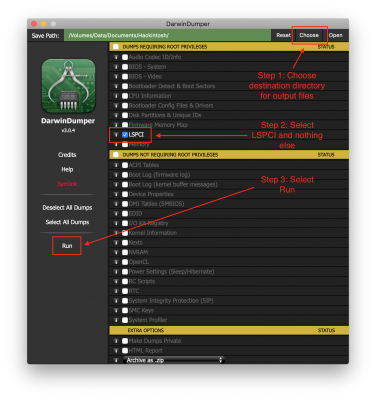
  2. Perform the 3 steps shown:
    Darwin Dumper 1.png
  3. You will be prompted for your system password, so enter it.
  4. A couple of seconds later, Darwin Dumper will quit automatically and will pop up a Finder window showing the output files. Here's the resulting folder from my system:
    Darwin Dumper Files.png
  5. Open the LSPCI folder and double-click lspci map (M).txt. It should open in TextEdit or you can right-click and open it in an app of your choice. This is a condensed summary of all the PCI devices and their PCI paths. If you wish to view a more detailed report, open the file lspci detailed (nnvvbxxxx).txt.
  6. Here's what my condensed summary looks like, with some key devices highlighted in red and the AMD RX 580 highlighted in green.
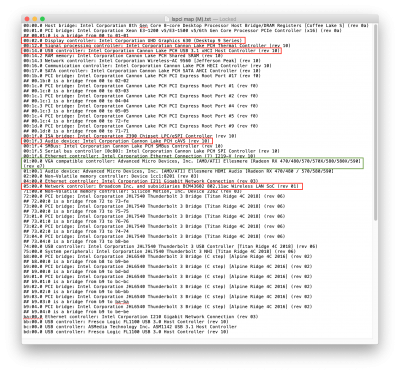
    Darwin Summary.png
  7. Let's say we want to modify the name of our RX 580 graphics card. We see in green that the card has a PCI address (first few characters in the green line) of 01:00.0.
  8. Now mount the EFI partition of your Mojave SSD, run Clover Configurator, and open your config.plist.
  9. Go to the Devices section and take a look at the Arbitrary tab.
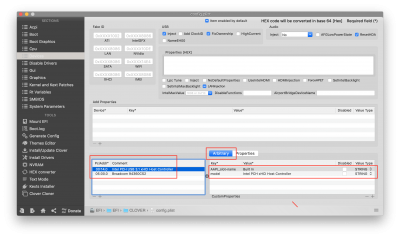
    CC - Devices.png
  10. If you followed the section entitled Specifying Device Names and Types in the build guide, your config.plist will look like the image above, with two PCI devices already named (Intel PCH USB 3.1 xHCI Host Controller and Broadcom 94360CS2). [If you're using a different WiFi card, you can use this mini-guide to rename it.]
  11. Notice the PciAddr* field. The first entry is 00:14.0 (USB controller) which is the 2nd red highlight in Step 6 above. The next entry is 05:00.0 (Broadcom WiFi), which is the last red highlight in Step 6. Now you know where these PCI Addresses came from -- they came from a Darwin Dump.
  12. Now look at the green highlight in Step 6. This is the AMD RX 580 graphics card. And its PciAddr* is 01:00.0. This corresponds to Slot 1. If your RX 580 or Vega is in a different slot, you will see a different PCI Address.
  13. To specify a name for this card, we need to add a new Arbitrary entry as follows:
    • Click the + icon to add a new entry.
    • Enter the PCI Address as shown in the Darwin Dump. For the RX 580 in this example, we would enter 01:00.0
    • Enter a Comment for your own reference. This will not appear in macOS.
    • Now enter one or more Custom Properties in the box on the right by clicking the + icon on the bottom right.
    • The name of the device is specified in the parameter model. Therefore, to name our RX 580 as "AMD RX 580" we would create a custom property where key is model, Value is AMD RX 580, and Value Type is String. The result should look like this:
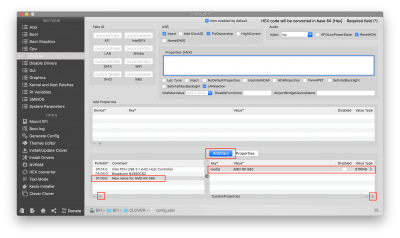
      CC - New Name.png
    • But we're not finished yet. We can also specify a Slot ID. If we have 2 or more graphics cards, we would create separate entries for each one. We can give each one the same name or different names. But we would assign different Slot IDs for each card.
    • Slot ID is specified by adding the Custom Property AAPL,slot-name. In this example, the RX 580 is in Slot 1, so we would create another Custom Property as follows: Key is AAPL,slot-name, Value is Slot-1, and Value Type is String. The final result is shown here:
      CC - Slot Name.png
  14. Now save the file and reboot for changes to take effect.
Verification:
After rebooting the system, open System Information --> PCI (go to About this Mac and choose System Report) and check if your device is listed along with the custom properties you specified.

Notes and Warnings:
  • If you are using the RX580 or Vega SSDT (in CLOVER/ACPI/patched folder), you should modify names and slot IDs in the SSDT itself.
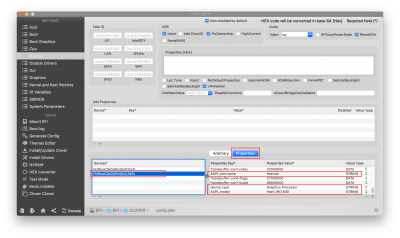
  • If you want to add or modify custom properties for the Intel UHD 630, you can add the custom properties to Devices --> Properties instead of Devices --> Arbitrary. This is because we are already injecting various custom properties for the Intel UHD 630 as you can see below.
    CC - Intel UHD.png
--- end of procedure ---
 
Last edited:
Not a problem with the quality of the drives, they are SanDisks and I tried several ones.

The installer log has this set of lines that seem to indicate the problem. Please note that the file name used in the line "Validating asset: ..." ends in .dmg.partial vs. .dmg.partialState on the actual drive.

Mar 31 15:18:52 iMac osinstallersetupd[623]: Started downloading package com.apple.dmg.InstallESD (linkfile:///Volumes/Image%20Volume/Install%20macOS%20Mojave.app/Contents/SharedSupport/InstallESD.dmg)
Mar 31 15:22:31 iMac osinstallersetupd[623]: Validating asset: /Volumes/Mojave/macOS Install Data/InstallESD.dmg.partial
Mar 31 15:22:31 iMac osinstallersetupd[623]: Will verify dmg as pkgdmg.
Mar 31 15:22:31 iMac osinstallersetupd[623]: Getting offset for dmg in pkg: /Volumes/Mojave/macOS Install Data/InstallESD.dmg.partial
Mar 31 15:22:31 iMac osinstallersetupd[623]: Verifying InstallESD.dmg
Mar 31 15:22:55 iMac osinstallersetupd[623]: Failed to validate
Mar 31 15:22:55 iMac osinstallersetupd[623]: Failed to retrieve linkfile:///Volumes/Image%20Volume/Install%20macOS%20Mojave.app/Contents/SharedSupport/InstallESD.dmg (Error Domain=com.apple.osinstallersetup.LinkFileDownload Code=8 "An error occurred validating the installer data. The download is either damaged or incomplete." UserInfo={NSLocalizedDescription=An error occurred validating the installer data. The download is either damaged or incomplete., NSLocalizedRecoverySuggestion=Redownload the installer and try again.})
Good catch! That looks like a bad/incomplete download. Suggestions:
  • On your real Mac, open the Applications folder in Finder.
  • Right-click "Install MacOS Mojave" and choose Show Package Contents.
  • Then open the SharedSupport folder and check the file InstallESD.dmg
  • This is what a good download looks like:
    Screen Shot 2019-03-31 at 4.45.00 PM.png
 
Thanks once again CaseySJ. You are a very helpful person to keep refining the guide for the benefit of others.

I think this is by far the best Hackintosh I've ever built in all my years of doing this. I think it was just after the release of Leopard that I built my first Hackintosh; thankfully it's much easier now than back then!
 
*** Mini Guide: How to Customize Device Names and Properties ***

In most cases macOS identifies your PCI devices and shows them to you in System Information --> PCI. But there are always some devices that are not listed or devices whose names we wish to change. In most cases, the information presented in the System Information --> PCI page is informational only and has no functional effect. This means we can choose our own property values (within reason).

But some applications such as Adobe Premiere (and possibly others) are sensitive to the device names -- but only in certain specific cases. If you have two or more graphics cards, regardless of whether they are iGPU or dGPU or eGPU, some applications prioritize the graphics card whose name comes first alphabetically. So if you wanted these applications to prioritize Vega over the Intel UHD 630, you would have to rename one or the other, or both. Because the letter I comes before V, the Intel UHD 630 will be prioritized by default. To prioritize the Vega over the Intel, we could rename it to "AMD Vega" because, well, A comes before everything else!

The procedure for customizing device names and properties is rather straightforward. We'll go through an example.

Preparation:
Download DarwinDumper 3.0.4 from any of several locations. Here's one download location.

Procedure:
  1. Launch Darwin Dumper. If you encounter a security warning, open System Preferences --> Security & Privacy --> General and allow macOS to run the application.
  2. Perform the 3 steps shown:
    View attachment 396513
  3. You will be prompted for your system password, so enter it.
  4. A couple of seconds later, Darwin Dumper will quit automatically and will pop up a Finder window showing the output files. Here's the resulting folder from my system:
    View attachment 396515
  5. Open the LSPCI folder and double-click lspci map (M).txt. It should open in TextEdit or you can right-click and open it in an app of your choice. This is a condensed summary of all the PCI devices and their PCI paths. If you wish to view a more detailed report, open the file lspci detailed (nnvvbxxxx).txt.
  6. Here's what my condensed summary looks like, with some key devices highlighted in red and the AMD RX 580 highlighted in green.
    View attachment 396527
  7. Let's say we want to modify the name of our RX 580 graphics card. We see in green that the card has a PCI address (first few characters in the green line) of 01:00.0.
  8. Now mount the EFI partition of your Mojave SSD, run Clover Configurator, and open your config.plist.
  9. Go to the Devices section and take a look at the Arbitrary tab.
    View attachment 396519
  10. If you followed the section entitled Specifying Device Names and Types in the build guide, your config.plist will look like the image above, with two PCI devices already named (Intel PCH USB 3.1 xHCI Host Controller and Broadcom 94360CS2). [If you're using a different WiFi card, you can use this mini-guide to rename it.]
  11. Notice the PciAddr* field. The first entry is 00:14.0 (USB controller) which is the 2nd red highlight in Step 6 above. The next entry is 05:00.0 (Broadcom WiFi), which is the last red highlight in Step 6. Now you know where these PCI Addresses came from -- they came from a Darwin Dump.
  12. Now look at the green highlight in Step 6. This is the AMD RX 580 graphics card. And its PciAddr* is 01:00.0. This corresponds to Slot 1. If your RX 580 or Vega is in a different slot, you will see a different PCI Address.
  13. To specify a name for this card, we need to add a new Arbitrary entry as follows:
    • Click the + icon to add a new entry.
    • Enter the PCI Address as shown in the Darwin Dump. For the RX 580 in this example, we would enter 01:00.0
    • Enter a Comment for your own reference. This will not appear in macOS.
    • Now enter one or more Custom Properties in the box on the right by clicking the + icon on the bottom right.
    • The name of the device is specified in the parameter model. Therefore, to name our RX 580 as "AMD RX 580" we would create a custom property where key is model, Value is AMD RX 580, and Value Type is String. The result should look like this:
      View attachment 396528
    • But we're not finished yet. We can also specify a Slot ID. If we have 2 or more graphics cards, we would create separate entries for each one. We can give each one the same name or different names. But we would assign different Slot IDs for each card.
    • Slot ID is specified by adding the Custom Property AAPL,slot-name. In this example, the RX 580 is in Slot 1, so we would create another Custom Property as follows: Key is AAPL,slot-name, Value is Slot-1, and Value Type is String. The final result is shown here:
      View attachment 396529
  14. Now save the file and reboot for changes to take effect.
Verification:
After rebooting the system, open System Information --> PCI (go to About this Mac and choose System Report) and check if your device is listed along with the custom properties you specified.

Notes and Warnings:
  • If you are using the RX580 or Vega SSDT (in CLOVER/ACPI/patched folder), you should modify names and slot IDs in the SSDT itself.
  • If you want to add or modify custom properties for the Intel UHD 630, you can add the custom properties to Devices --> Properties instead of Devices --> Arbitrary. This is because we are already injecting various custom properties for the Intel UHD 630 as you can see below.
    View attachment 396526
--- end of procedure ---

BRAVO. Thank you very much.
 
*** Mini Guide: How to Customize Device Names and Properties ***

In most cases macOS identifies your PCI devices and shows them to you in System Information --> PCI. But there are always some devices that are not listed or devices whose names we wish to change. In most cases, the information presented in the System Information --> PCI page is informational only and has no functional effect. This means we can choose our own property values (within reason).

But some applications such as Adobe Premiere (and possibly others) are sensitive to the device names -- but only in certain specific cases. If you have two or more graphics cards, regardless of whether they are iGPU or dGPU or eGPU, some applications prioritize the graphics card whose name comes first alphabetically. So if you wanted these applications to prioritize Vega over the Intel UHD 630, you would have to rename one or the other, or both. Because the letter I comes before V, the Intel UHD 630 will be prioritized by default. To prioritize the Vega over the Intel, we could rename it to "AMD Vega" because, well, A comes before everything else!

The procedure for customizing device names and properties is rather straightforward. We'll go through an example.

Preparation:
Download DarwinDumper 3.0.4 from any of several locations. Here's one download location.

Procedure:
  1. Launch Darwin Dumper. If you encounter a security warning, open System Preferences --> Security & Privacy --> General and allow macOS to run the application.
  2. Perform the 3 steps shown:
    View attachment 396513
  3. You will be prompted for your system password, so enter it.
  4. A couple of seconds later, Darwin Dumper will quit automatically and will pop up a Finder window showing the output files. Here's the resulting folder from my system:
    View attachment 396515
  5. Open the LSPCI folder and double-click lspci map (M).txt. It should open in TextEdit or you can right-click and open it in an app of your choice. This is a condensed summary of all the PCI devices and their PCI paths. If you wish to view a more detailed report, open the file lspci detailed (nnvvbxxxx).txt.
  6. Here's what my condensed summary looks like, with some key devices highlighted in red and the AMD RX 580 highlighted in green.
    View attachment 396527
  7. Let's say we want to modify the name of our RX 580 graphics card. We see in green that the card has a PCI address (first few characters in the green line) of 01:00.0.
  8. Now mount the EFI partition of your Mojave SSD, run Clover Configurator, and open your config.plist.
  9. Go to the Devices section and take a look at the Arbitrary tab.
    View attachment 396519
  10. If you followed the section entitled Specifying Device Names and Types in the build guide, your config.plist will look like the image above, with two PCI devices already named (Intel PCH USB 3.1 xHCI Host Controller and Broadcom 94360CS2). [If you're using a different WiFi card, you can use this mini-guide to rename it.]
  11. Notice the PciAddr* field. The first entry is 00:14.0 (USB controller) which is the 2nd red highlight in Step 6 above. The next entry is 05:00.0 (Broadcom WiFi), which is the last red highlight in Step 6. Now you know where these PCI Addresses came from -- they came from a Darwin Dump.
  12. Now look at the green highlight in Step 6. This is the AMD RX 580 graphics card. And its PciAddr* is 01:00.0. This corresponds to Slot 1. If your RX 580 or Vega is in a different slot, you will see a different PCI Address.
  13. To specify a name for this card, we need to add a new Arbitrary entry as follows:
    • Click the + icon to add a new entry.
    • Enter the PCI Address as shown in the Darwin Dump. For the RX 580 in this example, we would enter 01:00.0
    • Enter a Comment for your own reference. This will not appear in macOS.
    • Now enter one or more Custom Properties in the box on the right by clicking the + icon on the bottom right.
    • The name of the device is specified in the parameter model. Therefore, to name our RX 580 as "AMD RX 580" we would create a custom property where key is model, Value is AMD RX 580, and Value Type is String. The result should look like this:
      View attachment 396528
    • But we're not finished yet. We can also specify a Slot ID. If we have 2 or more graphics cards, we would create separate entries for each one. We can give each one the same name or different names. But we would assign different Slot IDs for each card.
    • Slot ID is specified by adding the Custom Property AAPL,slot-name. In this example, the RX 580 is in Slot 1, so we would create another Custom Property as follows: Key is AAPL,slot-name, Value is Slot-1, and Value Type is String. The final result is shown here:
      View attachment 396529
  14. Now save the file and reboot for changes to take effect.
Verification:
After rebooting the system, open System Information --> PCI (go to About this Mac and choose System Report) and check if your device is listed along with the custom properties you specified.

Notes and Warnings:
  • If you are using the RX580 or Vega SSDT (in CLOVER/ACPI/patched folder), you should modify names and slot IDs in the SSDT itself.
  • If you want to add or modify custom properties for the Intel UHD 630, you can add the custom properties to Devices --> Properties instead of Devices --> Arbitrary. This is because we are already injecting various custom properties for the Intel UHD 630 as you can see below.
    View attachment 396526
--- end of procedure ---
Thank you!

Before I attempted the renaming I did try something else.
I had read that using the igpu with the Vega cards can have a performance impact so I tried disabling the igpu, switching to iMacPri1,1 and removing the references in the config file.
I am seeing MUCH better performance in Cinema4d and rendering however I still can't render h.264.
I grow vexed..
 
Hello Victor,

Thank you for posting detailed logs and CLOVER folder. Your configuration looks correct; you also have the NO-CNVW SSDT installed. I've added WhateverGreen configuration to your config.plist and removed "IntelGFX" and "Platform-ID". These and other parameters are better handled by WhateverGreen.

What is the make and model of your Firewire card? Is it a x1 card?

@rj510 has posted some experiences here with his Vantec Firewire card, which is a x1 card, but seems to work best in a long slot (x16). However, with the use of NO-CNVW, perhaps the Vantec will function properly in x1.

@rj510: Do you experience any shutdown problems with the Vantec card installed?

Since installing your config.plist, I can't get apps like Final Cut Pro X to start, disabling the integrated graphics in the BIOS gets it back to work though. Should I better change my profile to iMacPro1,1 or something like that ? (right now I have the MacMini8,1 profile)

By the way, I got shutdown to work (no restart/reboot in 1 sec) with the Firewire card installed! I just had to activate the obvious (I can't tell why I missed it until now) option in Clover "ACPI -> Fixes (1) -> FixFirewire :) I found this mentioned by @makoffee in this thread.
 
Last edited:
I just AirDropped 30 photos from my iPhone X to the Hackintosh in 3 groups without any problem. I'm using an AMD RX580, however.
In 3 groups is like doing only 3 Airdrop actions. You have to send them one by one so that you get a notification for each photo
 
I'm still not able to build the USB stick that I originally used (with 10.14.0 on it) with UniBeast without it throwing the "can't detach" error. I've looked online quite a bit and it literally may just not want to eject the USB stick from the UniBeast installer (In other words - it may be a fine install but for some reason macOS doesn't want to unmount the USB stick after the install).

I'm too cheap to just go buy another one so I think I'm going to attempt using it. I'll let you all know what happens!
You need to have your hardware profile filled out as per rules (the ones you agreed to when signing up here)
 
Since installing your config.plist, I can't get apps like Final Cut Pro X to start, disabling the integrated graphics in the BIOS gets it back to work though. Should I better change my profile to iMacPro1,1 or something like that ? (right now I have the MacMini8,1 profile)
This is discussed in the section For Final Cut Pro X (FCPX) and iMovie Users.

By the way, I got shutdown to work (no restart/reboot in 1 sec) with the Firewire card installed! I just had to activate the obvious (I can't tell why I missed it until now) option in Clover "ACPI -> Fixes (1) -> FixFirewire :) I found this mentioned by @makoffee in this thread.
Good to know! I'll add this to the section Contributed Files and Tips.
 
Last edited:
Back
Top