Contribute
Register

[SUCCESS] Gigabyte Designare Z390 (Thunderbolt 3) + i7-9700K + AMD RX 580

*** Interim Status: CPU Voltage and Fan RPM in HW Monitor ***

With special thanks to @rj510 and the great work he has done in configuring the only ITX motherboard with on-board Thunderbolt 3 (ASRock Z390 Phantom Gaming-ITX/ac), we may be able to monitor CPU voltage and fan RPMs on the Designare motherboard. Check out his build guide here.

First, let's take a look at the results on Designare Z390 with both (a) HWMonitorSMC2 v2.4.5 and (b) iStat Menus.

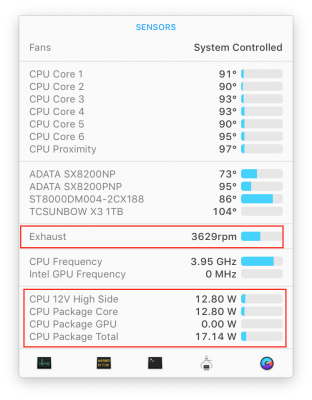
Screen Shot 2019-05-26 at 3.59.58 PM.png Screen Shot 2019-05-26 at 4.04.10 PM.png

What follows is a very preliminary guide for doing this. You MUST make a full bootable clone of your Mojave SSD and perform the procedure on the clone. This means copying the EFI partition as well. Reason: If you make a mistake, there's a good chance you'll end up with a system that kills DisplayPort video output (HDMI will still work) and I do not know how to recover from that.

PREPARATION STAGE 1:
  1. Make all of the following changes to the CLONE disk. Leave the main Mojave SSD untouched.
    • Please use a spare SSD, preferably installed in an external USB 3 enclosure such as this one.
  2. Make a clone of your Mojave SSD. This includes copying the EFI partition to the clone disk.
    • Give this USB SSD a different name such as MOJAVE-EXTERNAL.
  3. Download the attached ZIP file: Updated-Sensors.zip
PREPARATION STAGE 2:
  1. Connect the cloned USB SSD to a USB 3 port on the Hackintosh.
  2. Reboot and press F12 at BIOS splash screen. Select the USB SSD to boot from.
  3. At the Clover Boot Menu, select Boot macOS Mojave from MOJAVE-EXTERNAL (use the actual name of the USB SSD).
  4. Login to Mojave.
PROCEDURE:
  1. Mount the EFI partition of the USB SSD.
  2. Open the EFI/CLOVER folder and copy the files in the attached Updated-Sensors.zip to the indicated directories.
    Screen Shot 2019-05-26 at 4.24.26 PM_resize.png
    • Copy VirtualSmc.efi to CLOVER/drivers64UEFI folder.
    • Copy everything in CLOVER-kexts-Other to the CLOVER/kexts/Other folder.
  3. Now delete the following files from your CLOVER folder:
    • CLOVER/drivers64Uefi/SMCHelper-64.efi
    • CLOVER/kexts/Other/FakeSMC.kext and all of the FakeSMC_Sensor kexts that might (or might not) be in this directory
  4. We also have to delete FakeSMC from the /Library/Extensions folder as follows:
    • Use Finder to delete the following files from /Library/Extensions:
      • FakeSMC.kext
      • FakeSMC_ACPISensors.kext
      • FakeSMC_CPUSensors.kext
      • FakeSMC_GPUSensors.kext
      • FakeSMC_LPCSensors.kext
      • FakeSMC_SMMSensors.kext
    • Empty the trash.
    • Now run Kext Utility to rebuild kernel cache.
  5. Open config.plist with Clover Configurator and make sure that System Parameters --> Inject Kexts is set to Detect.
  6. Double-check all preceding Steps 1 through 5.
TEST:
  1. Reboot the computer, press F12 at BIOS splash screen, choose the USB SSD to boot from.
  2. At Clover Boot Menu, once again choose Boot macOS Mojave from MOJAVE-EXTERNAL
  3. If the system boot properly and the login window appears, proceed to the next step.
    • If you encounter a freeze during boot or a black screen, abort the process. It might be better to wait a few days until more user experience arrives and the procedure is fine-tuned.
  4. Congrats for making it this far!
  5. Now download and run the attached HWMonitorSMC2 (v2.4.5).
    • The icon in red belongs to HWMonitorSMC2. The icon in green belongs to iStat Menus.
      Screen Shot 2019-05-26 at 4.42.37 PM.png

    • To resize the HWMonitor window, open it by clicking the menu bar icon.
    • Then drag the window from its title bar to move it to any other spot on the desktop. This detaches the window.
    • Now resize the window by dragging from its bottom right corner.
    • Click the menu bar icon to close the window. And click it again to reopen it. It should now be resized.
  6. Take a look at both the HWMonitorSMC2 and iStat Menu windows.
  7. Post your screenshots.
  8. If you have any suggestions or tips on this subject, please share them.
** End **
 

Attachments

  • Updated-Sensors.zip
    353.5 KB · Views: 298
  • HWMonitorSMC2 2.4.5.zip
    6.5 MB · Views: 275
Last edited:
MacMini 8,1 is a good match for your system. Platform ID would be 0x3E910003 or 0x3E920003 for headless operation.

In the SMBIOS page of Clover Configurator, the pop-up menu toward the bottom right side will populate all fields. If you’re using an older version of Clover Configurator, try the latest version.
Not sure what's up, headless mode no beuno.

Mac mini 8,1 setup I've tried platform ID 3E980003 from the page 1 guide. Both 3E910003 and 31920003 from your response. Each option results in an error when checked with VDODecoder Checker, and no activity on the Intel Power Gadget Frequency graphs. Any ideas?

In each case headless platform id was defined in the Devices tab of clover. Is this what is referred to as WEG?
 
not sure what's up, headless mode no beuno.

Mac mini 8,1 setup I've tried platform ID 3E980003 from the page 1 guide and both 3E910003 and 31920003 from your response. Each option results in an error when checked with VDODecoder Checker and no activity on the Intel Power Gadget Frequency graphs. Any ideas?
I'm not familiar with VDODecoder Checker. Have you tried using VideoProc to see if HEVC and H.264 are enabled on the iGPU? Remember also that if the system has multiple GPUs, some apps automatically pick the GPU in alphabetical name order. So if your GPUs are named:
  • AMD RX 580
  • Intel UHD 630
Then the AMD RX 580 will be prioritized. We can also run IORegistryExplorer, scroll the device tree to IGPU@2 and see if AppleIntelFramebuffer... is attached as an immediate child node. That confirms that iGPU is enabled and accelerated.

in each case headless platform id was defined in the Devices tab of clover, is this what is referred to as WEG?
Yes, we specify WEG (WhateverGreen) in the Devices --> Properties section of Clover Configurator.
 
I'm not familiar with VDODecoder Checker. Have you tried using VideoProc to see if HEVC and H.264 are enabled on the iGPU? Remember also that if the system has multiple GPUs, some apps automatically pick the GPU in alphabetical name order. So if your GPUs are named:
  • AMD RX 580
  • Intel UHD 630
Then the AMD RX 580 will be prioritized. We can also run IORegistryExplorer, scroll the device tree to IGPU@2 and see if AppleIntelFramebuffer... is attached as an immediate child node. That confirms that iGPU is enabled and accelerated.


Yes, we specify WEG (WhateverGreen) in the Devices --> Properties section of Clover Configurator.
[/QUOTE

Look good on your end?

408472


408474


408471
 

Attachments

  • Screen Shot 2019-05-26 at 8.39.31 PM.png
    Screen Shot 2019-05-26 at 8.39.31 PM.png
    11.9 KB · Views: 278
@bsholbrook,

Those settings are backwards. In Devices --> Properties we must specify hex data values in reverse byte order. Please change line one in that screenshot to:

0300923E

and try again.
 
@bsholbrook,

Those settings are backwards. In Devices --> Properties we must specify hex data values in reverse byte order. Please change line one in that screenshot to:

0300923E

and try again.
same issue... the search continues
 
Holy crap,
Posting this as a PSA after I spent the last 8 hours pulling my hair out because this issue was making no sense at all!

Last night, I decided to run a bunch of windows updates. (I rarely use Windows, but the latest major update just came out, and I decided it was a decent time to run updates on that side/drive.) The updates included the May 2019 Windows Update, and a bunch of driver updates including latest AMD drivers for my Radeon VII and Intel drivers for the UHD 630. After running all these updates and only (re)booting to Windows for a few hours and leaving the system running Windows overnight, I finally booted back into macOS this morning.

Keep in mind my macOS side was running flawlessly before these Windows updates. And nothing that I did with these updates would have or should have affected my macOS disk in any way. I also did not change anything in the BIOS. Just windows software and windows driver updates. Nonetheless as soon as I went back to macOS, my system was no longer able to boot. It would always get all the way to the point where the login screen would normally load and then instant reboot. I may on occasion see the mouse pointer appear for a split second- then reboot.

At first I thought it was an issue related to my Radeon VII - I tried everything I could think of - booting macOS safe mode worked without acceleration. But, once the framebuffer loaded (or whatever it is that happens when the login screen appears), during normal boot the system would immediately reboot. I was worried that something happened with the latest Windows updates that messed up my Radeon power settings, as the problem also reminded me of issues I had with Vega 64 and the reboots it could suffer in macOS without an edited power table.

Finally, I discovered that if I disabled the iGPU in BIOS, I could boot successfully again.

I then tried rolling back Windows drivers for the Radeon, IGPU, tried new Clover IGPU settings (even though mine were working fine before), loading optimized settings, fully recreating BIOS settings, hours and hours of fruitless troubleshooting. I just could no longer use the iGPU + Radeon VII together even with a known previously working setup.

I finally re-flashed my BIOS. As soon as I did this and re-created my BIOS settings to exactly the way they were before-

boot successful.

So something with those Windows updates messed with the UEFI or some system firmware in a way that made it incompatible with macOS. And re-flashing the BIOS restored the compatible state. Maybe the ME firmware was updated? I have no idea, but be very careful running the latest Windows updates. It could break your system for macOS. I have not booted back into Windows since fixing this, as for all I know it may mess up the system again. If you suddenly find your iGPU causes instant reboots when loading macOS, you may need to re-flash your BIOS to recover your working state.

g\
 
same issue... the search continues
Feel free to compress and upload your Clover folder and a screenshot of /Library/Extensions. You may redact serial number from SMBIOS section of config.plist.
 
@genzai, despite the recent improvements in Windows 10, I can honestly say that it looks and feels like a colossal mess. It is better to buy or build a separate cheap Windows PC if someone really needs to use this monstrosity.
 
@genzai, despite the recent improvements in Windows 10, I can honestly say that it looks and feels like a colossal mess. It is better to buy or build a separate cheap Windows PC if someone really needs to use this monstrosity.
It could have been more appropriately named "Windows 10 Telemetry Edition."
 
Back
Top