Contribute
Register

[SUCCESS] Gigabyte Designare Z390 (Thunderbolt 3) + i7-9700K + AMD RX 580

Hello @mango1122,

Your setup looks good. Thunderbolt Switch is at port 3 and configured correctly. I'll add this to the Repository and create a Thunderbolt DROM micro-guide.

The only potential issue (and it may or may not be consequential) is a set of IOThunderboltFamily errors like this:

(IOThunderboltFamily) IOThunderboltController::configReadDWord - ERROR: synchronous call on workloop thread.
(IOThunderboltFamily) IOThunderboltSwitch<0x0>(0x0)::listenerCallback - Thunderbolt HPD packet for route = 0x0 port = 1 unplug = 1
(IOThunderboltFamily) IOThunderboltController::configReadDWord - ERROR: synchronous call on workloop thread.
(IOThunderboltFamily) IOThunderboltSwitch<0x0>(0x0)::listenerCallback - Thunderbolt HPD packet for route = 0x0 port = 2 unplug = 1

Are you seeing any real world issues with Thunderbolt?

None so far. Thanks for taking a look. Sleep wake also works fine. I do have a 5 second pause near loading ACPI tables but that’s tolerable. Anything wrong/missing from my SSDT ? In the PCI tab (screenshot from before) I see a lot of fields not populated.
 
*** Thunderbolt DROM Micro-Guide for ASRock Z390/Z370 ITX/ac ***
Credit: @Elias64Fr and @mango1122
Please do not quote this micro-guide in its entirety. Post a link instead.


Target Audience for this Procedure:
  • ASRock Z390 Phantom Gaming ITX/ac with activated Thunderbolt Bus.
  • ASRock Z370 Fatal1ty Gaming-ITX/ac with activated Thunderbolt Bus.
  • To activate Thunderbolt Bus, it's necessary to flash a modified firmware onto the motherboard.
  • Become thoroughly familiar with the following posts:
  • If System Information --> Thunderbolt says No drivers are loaded, then this does not apply to you.
Benefits / Purpose:
  • Just as your Mac's serial number is unique and your Ethernet card's MAC address is unique, we need to assign a unique ID to the Thunderbolt controller.
  • Thunderbolt Ethernet Bridge and Target Disk Mode require this procedure.
  • Most eGPUs require this procedure.
  • QNAP Thunderbolt-based NAS units require this procedure.
    • Other Thunderbolt-based storage and NAS systems may require this procedure as well.
  • This procedure may improve overall compatibility with a wider set of Thunderbolt devices.
Procedure:
There are two options for configuring Thunderbolt DROM. Choose one of the two methods.

Option 1: Web GUI Method (credit: @Inqnuam)
This method is the easiest to use.
  • Click here
  • Follow on-screen instructions carefully
  • Thunderbolt DROM will be customized for you using a randomly generated Unique ID (UID) and all checksums will be auto-computed.
  • A complete Thunderbolt SSDT (with the new DROM) will be presented on screen and it will also be copied to the clipboard for you.
  • Download and run MaciASL, create new file (File --> New) and paste the clipboard.
  • Then save the file in ACPI Machine Language (AML) format: File --> Save As... and choose ACPI Machine Language from the pop-up menu.
  • Give the file an appropriate name such as: SSDT-TB3-DROM-HOTPLUG.aml.
    • Any name is okay as long as it begins with SSDT-
  • However, download SSDT-DTPG.aml from the bottom of this guide.
  • Both SSDT files must be copied to the CLOVER/ACPI/patched folder (for CLOVER users) or OC/ACPI folder (for OpenCore users).
Option 2: Superuser Method (credit: @joevt)
Please see this guide for advanced users.

Option 3: Manual Method
  • Specify a new Unique ID (UID) in the 5 green bytes below (0x11).
  • Replace the 5 green numbers below with 5 randomly selected hex numbers.
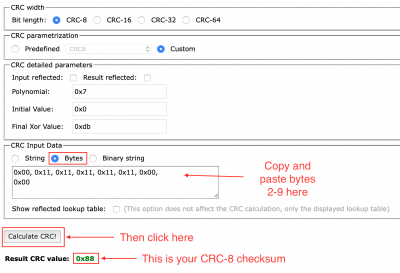
  • Now click here to visit an online CRC calculator and configure it as shown:
    Screen Shot 2020-03-18 at 9.35.24 AM.png
  • Copy the boldfaced bytes below (bytes 2-9 after replacing the green bytes with your own values) to clipboard and paste them into the Bytes field as shown and click CRC button:
    Screen Shot 2020-03-18 at 9.37.02 AM.png
  • Enter the CRC-8 checksum into the 1st byte of Thunderbolt DROM as shown in red below.
  • Save this into your Thunderbolt SSDT, in the NHI0._DSM method.
    • The attached SSDTs may be used, but they are configured for PCI0.RP21. Adapt the SSDT for the actual PCIe path for your system. If you have questions about this, just ask.
    • Both SSDTs should be copied to CLOVER/ACPI/patched or for OpenCore users, OC/ACPI
  • Optional but Highly Recommended for Add-in-Cards: Byte #2 below (between 0x88 and 0x11) represents the Thunderbolt Bus ID. If you have multiple Thunderbolt controllers, assign a different bus to each one. If you change this byte, please re-compute the CRC-8 checksum.
    • The first byte of ThunderboltConfig should then be changed to the same Bus ID.
"ThunderboltDROM",
Buffer (0x65)
{
0x88, 0x00, 0x11, 0x11, 0x11, 0x11 0x11, 0x00,
0x00, 0xC5, 0x0A, 0x25, 0xCB, 0x01, 0x49, 0x00,​
0x49, 0x18, 0x04, 0x00, 0x62, 0x02, 0x08, 0x81,​
0x80, 0x02, 0x80, 0x00, 0x00, 0x00, 0x08, 0x82,​
0x80, 0x02, 0x80, 0x00, 0x00, 0x00, 0x02, 0x83,​
0x0B, 0x84, 0x20, 0x01, 0x00, 0x3C, 0x00, 0x00,​
0x00, 0x00, 0x00, 0x05, 0x85, 0x50, 0x00, 0x00,​
0x09, 0x01, 0x41, 0x53, 0x52, 0x6F, 0x63, 0x6B,​
0x00, 0x15, 0x02, 0x5A, 0x33, 0x37, 0x30, 0x20,​
0x47, 0x61, 0x6D, 0x69, 0x6E, 0x67, 0x2D, 0x49,​
0x54, 0x58, 0x2F, 0x61, 0x63​
},
  • CRITICAL WARNING:
    • Do not copy and paste the text above into MaciASL. Instead, copy-and-paste from the spoiler below. Failure to do so will be catastrophic.
Code:
"ThunderboltDROM",
Buffer (0x65)
{
0x88, 0x00, 0x11, 0x11, 0x11, 0x11, 0x11, 0x00,
0x00, 0xC5, 0x0A, 0x25, 0xCB, 0x01, 0x49, 0x00,
0x49, 0x18, 0x04, 0x00, 0x62, 0x02, 0x08, 0x81,
0x80, 0x02, 0x80, 0x00, 0x00, 0x00, 0x08, 0x82,
0x80, 0x02, 0x80, 0x00, 0x00, 0x00, 0x02, 0x83,
0x0B, 0x84, 0x20, 0x01, 0x00, 0x3C, 0x00, 0x00,
0x00, 0x00, 0x00, 0x05, 0x85, 0x50, 0x00, 0x00,
0x09, 0x01, 0x41, 0x53, 0x52, 0x6F, 0x63, 0x6B,
0x00, 0x15, 0x02, 0x5A, 0x33, 0x37, 0x30, 0x20,
0x47, 0x61, 0x6D, 0x69, 0x6E, 0x67, 0x2D, 0x49,
0x54, 0x58, 0x2F, 0x61, 0x63        
},

Reboot.
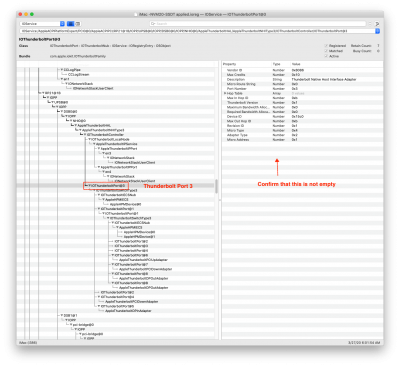
  • Check if Thunderbolt Port 3 is activated.
    Screen Shot 2020-03-28 at 1.53.21 AM.png
 

Attachments

  • SSDT-DTPG.aml
    100 bytes · Views: 228
  • SSDT-TBOLT3-RP21-ASROCK-Z390-ITX-AC.aml
    2 KB · Views: 243
Last edited:
None so far. Thanks for taking a look. Sleep wake also works fine. I do have a 5 second pause near loading ACPI tables but that’s tolerable. Anything wrong/missing from my SSDT ? In the PCI tab (screenshot from before) I see a lot of fields not populated.
Please try the SSDT in the micro-guide above. I've changed some device-property information.
 
Hi @Casey, wondering if you might know a fix for this problem. When I share a video from the photos app I see a pie shaped progress indicator in the toolbar of the photos app. The VTEncoderXPCService process runs during this time and CPU activity is ~600%. To share one 60 second video takes longer than 60 seconds. I know it's converting it or downscaling it, but that seems extremely slow for such a well specced machine. Is this supposed to be offloaded to my 5700 XT or can you think of anything that might not be optimized for this process?
Have you checked whether hardware acceleration is enabled for HEVC and H.264? We can use VideoProc to check this. Simply search this thread for posts from me containing the keyword 'VideoProc'.

Also, have you checked how long it takes a real Mac to do the same job?
 
*****UPDATE*****
i got the restart sleep and shutdown fixed in 10.15.4 with native nvram enabled ,but how ever the sleep needs a bit of touch up work. here is the scenario the sleep is working but however upon from wake from sleep on the lg 4k monitor it wakes up but black but to show the "locked password" screen you must begin typing the first character in the beginning of the macs password that was set up by the user. i tried clicking multiple times to wake from sleep but no screen until pressing the first set of characters password that was set by the user. other than that the system seems so far stable. i have removed the sleep wake clover bug but this did not help either with the latest 5107 clover build. hopefully we can pull together and find a more stable fresh install for 10.15.4 the sleep worked better in 10.15.3 i don't know what was changed for sleep. i know apple time to time can change the darkwake to different set of numbers. a better guide to understanding what darkwake does for each build can be viewed here.

p.s to my conclusion i have found that the catalina fresh install 10.15.3 guide will not work with hdmi support on 10.15.4 i tried booting the hdmi from the z390 designare motherboard to the lg 4k and no signal was being picked up at all on 10.15.4. i disconnected the power source to the vega frontier edition cooled and was unsuccessful with the hdmi display intel 630 uhd. right now what is working is the amd graphics card hdmi or display port not the onboard hdmi in 10.15.4.

my ioreg shows the igu framebuffer in 10.15.4 but does not pick up signal upon boot.
What you're describing in the first paragraph is the need to pressing 2 or 3 keys to wake from sleep. I always press 3 keys (space bar) with a few seconds between each. Have you tried setting darkwake=0 in Boot Arguments? That may allow wake with single keypress.
 
hello @CaseySJ,
This is the txt that I used the command feedback
The screenshot shows normal behavior. Are you experiencing any technical problems with Thunderbolt?
 
Update on Damaged Asus ThunderboltEX 3

Last week I damaged the Winbond chip on my Asus ThunderboltEX 3 add-in-card while attempting to force-flash a modified Thunderbolt firmware. This was before creating the circuit with a 47uF capacitor and 2K Ohm resistor. Had I used that circuit at the time, I would not have damaged the chip.

Nevertheless, to turn the loss into a gain I decided to desolder and replace the damaged chip. First step: to order a set of replacement chips and desoldering materials, all of which arrived over the past couple of days.

Status update:

The Winbond W25Q80DV comes in two package sizes:
  • W25Q80DVNIG
  • W25Q80DVSIG
The following boards use the larger W25Q80DVSIG:
  • Gigabyte Designare Z390
  • Gigabyte Z390 AORUS Xtreme
  • Gigabyte GC-Titan Ridge
  • Asus ThunderboltEX 3
View attachment 457579

It was easy to flash the standalone chip, but it could only be gripped properly by the Pomona 5250. The cheap clip that accompanies most CH341a Programmers placed too much pressure, bending some of the pins.

Next the existing flash chip on the Asus add-in-card had to be desoldered:
  • A clean solder tip is essential. I had to replace a worn tip that was merely evaporating the solder instead of melting it into tiny beads.
  • Applied liquid flux and used ChipQuik at a temperature of about 250 C. After about 4 or 5 strokes on each side, the chip glided off easily. No hot air this time.
View attachment 457583

Soldering the replacement was fairly easy because of the relatively wide spacing between pins.

View attachment 457584

So after all that, did it work? No! :(

The soldered-on chip does work and is readable and writable by the Raspberry Pi, but it's possible that other components were damaged. Will make one more attempt to repair the board.

Meanwhile, the replacement Asus ThunderboltEX 3 arrived today and it's easily readable and programmable with the 47uF / 2K Ohm circuit.


you use a Asus ThunderboltEX 3 on a gigybite z390 designare ?
 
Hey Guys i got some news and decided to share with the community, two days ago I decided to do a clean install of 10.15.4
Using the mini guide And I was finally successful when I stopped caring about the error codes , there are a two curve balls when using 10.15.4 , Assuming you have the time correctly set in your Bios , There are two errors that get thrown your way during installation (see attached images ) the installation throws an error with two minutes remaining , reboot and boot into the usb again to continue installation then when it finishes it will give you the second error regarding bless tool and choosing the right startup disk , reboot and boot from usb again and choose to boot Mac OS from your Mac OS partition if you named it Catalina as per the mini guide that is going to be the one , from that moment on everything goes smoothly and that is pretty much what I did , Thank you@CaseySJ all the kexts load correctly now , my only hesitation is regarding the the installation of RC scripts for use with EmuNvram vs native nvram
i have same problem even my installation

1) i think it is your ssd broken

2) Format your ssd on another mac

3) have format in apfs ?
 
... my only hesitation is regarding the the installation of RC scripts for use with EmuNvram vs native nvram
Native NVRAM is the way to go! But keep in mind that MSR 0xE2 will get locked each time new BIOS is flashed to the motherboard. It may also get locked under some circumstances when CMOS Reset is performed. So be sure to keep the "grub" USB flash disk handy in case it's necessary to unlock MSR 0xE2 in the future.
 
Back
Top