Contribute
Register

[SUCCESS] Gigabyte Designare Z390 (Thunderbolt 3) + i7-9700K + AMD RX 580

Movie trailers are not DRM protected. In my case with iMac19,1 and iGPU enabled, Apple TV+ movies do not play unless I use both shikigva and shiki-id with WEG 1.3.4. I'm hoping that WEG 1.3.5 fixes the underlying issues for most users, but I haven't yet experimented with it. May have to add that to my (ever growing) to-do list for the weekend. :)

I can confirm that using WEG 1.3.5 and latest LILU are working for Apple TV app in Catalina 10.15.1. Using the shikigva=16 boot arg. Haven't tested anything else.
 
On the monitor subject... I'm considering purchasing the 24MD4KL. Does anyone know if the following would work:
Connect a second monitor to the USB-C port of the 24MD4KL using a Belkin USB-C to HDMI monitor? The goal is to connect the second monitor in daisy chain fashion without sacrificing the second TB3 port on the monitor- leaving it available for other peripherals as needed. I'm replacing an older 1080p monitor in my setup, so this would give me two 4K's.
 
Ever since I updated my Hackintosh to 10.15.1 I had a lot of weird behaviours. Sleep issues, the computer randomly freezing, Apps failing suddenly and Final Cut performance problems. I finally got to install a Fenvi wireless card a few days ago and ever since the system is running super smoothly without me changing anything else. Really weird. I still have some minor performance issues in Final Cut so I might try out playing with the shikgva boot arguments a bit to see if that actually helps.
 
On the monitor subject... I'm considering purchasing the 24MD4KL. Does anyone know if the following would work:
Connect a second monitor to the USB-C port of the 24MD4KL using a Belkin USB-C to HDMI monitor? The goal is to connect the second monitor in daisy chain fashion without sacrificing the second TB3 port on the monitor- leaving it available for other peripherals as needed. I'm replacing an older 1080p monitor in my setup, so this would give me two 4K's.
I am 99% sure that this won't work. Okay, 100% sure. :)
  • The 24" LG UltraFine does not output video from its three USB-C ports.
  • It can only output video from one of the two Thunderbolt ports.
 
I am 99% sure that this won't work. Okay, 100% sure. :)
  • The 24" LG UltraFine does not output video from its three USB-C ports.
  • It can only output video from one of the two Thunderbolt ports.

Thanks for the INPUT! :lol:
 
This might indicate an ACPI error. When you're back, please do the following:
  1. Run IORegistryExplorer and select File --> Save As... Then post that file.
  2. Post screenshots of:
    1. Clover Configurator --> Kernel and Kext Patches.
    2. Clover Configurator --> ACPI.
I think you already give me the hint to solve the issue.
For the Bluetooth USB update of my USB SSDT file I've activated again the Patch for showing all USB ports.

I will confirm on Sunday if that was the issue. Thank you! :)
 
@WhosMac @SpikedBR @heyelly
Phase 2:
  • Power down, flip power switch on PSU to OFF, then completely remove the RX 5700 XT GPU from the system.
    • Don't skip any one of these steps.
  • Connect HDMI cable to rear IO panel and to your monitor.
    • Don't use a TV. Use a computer monitor.
  • Power up the system and press Del to enter BIOS Setup.
    • Change Initial Display Output to IGFX.
    • Save and quit.
  • Press F12 at BIOS Splash Screen to open BIOS Boot Menu.
    • Select the USB install disk.
    • At the Clover Boot Menu, select the leftmost icon (the external USB disk).

So I decided to try this new fresh install method, made a new USB disk with the config list for the iGPU but I couldn't boot the "Install Catalina" with the new USB disk's Clover, I got three line and it hangs, it says:

ERROR allocating 0x119fa pages at 0x00000000004813000 alloc type 2
Couldn't allocate runtime area
Boot failed: will sleep for 10 seconds before exiting...


I think that it is the same error that I got with the "regular" fresh install USB disk also, but that at that moment I used a Mojave bckp that I had to start the USB disk install process, but this time because of the iGPU I can't boot it anymore.

I tried different USB ports, could it be a problem with my USB disk? Even though the install process is sucessful when I boot with another disk?
 
Last edited:
So I decided to try this new fresh install method, made a new USB disk with the config list for the iGPU but I couldn't boot the "Install Catalina" with the new USB disk's Clover, I got three line and it hangs, it says:

ERROR allocating 0x119fa pages at 0x00000000004813000 alloc type 2
Couldn't allocate runtime area
Boot failed: will sleep for 10 seconds before exiting...


I think that it is the same error that I got with the "regular" fresh install USB disk also, but that at that moment I used a Mojave bckp that I had to start the USB disk install process, but this time because of the iGPU I can't boot it anymore.

I tried different USB ports, could it be a problem with my USB disk? Even though the install process is sucessful when I boot with another disk?
This problem should be easy to circumvent:
  • In the EFI/CLOVER/drivers/UEFI folder of the USB install disk, delete both OcQuirks-4.efi and FwRuntimeServices.efi and replace them with OsxAptioFix2Drv-free2000.efi which is found at the bottom of Post #1.
 
@WhosMac @SpikedBR @heyelly

I've just installed Catalina successfully using only the iGPU, as follows:

Phase 1:
  • Start with the USB install disk you created by following the Catalina Mini-Guide.
  • Connect it to your Mac.
  • Now, in the ZIP attached below there are two config.plist files:
    • config-Internal-GPU.plist
    • config-AMD-GPU.plist
  • We will perform the installation with the Internal file and then switch to the AMD-GPU file later.
  • Copy config-Internal-GPU.plist to the CLOVER folder of the USB install disk.
  • Open the file with Clover Configurator, go to SMBIOS section, and select iMac19,1 from the pop-up menu.
  • Save the file and then rename it to simply config.plist.
Phase 2:
  • Power down, flip power switch on PSU to OFF, then completely remove the RX 5700 XT GPU from the system.
    • Don't skip any one of these steps.
  • Connect HDMI cable to rear IO panel and to your monitor.
    • Don't use a TV. Use a computer monitor.
  • Power up the system and press Del to enter BIOS Setup.
    • Change Initial Display Output to IGFX.
    • Save and quit.
  • Press F12 at BIOS Splash Screen to open BIOS Boot Menu.
    • Select the USB install disk.
  • At the Clover Boot Menu, select the leftmost icon (the external USB disk).
  • Follow the on-screen progress.
  • When the installer starts, run Disk Utility and format the target disk as APFS, select the Scheme as GUID Partition Map, and give it the name Catalina
    • You must select View --> Show All Devices... and click on the parent name of your target macOS SSD. Then click Erase and you will see three options: Name, Format, and Scheme.
  • Then quit Disk Utility and select the option to Install macOS.
  • When the system reboots, make sure to press F12 at BIOS Splash Screen.
    • Select the USB install disk.
  • At the Clover Boot Menu, select Boot macOS Install from macOS Catalina
    • NOTE: We will NOT select the USB install disk in Clover Boot Menu any longer. We will still use the USB disk to boot the system because only the USB disk contains the EFI partition that allows computer to boot.
  • The macOS installer should automatically resume and take 15-30 minutes.
  • When it reboots, press F12 again and select the USB install disk.
  • At the Clover Boot Menu, select Boot macOS from macOS Catalina
    • Now you will be greeted with the Welcome screen.
    • Follow the wizard. You can login to iCloud or do it later.
  • When you're at the desktop, run Clover Configurator to Mount EFI partitions of both the USB install disk and the new Catalina SSD.
    • Copy the entire EFI Folder from EFI partition of USB disk to EFI partition of Catalina SSD.
  • Eject the USB install disk.
  • Reboot and see if Catalina starts up.
Phase 3: Prepare to install RX 5700 XT.
  • (Steps to be provided later.)
  • Do not do this yet.
  • Please report your progress with Phases 1 and 2.


Voodoo Science: For some reason System Information --> Graphics/Displays is showing 4K at 60Hz when connecting my Asus Designo 4K monitor to the on-board HDMI port. This port should not support 60Hz. I'll post screenshot later this evening if I can prove to myself that I wasn't hallucinating. Maybe it's a bug in 10.15.1, but the screen did not flicker when moving windows around as it does at 30Hz. Anyway, this could just be a mistake on my part. But if the 3 of you have 4K monitors, see if you also get 60Hz.

View attachment 439031


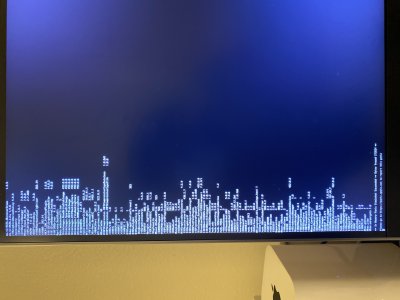
Just attempted this and in verbose gave me this didn’t launch installer. States at the bottom ** In memory Panic stackshot succeeded ** bytes traced 273024**
 

Attachments

  • 6EB6DF7E-A796-4B2C-BD64-C4B32D73E3B9.jpeg
    6EB6DF7E-A796-4B2C-BD64-C4B32D73E3B9.jpeg
    3.2 MB · Views: 62
Just attempted this and in verbose gave me this didn’t launch installer. States at the bottom ** In memory Panic stackshot succeeded ** bytes traced 273024**


Just in case you would like to know I did follow instructions as stated and I’m on F6 BIOS.
 
Back
Top