
- Joined
- Feb 9, 2012
- Messages
- 48
- Motherboard
- Z97-D3H Rev 2.2
- CPU
- i7 4790k @ 4.6 Ghz
- Graphics
- MSI Gaming GTX 980 4GB (OC)
- Mobile Phone
theconsumer1's Upgraded GAH61m-DS2 Build - 10.10
Components
Motherboard: GAH61M-DS2 Rev 2.2 Bios F9 - $50-75
http://www.amazon.com/dp/B005PX3UYA/
CPU: Intel Core i5 2500k Sandy Bridge @ 3.3GHZ - $250-300
http://www.amazon.com/dp/B004EBUXHQ/
Graphics: EVGA GeForce GTX 650 1024 MB - $100
http://www.ebay.com/itm/like/380478141374
RAM: Corsair XMS3 DDR3 8GB 1333mhz - $80
http://www.amazon.com/dp/B003N8GVUY/
CASE: NZXT Source 210 White - $40
http://www.newegg.com/Product/Product.aspx?Item=N82E16811146076
Wifi: Asus Wifi USB N13 Dongle - $18
http://www.amazon.com/dp/B002UVNW5W/
SSD: PNY XLR8 120 GB SSD 2.5in 6gb/s - $68
http://www.amazon.com/dp/B007WT9SU0/
HDD: Seagate 750GB Barracuda 7200RPM 3GB/s - $80
http://www.amazon.com/dp/B00272NHOU/
Power Supply: Coolermaster Elite 460Watt PSU - $36
http://www.amazon.com/dp/B002G1YPHK/
CPU Cooler: Cooler Master Hyper 212 Evo 120mm Fan - $30
http://www.amazon.com//dp/B005O65JXI/
TOTAL: $752 - $827
Comments
I decided to build this hackintosh a few months after getting some minor experience using OSX and hackintoshing. This is the more superior and updated build to my more commonly known budget build I wrote up last year. Since I upgraded graphics, SSD and CPU cooler, I thought I would write up a new post for this new and improved machine. For a $750 build, I wouldn't exactly consider this a budget hackintosh anymore, but rather a workstation. I use this machine for basic web browsing, document writing, music production, photo editing, AUTOCad Work, and video production. It handles all the tasks well however it could use another 8GB of DDR3. Why I chose to build this machine? Because OSX is simply better, cleaner, faster and more enjoyable to use than Windows ever could be. If you want an affordable Mac that has specs that exceed a $1800 MacBook, build this! Compatibility is great.
P.S. This machine has one OS installed, other than Win 7 in parallels (for FL Studio).
Installation Notes:
1. Yosemite 10.10 Installed via UniBeast
2. This build boots from the UniBeast USB and does not have an installed bootloader due to issues with Chimera (black screen, freezing. Therefore I recommend NOT installing Chimera or you will run into problems)
3. I used a combo of MultiBeast 6.0.1 (Mavericks) and MultiBeast for Yosemite (v. 7). It all depends on what works for you. Yosemite may have worked for all my drivers but went with what I KNEW worked.
BIOS Settings (Version F9)
1. Loaded Optimized Defaults
2. Set SATA to AHCI
3. Set internal Graphics to PEG
4. Onboard Graphics: Disabled
5. High Precision Event Timer: Enabled
Other installation procedures:
Go to ASUS's Website and download the ASUS N13 Wireless utility for OSX 10.7
Titled: USBWireless-Lion.pkg
Run the pkg and your USB N13 Dongle should now work.
link: http://www.asus.com/Networking/USBN13/HelpDesk_Download/
Multibeast Settings:
1. Open Multibeast Yosemite Edition - Drivers>Misc>Install FakeSMC V6.11.1328, Plugins, HWMonitor - Reboot Machine
2. Open Multibeast Yosemite Edition - Drivers>Internet>Install Realtek>RealtekRTL81xx v0.0.90 kext - Reboot Machine
3. Open Multibeast Mavericks V6.0.1 - Drivers>Audio>Realtek ALCxxx>Without DSDT>ALC887/888b Current V100302 - Reboot
4. Install TrimEnabler kext with Multibeast or use Chameleon SSD Optimizer to enable trim - Your choice.
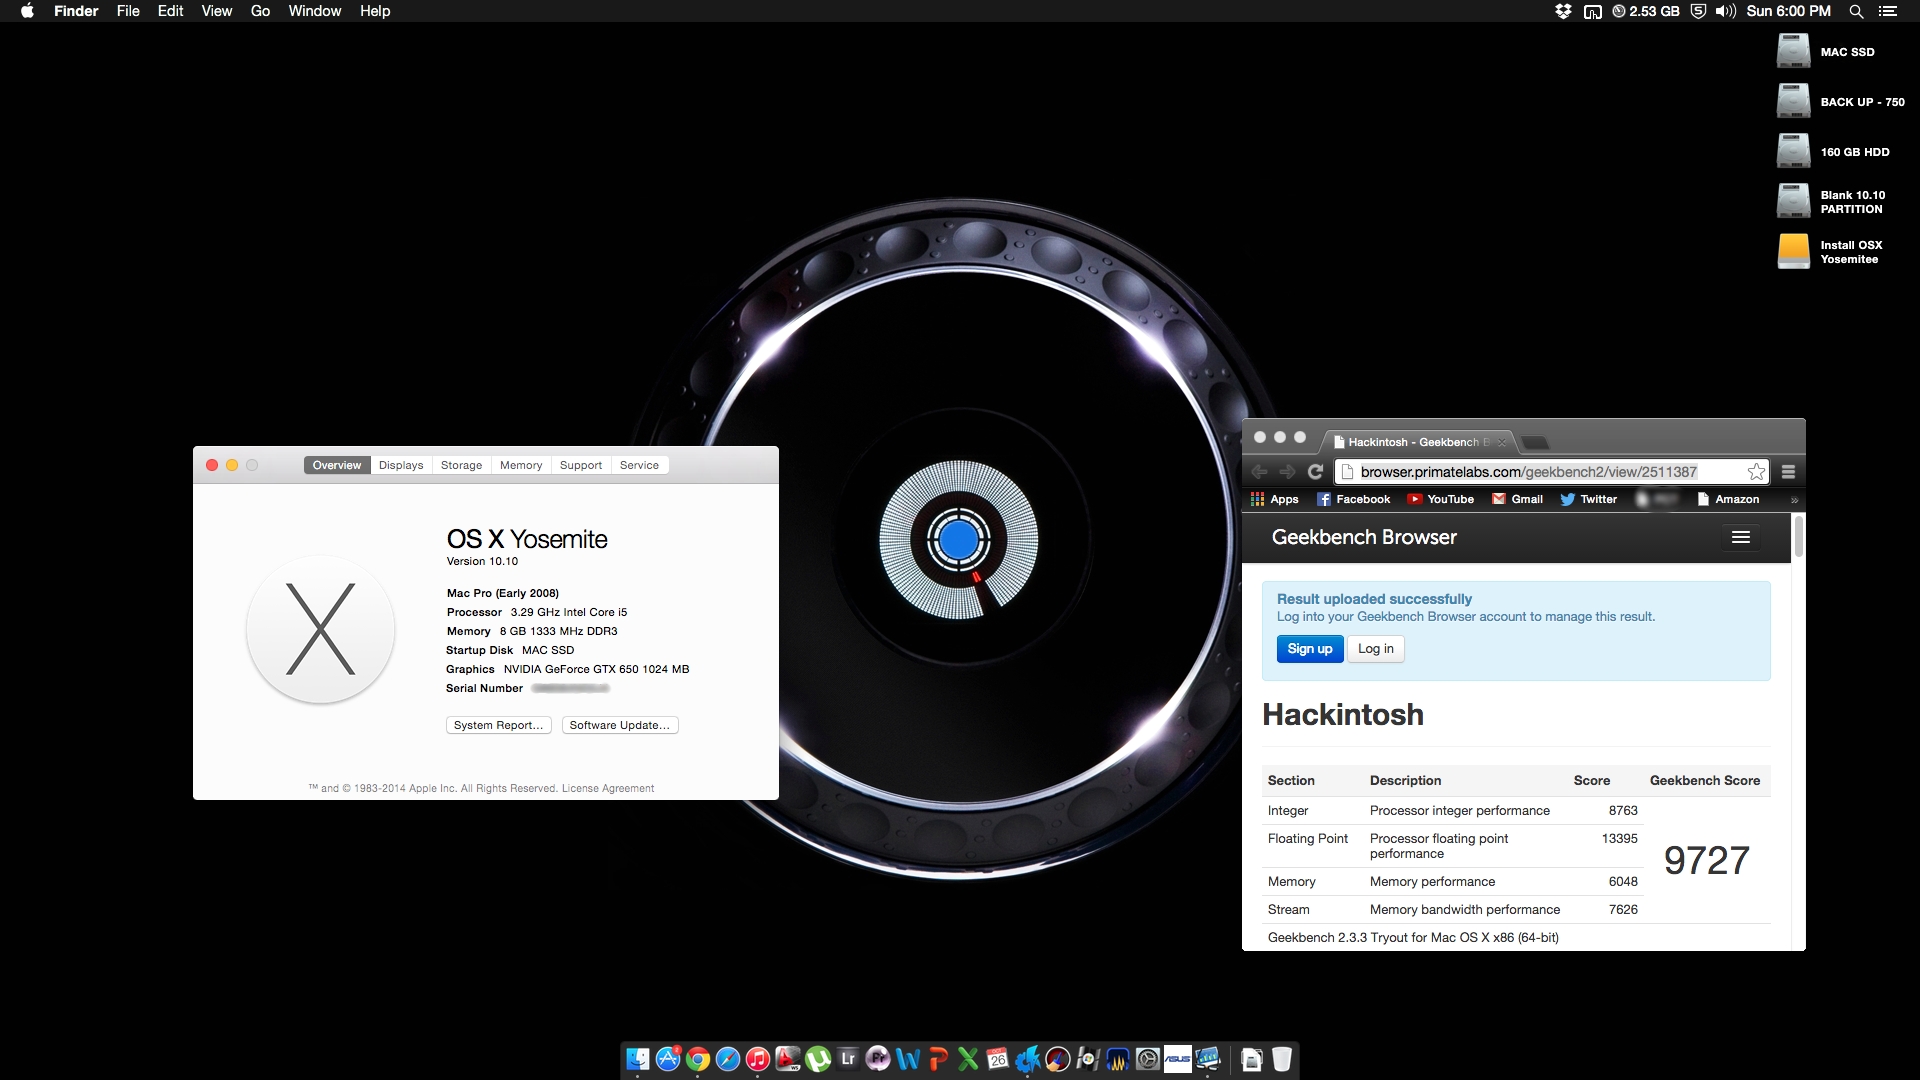
Screenshot and Geekbench 2 Score:

What does not work:
1. Restart and shutdown does NOT work. The machine will turn the display off but the fans will continuously run. Not a big problem for me as sleep works just fine.
2. Bootloader is not installed because of issues i mentioned above. So I must boot via unibeast USB. Not a big deal.
Last words: This build is excellent for anyone who wants to run 10.8, 10.9, and now 10.10. I will say 10.10 was the hardest, with 10.8 being 2nd in difficulty, and 10.9 being absolutely seamless and simple. 10.9 settings are the same for this build, except I installed NullCPUPowerManagement.kext in multibeast. I disregarded it in this build.
If anyone has troubles or questions, please contact me on here.
I will update the build as required.
Thanks
Thanks to Tonymacx86 for the resources to construct a functional build, and a thanks to Apple for releasing great OSs!!!
Edit Log:
Blank
Last edited by a moderator: