- Joined
- Feb 9, 2012
- Messages
- 302
- Motherboard
- Gigabyte X299 Desgnare EX
- CPU
- i9-9900x
- Graphics
- W5700
- Mac
- Mobile Phone
I've researched a lot and so many contributors helped me.
I will try making a easy smooth guide for Gaming Series MOBO with Skylake Cpu.
Sorry, my English is so bad but I will try the best as I can.
The Build Spec
1 x i7 6700k
1 x ASUS Radeon R9 390 DirectX 12
1 x G.SKILL Ripjaws V Series 32GB 288-Pin DDR4 SDRAM DDR4 3000
1 x GIGABYTE G1 Gaming GA-Z170X-Gaming 7
1 x Rosewill Photon-1050, PHOTON Series 1050W
1 x Corsair Hydro Series™ H110i GTX 280mm
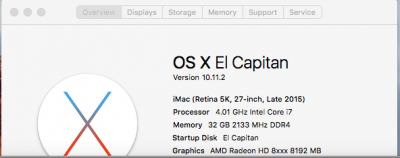
Working:
Everything excepting usb3.1c and Apple audio control UI(Sound working but just cannot control the sound strength by UI)
P.S Thunderbolt function not tested.
Installation
A. Required apps and files
Apps: Clover Configurator, Kextbeast or other apps for kext installing.
Files: Attached folder.
You need at least a machine which has working OS X.
1. Make a USB Clover installer w/ the regular guide for El Capitan
2. After you have install USB, replace folder in the USB to my attached folder.
For this step, You need to use Clover configurator app to mount your USB EFI.
So open the app and in tool's section click "Mount EFI". Click "Check Partition". After you check the USB's disk number (i.e figured by disk's size.), Click "Mount EFI Partition" and click the corrected disk number. Now your USB mounted!
3. Now in finder, you can see EFI mounted. Click it and Delete or back up your EFI folder. Move 'First EFI' folder and change the folder name 'EFI'. So now you have new EFI in you USB w/o any coding.") )
)
B. Bios setting.
For smooth installation, we need to update bios to newer version(in my case, F6 is the newest) and change settings.
1. Please go to Gigabyte site and download the newest bios driver and store it in the USB.
2. Q-flash and update bios driver using the downloaded file in the USB. Reboot again and then into bios setup, you now should see bios version changed.
3. Now change the bios setting like below:
a. Default (short key is f7)
b. XHCI Hand-off(Enable)/ Super IO Configuration(Disable)/ VT-D(disable)/ IOAPIC Entry(Disabled).
4. Now good to go installation.
Note. It could need some change graphic setting depend on your own graphic card installed. I haven't any problem with my AMD card. And after installation, I applied new EFI folder for all functions working including GPU.
Post Installation
1. Boot with your USB and select the installed OS X drive.
a. Open Clover configurator again, mount your OS X.(Just in case eject your USB before this proceed)
b. Click EFI. Remove EFI folder and add 'Second EFI' attached and rename it 'EFI'
c. In the EFI/Clover/Kexts/ install all kexts by kextbeast or other apps.
2. You might need to change the GPU setting for your own GPU. Again, mine is AMD, so if you have Nvidia you should change Config setting and install new driver for that.(I think you can find it very easy in this site.)
3. Important fix for overrides boot list whenever you reboot the computer issue.
So please go to this thread http://www.tonymacx86.com/general-help/181720-boot-entries-duplicate-clover-boot.html#post1174987
4. Now good to go boot with new OS X!!
Note. if you have an error during booting, just use your bootable USB for boot with Verbose mode.
Ok, this is everything I know so far.
I am noob of this world. I am not a programer or whatever geek for computer. So please understand me if I made any mistakes for this guide. And please ask me anything if you have questions.
Thank you!!
I am always appreciated for all your supports in this site!!
Credit to not only limited to specific people who find this amazing routes but also anyone helped me!!
Joe.
P.S. if you founded a method, how to use Apple audio UI working and USB3.1, please let me know!
I will try making a easy smooth guide for Gaming Series MOBO with Skylake Cpu.
Sorry, my English is so bad but I will try the best as I can.
The Build Spec
1 x i7 6700k
1 x ASUS Radeon R9 390 DirectX 12
1 x G.SKILL Ripjaws V Series 32GB 288-Pin DDR4 SDRAM DDR4 3000
1 x GIGABYTE G1 Gaming GA-Z170X-Gaming 7
1 x Rosewill Photon-1050, PHOTON Series 1050W
1 x Corsair Hydro Series™ H110i GTX 280mm
Working:
Everything excepting usb3.1c and Apple audio control UI(Sound working but just cannot control the sound strength by UI)
P.S Thunderbolt function not tested.
Installation
A. Required apps and files
Apps: Clover Configurator, Kextbeast or other apps for kext installing.
Files: Attached folder.
You need at least a machine which has working OS X.
1. Make a USB Clover installer w/ the regular guide for El Capitan
2. After you have install USB, replace folder in the USB to my attached folder.
For this step, You need to use Clover configurator app to mount your USB EFI.
So open the app and in tool's section click "Mount EFI". Click "Check Partition". After you check the USB's disk number (i.e figured by disk's size.), Click "Mount EFI Partition" and click the corrected disk number. Now your USB mounted!
3. Now in finder, you can see EFI mounted. Click it and Delete or back up your EFI folder. Move 'First EFI' folder and change the folder name 'EFI'. So now you have new EFI in you USB w/o any coding.
)B. Bios setting.
For smooth installation, we need to update bios to newer version(in my case, F6 is the newest) and change settings.
1. Please go to Gigabyte site and download the newest bios driver and store it in the USB.
2. Q-flash and update bios driver using the downloaded file in the USB. Reboot again and then into bios setup, you now should see bios version changed.
3. Now change the bios setting like below:
a. Default (short key is f7)
b. XHCI Hand-off(Enable)/ Super IO Configuration(Disable)/ VT-D(disable)/ IOAPIC Entry(Disabled).
4. Now good to go installation.
Note. It could need some change graphic setting depend on your own graphic card installed. I haven't any problem with my AMD card. And after installation, I applied new EFI folder for all functions working including GPU.
Post Installation
1. Boot with your USB and select the installed OS X drive.
a. Open Clover configurator again, mount your OS X.(Just in case eject your USB before this proceed)
b. Click EFI. Remove EFI folder and add 'Second EFI' attached and rename it 'EFI'
c. In the EFI/Clover/Kexts/ install all kexts by kextbeast or other apps.
2. You might need to change the GPU setting for your own GPU. Again, mine is AMD, so if you have Nvidia you should change Config setting and install new driver for that.(I think you can find it very easy in this site.)
3. Important fix for overrides boot list whenever you reboot the computer issue.
So please go to this thread http://www.tonymacx86.com/general-help/181720-boot-entries-duplicate-clover-boot.html#post1174987
4. Now good to go boot with new OS X!!
Note. if you have an error during booting, just use your bootable USB for boot with Verbose mode.
Ok, this is everything I know so far.
I am noob of this world. I am not a programer or whatever geek for computer. So please understand me if I made any mistakes for this guide. And please ask me anything if you have questions.
Thank you!!
I am always appreciated for all your supports in this site!!
Credit to not only limited to specific people who find this amazing routes but also anyone helped me!!
Joe.
P.S. if you founded a method, how to use Apple audio UI working and USB3.1, please let me know!
Attachments
Last edited: