- Joined
- Mar 29, 2013
- Messages
- 168
- Motherboard
- Gigabyte GA-Z87X OC
- CPU
- i7-4790K
- Graphics
- HD 4600
- Mac
- Mobile Phone
I decided to share my experience working with this motherboard from a while now
Items needed
-8 GB or more USB drive
-A working Hackintosh or A real mac (this is needed to make the unibeast drive)
Things needed
-Yosemite.app from App Store
-unibeast app
-El Capitan post installation tools
-Clover configurator
-CloverALC110 script
-iMessageDebugv2.zip (from the Fix iMessage Guide)
Bios settings
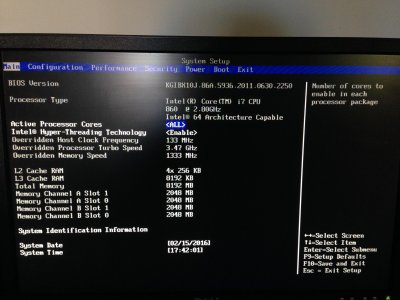
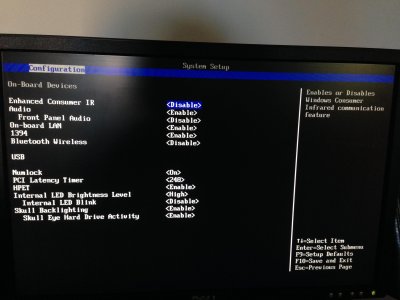
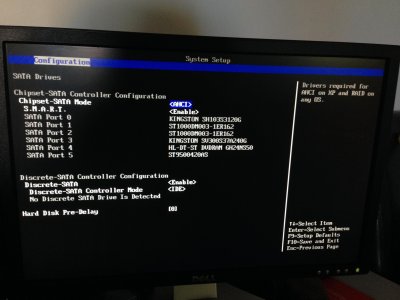
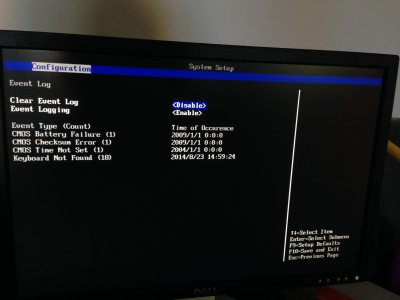
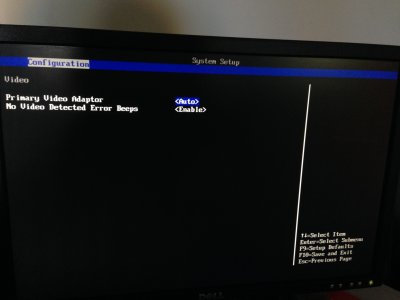
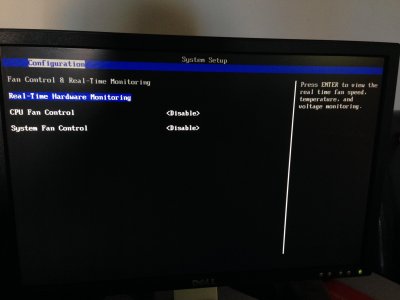


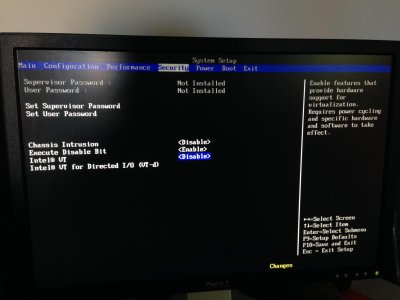
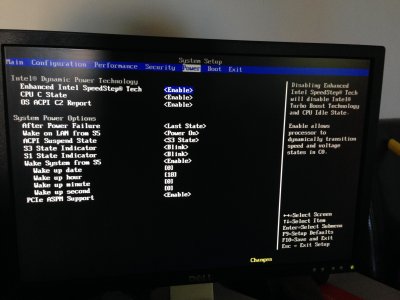
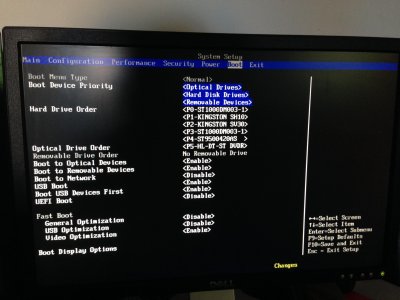
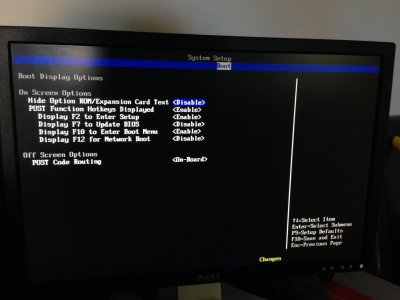
I used the 10.11 installation guide but using Yosemite.app 10.10.5
It is only because I find it more convenient an use the post installation package you may want to follow the exact guide by clicking: Guide / 10.11 installation
Format USB drive on the real mac or working Hack
disk utility
partition
1 parition
Option GUID
Name USB
Format MAC OS Extended journalized
Create unibeast drive
Just select Yosemite at step 14 instead of el capitan
Select Legacy boot mode at step 15
do not inject any graphic at step 16 (depending on your graphic card
Important your Hack must not be connected to the internet
before making your serial number in the SMBIOS if
you wish to use iCloud FaceTime iMessage .or you will have to do this later
insert USB drive
press F10 a couple of times
boot from USB drive
Select USB Drive at Clover menu
- Install OSX
- Boot from HDD (using the USB drive)
- Post installation very simple all you need is (EL Capitan Post
installation Tools), Clover configurator and CloverALC110 script. Everything is downloadable through the 10.11 Guide
YOU dont have audio working it is normal it is explained after the blue section
-click anywhere on the desktop ,go to upper left finder in task bar hit preferences and tick the HDD box to show on desktop now you see every HDD
- Run Clover_v2.3k_r3320-Legacy.pkg.
install it to your HDD (a new EFI partition is now created) we will need it later
when done close it
- Run CustoMac Essentials
install it to your HDD
when done close it
- Run Clover configurator (we want to change the smbios in config.plist)
Click File/open/EFI/Clover and open config.plist
Go to SMBIOS and hit the magic wand to the right
select the iMac Then select iMac 11.1 -LGA 1156 on the upper left
Manufactured location select QP:USA
year of manufacture Select 2009
then hit the 2 Shake button a couple of times to generate your own serial number
Now save it to EFI/CLOVER and replace it
Your Hack is now Totally Bootable but if you want All iCloud iMessage FaceTime to be working
Continue reading
if you dont want those services skip the blue section
open a terminal window and enter the command "uuidgen" without quotes this will create a new SmUUID for your SMBIOS use this commands at least 6-10 times to make it unique copy the UUID generated in the terminal window and paste it in SmUUID of SMBIOS section in clover configurator
Be careful saving an empty config.plist and replacing the one you use could make your system un-bootable without the usb drive so make sure you select it in EFI/CLOVER every time you want to make any changes before doing any changes and saving it
In Clover configurator Open the config.plist the same way you did before (if you closed it) EFI/CLOVER
Go to SMBIOS Copy your Serial number
Go to RT Variables and paste it in MLB then TYPE a RANDOM CAPTIAL LETTER and a random number to make it 13 alpha numeric digits total (if of course you Followed The SMBIOS section up here)
go back to SMBIOS and copy the LAST 12 digits of the SmUUID if of course you Followed The SMBIOS section up here)
Go to RT Variables and paste it in ROM
now you go over system parameters and you make sure inject System ID is ticked
You can save it
-Make sure your ethernet cable is now plugged in and start CloverALC110 script
your EFI partition must be on your desktop (mounted)
a terminal window will open just follow the instructions pretty basic...
it will reboot and you will have audio
if you have a SSD open a terminal window and type the command without quotes "sudo trimforce enable" enter your password follow the intructions and it will reboot
Items needed
-8 GB or more USB drive
-A working Hackintosh or A real mac (this is needed to make the unibeast drive)
Things needed
-Yosemite.app from App Store
-unibeast app
-El Capitan post installation tools
-Clover configurator
-CloverALC110 script
-iMessageDebugv2.zip (from the Fix iMessage Guide)
Bios settings


I used the 10.11 installation guide but using Yosemite.app 10.10.5
It is only because I find it more convenient an use the post installation package you may want to follow the exact guide by clicking: Guide / 10.11 installation
Format USB drive on the real mac or working Hack
disk utility
partition
1 parition
Option GUID
Name USB
Format MAC OS Extended journalized
Create unibeast drive
Just select Yosemite at step 14 instead of el capitan
Select Legacy boot mode at step 15
do not inject any graphic at step 16 (depending on your graphic card
Important your Hack must not be connected to the internet
before making your serial number in the SMBIOS if
you wish to use iCloud FaceTime iMessage .or you will have to do this later
insert USB drive
press F10 a couple of times
boot from USB drive
Select USB Drive at Clover menu
- Install OSX
- Boot from HDD (using the USB drive)
- Post installation very simple all you need is (EL Capitan Post
installation Tools), Clover configurator and CloverALC110 script. Everything is downloadable through the 10.11 Guide
YOU dont have audio working it is normal it is explained after the blue section
-click anywhere on the desktop ,go to upper left finder in task bar hit preferences and tick the HDD box to show on desktop now you see every HDD
- Run Clover_v2.3k_r3320-Legacy.pkg.
install it to your HDD (a new EFI partition is now created) we will need it later
when done close it
- Run CustoMac Essentials
install it to your HDD
when done close it
- Run Clover configurator (we want to change the smbios in config.plist)
Click File/open/EFI/Clover and open config.plist
Go to SMBIOS and hit the magic wand to the right
select the iMac Then select iMac 11.1 -LGA 1156 on the upper left
Manufactured location select QP:USA
year of manufacture Select 2009
then hit the 2 Shake button a couple of times to generate your own serial number
Now save it to EFI/CLOVER and replace it
Your Hack is now Totally Bootable but if you want All iCloud iMessage FaceTime to be working
Continue reading
if you dont want those services skip the blue section
open a terminal window and enter the command "uuidgen" without quotes this will create a new SmUUID for your SMBIOS use this commands at least 6-10 times to make it unique copy the UUID generated in the terminal window and paste it in SmUUID of SMBIOS section in clover configurator
Be careful saving an empty config.plist and replacing the one you use could make your system un-bootable without the usb drive so make sure you select it in EFI/CLOVER every time you want to make any changes before doing any changes and saving it
In Clover configurator Open the config.plist the same way you did before (if you closed it) EFI/CLOVER
Go to SMBIOS Copy your Serial number
Go to RT Variables and paste it in MLB then TYPE a RANDOM CAPTIAL LETTER and a random number to make it 13 alpha numeric digits total (if of course you Followed The SMBIOS section up here)
go back to SMBIOS and copy the LAST 12 digits of the SmUUID if of course you Followed The SMBIOS section up here)
Go to RT Variables and paste it in ROM
now you go over system parameters and you make sure inject System ID is ticked
You can save it
-Make sure your ethernet cable is now plugged in and start CloverALC110 script
your EFI partition must be on your desktop (mounted)
a terminal window will open just follow the instructions pretty basic...
it will reboot and you will have audio
if you have a SSD open a terminal window and type the command without quotes "sudo trimforce enable" enter your password follow the intructions and it will reboot
