
- Joined
- Feb 13, 2017
- Messages
- 8
- Motherboard
- GIGABYTE Z170MX-Gaming 5
- CPU
- i7-6700K
- Graphics
- GTX 970
- Mac
- Mobile Phone
tmpdmp's mATX Build:
Gigabyte Z170MX-Gaming 5 - Core i7 6700k - 32GB RAM - EVGA GeForce GTX 970 SSC - m.2 NMVE Drive

Gigabyte Z170MX-Gaming 5 - Core i7 6700k - 32GB RAM - EVGA GeForce GTX 970 SSC - m.2 NMVE Drive
Components
GIGABYTE Z170MX-Gaming 5
https://www.amazon.de/dp/B014SL2XKQ/?tag=tonymacx8603-21
Intel Core i7-6700K Skylake Processor
https://www.amazon.de/dp/B010T6DQTQ/?tag=tonymacx8603-21
EVGA GeForce GTX 970 SSC (used)
https://www.amazon.de/dp/B00R3NK2LE/?tag=tonymacx8603-21
32GB G.Skill Ripjaws V 2800mhz 16GBx2
https://www.amazon.de/dp/B0171GQLSA/?tag=tonymacx8603-21
Corsair Hydro Series H80i
https://www.amazon.de/dp/B019954Y2Q/?tag=tonymacx8603-21
Coolermaster v750 Modular PSU
https://www.amazon.de/dp/B0118FFHZI/?tag=tonymacx8603-21
Cooltek Jonsbo rm3
https://www.amazon.de/dp/B01IJ9CFHO/?tag=tonymacx8603-21
Samsung 960 Evo 250GB
https://www.amazon.de/dp/B01M211K53/?tag=tonymacx8603-21
Samsung 850 Evo 250GB
https://www.amazon.de/dp/B00P736UEU/?tag=tonymacx8603-21
TP-LINK TL-WDN4800 - TP-Link N900
https://www.amazon.de/dp/B007GMPZ0A/?tag=tonymacx8603-21
Comments
I wanted to create a small workstation for my wife, capable of running LightRoom and PhotoShop as she is a photographer. So i needed a fast CPU and a decent graphics card (got a good deal on a Btx 970 with warranty so i bought this one).I included a NVMe SSD because i was simple amazed by how fast it was. I decided to get the Jonsbo RM3 as it looks Appleish with its brushed aluminum finish. She doesn't really need Bluetooth airdrop and continuity so i just got a dongle i had lying around to connect a keyboard and mouse.
Installation Notes
Hardware Assembly
Make sure you plan your airflow properly (I have intake from bottom and top and exhaust through the water cooler in the back) as well as you cable management in time. I had to take the build apart a few times in order to arrange everything.
It is possibly a good idea to breadboard test your components first before assembly in the actual case.
UEFI Settings
1. To access Gigabytes BIOS/UEFI Setup, press Delete on a USB Keyboard while the system is booting up
2. If your BIOS is not running the latest Update download it from here:
http://www.gigabyte.com/Motherboard/GA-Z170MX-Gaming-5-rev-10#support-dl
At the time of writing the newest one was F20 (it was shipped to me with F4)
3. Update your BIOS using Method 1 (Q-Flash) from this Guide:
https://www.tonymacx86.com/threads/how-to-update-your-gigabyte-motherboards-bios.131047/
4. Load Optimized Defaults
5. Disable VT-d,
6. Set OS Type to Other OS
7. Disable IO SerialPort
8. Set XHCI Handoff to Enabled
9. Set X.M.P. Memory Profile to Profile1
10. Enable ERP(So pc won't turn on on USB mouse click or keyboard while shutdown)
11. Disable internal GPU
12. Set Boot order to SSD (We will copy the SSD contents to the NVME later as it won't be recognised as of now)
13. Save and exit.
Installing OS X
Download macOS Sierra from the app store and create a bootable installer as described here: https://www.tonymacx86.com/threads/...any-supported-intel-based-pc.200564/#download
Installing Process is pretty straight forward(also see tonymacx86`s guide)
Post Install
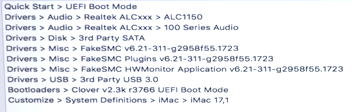
MultiBeast Settings
Getting the NVMe to work
- Get Clover Configurator http://mackie100projects.altervista.org/download-clover-configurator/
- Update Clover to the latest revision → reboot
- Mount EFI partition
- Add NVMe Fix to config.plist (): https://pikeralpha.wordpress.com/2016/06/27/nvmefamily-kext-bin-patch-data/
(needs to go in KernelAndKextPatches in between <array>"patch here"</array>)
- Copy everything from SSD to NVMe, Copy Recovery as well using Carbon Copy Cloner: https://bombich.com/de
- Run the command “sudo trimforce enable” in the terminal to enable TRIM
- Mount the EFI Partition of the SSD and copy contents to your desktop
- mount the NVME EFI Partition and paste the contents from the SSD here
You can now format your SSD and set the NVMe as in the BIOS to boot from
Clover configurations
- Load the config.plist in Clover configurator
- Clover Configurator System Parameter -> check nVideaWeb
- No Screen Wake after sleep Fix : set “darkwake=0” in Boot
- Enable XMPDetection in Boot
- Install Driver EmuVariableUefi 64 Bit (For NVRAM)
- Rt Variables→ Booter config 0x28, CsrActiveConfig → 0x67 (disables SIP in order to run AGDPfix)
→ reboot
- Install nVidea Webdriver https://www.tonymacx86.com/threads/...for-macos-sierra-10-12-3-367-15-10-35.213122/
- Run AGDPfix 1.3 to fix graphics in iMac 17,1: http://www.insanelymac.com/forum/files/file/424-agdpfix/
→ reboot
And you should be all good to go !
Furthermore
Getting iMessages to work was pretty straight forward following this guide:
https://www.******.com/r/hackintosh...ng_imessage_working_on_el_capitan_and_sierra/
What Does Not Work
Continuity and Airdrop, as i would have to get a specific Bluetooth card which was not worth the money in my opinion.
Benchmarks
Not overclocked or anything yet, just running standards:
I hope this helps some you folks. This forum has been a great help to me and so i wanted to share my build.
Attachments
Last edited:
")