
- Joined
- Nov 5, 2018
- Messages
- 126
- Motherboard
- Z390 Aorus Pro
- CPU
- i9-9900K
- Graphics
- 2 x Vega 64
100% WORKING
UPDATED 17 JULY, 2019 with THUNDERBOLT 3
UPDATED 9 JULY, 2019 for MOJAVE 10.14.5
blouse's "Hack Pro (Late 2018)" build:
Core i9-9900k - Z390 Aorus Pro - 64GB RAM - Sapphire Vega 64 - Thunderbolt 3

Components
GIGABYTE Z390 AORUS PRO Motherboard
https://www.amazon.com/dp/B07HRZRBRJ/?tag=tonymacx86com-20
https://www.newegg.com/Product/Product.aspx?Item=N82E16813145098
Intel Core i9-9900K Processor
https://www.amazon.com/dp/B005404P9I/?tag=tonymacx86com-20
https://www.newegg.com/Product/Product.aspx?Item=9SIAAM18E33412
G.SKILL Ripjaws V Series 64GB (4 x 16GB) DDR4 3600
https://www.newegg.com/Product/Product.aspx?Item=N82E16820232737
SAPPHIRE Radeon RX Vega 64
https://www.amazon.com/dp/B074HCCWW9/?tag=tonymacx86com-20
https://www.newegg.com/Product/Product.aspx?Item=N82E16814202326
Gigabyte Titan Ridge Thunderbolt 3 PCIe Card
https://www.amazon.com/dp/B07GBZL93X/?tag=tonymacx86com-20
https://www.newegg.com/p/17Z-0037-00007
CORSAIR RM1000i 1000W Modular Power Supply
https://www.amazon.com/dp/B07GBZL93X/?tag=tonymacx86com-20
https://www.newegg.com/Product/Product.aspx?Item=N82E16817139139
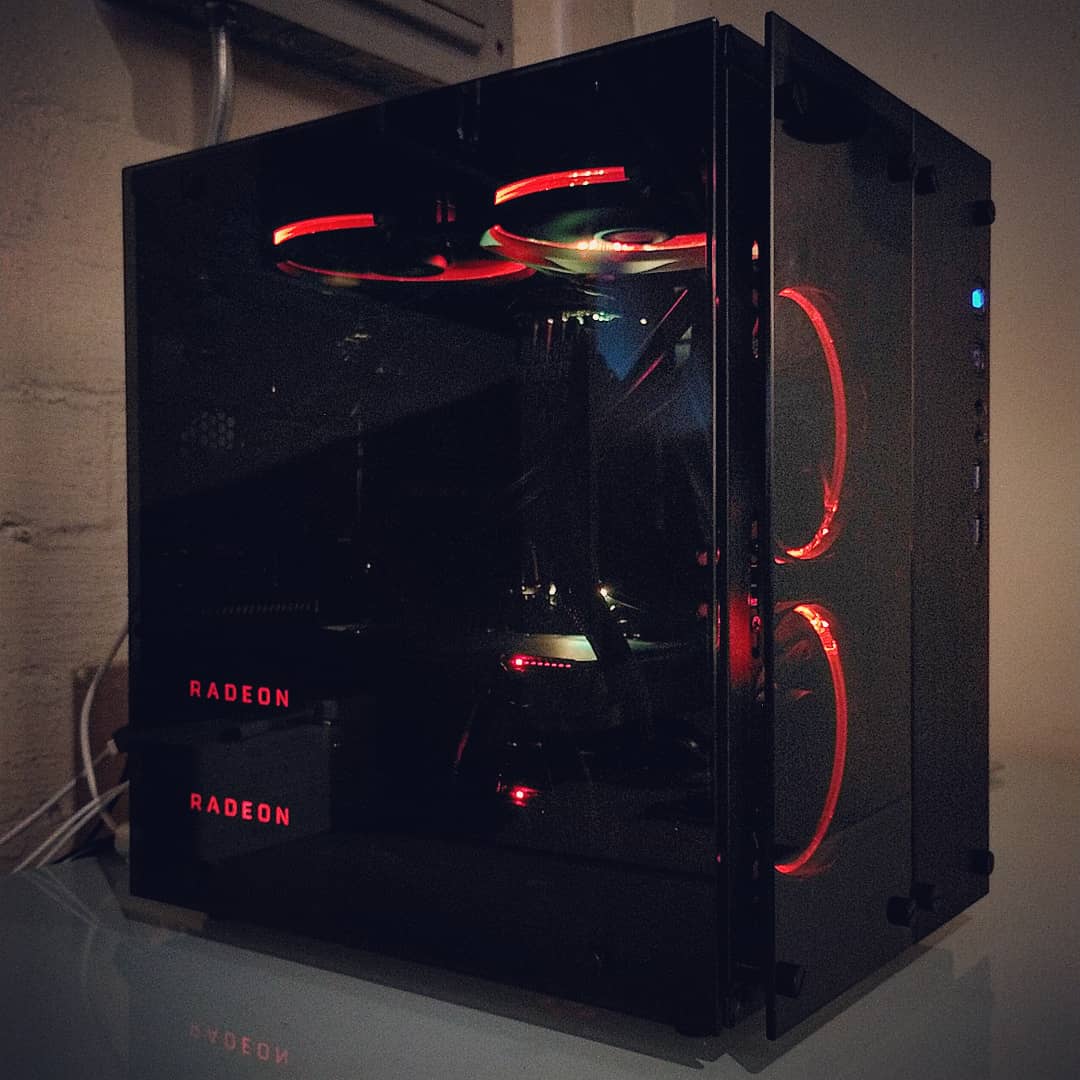
Rosewill CULLINAN PX Red Case
https://www.amazon.com/dp/B07DJ54NS9/?tag=tonymacx86com-20
https://www.newegg.com/Product/Product.aspx?Item=N82E16811147274
SAMSUNG 970 EVO M.2 2280 1TB SSD
https://www.amazon.com/dp/B07BN217QG/?tag=tonymacx86com-20
https://www.newegg.com/Product/Product.aspx?Item=N82E16820147691
Thermaltake Water 3.0 280 Riing CPU Cooler
https://www.amazon.com/dp/B01N6NCWLA/?tag=tonymacx86com-20
https://www.newegg.com/Product/Product.aspx?Item=N82E16835106470
2 x Thermaltake Riing 12 Series 120mm Fans
https://www.amazon.com/dp/B01BYB2WTK/?tag=tonymacx86com-20
https://www.newegg.com/Product/Product.aspx?Item=N82E16835106323
Note: Amazon only had a 3pack available at the time that I made this post
Sabrent Aluminum USB Audio Interface
https://www.amazon.com/gp/product/B00OJ5AV8I/?tag=tonymacx86com-20
Already Owned
FayTun 802.11AC 1200Mbps USB Wifi Adapter
https://www.amazon.com/dp/B07695YGLZ/?tag=tonymacx86com-20
Two 30" Cinema Displays
They never get old even when they get old
Two Apple Mini DisplayPort to Dual-Link DVI Adapter
https://www.amazon.com/gp/product/B0751RL35H/?tag=tonymacx86com-20
Comments
I do a lot of motion graphics work, and my Early 2009 cheese grater Max Pro 8 core was starting to feel tired. I had been meaning to do the dual 6 core upgrade for a while, but I felt like building a new machine would be more fun and most of all- way faster!
This is my first build. So I really did not know exactly what I was getting myself into by buying components that had little exact use cases on the forum. But I trusted myself to be able to figure it out. Luckily, I succeeded enough to make a useful workstation. It wasn't without lots of troubleshooting, but hopefully the following directions make it simple enough to follow.
I wanted something simple, so I chose a very stripped down version of a motherboard, this one lacks Bluetooth, WiFi, and probably other bells and whistles you may find on other higher end ones. I wanted ease of installation though, so I was looking for compatibility out of the box.
Specifications
Processor
3.6Ghz Intel Core i9 9900k Coffee Lake CPU
8 cores, 16 threads
5Ghz Turbo Boost
16MB cache
Supports DDR4 2666Mhz memory
RAM
64GB - Four 16GB DIMMs
Storage
1TB Samsung EVO 970
2.5GB/s Write (tested)
2.9GB/s Read (tested)
Graphics
Intel UHD Graphics 630 (natively supported)
AMD Vega64 (natively supported)
Power
Corsair RM1000i
1000W
I/O
2x Thunderbolt 3 ports (Titan Ridge)
6x USB3 ports and 4x USB2 ports on rear, includes one USB-C port
2x USB3 ports on front of case
Integrated Ethernet
Sound
ALC1220-VB Audio
Digital Audio Out
Installation of the OS
At first I tried to install with High Sierra because I had initially planned to use two GTX 1080's and that limited me to HS. However, after realizing that things would be much easier using AMD cards, I switched for Vega 64's which ended up being choice anyway. Then, I chose to do Mojave because I had read that installation was even easier.
If you want to add the Thunderbolt 3 add-in-card, it will need to be activated with Windows. This can be done for free (you don't need to buy a Windows license). This guide will also show you how to set up dual booting Windows 10 + macOS through Clover.
1. Change BIOS Settings (BIOS versF6)
• Save & Exit → Load Optimized Defaults
• M.I.T. → Advanced Frequency Settings → Enhanced Multi Core Performance : Disabled
• Peripherals → Thunderbolt Configuration → Thunderbolt Boot Support : Boot Once *
• Peripherals → Thunderbolt Configuration → Security Level : No Security *
• Peripherals → Trusted Computing → Security Device Support : Disable
• Peripherals → USB Configuration → Legacy USB Support : Auto
• Peripherals → USB Configuration → XHCI Hand-off : Enabled
• Chipset → Vt-d : Disabled
• Chipset → Internal Graphics : Enabled
• Chipset → DVMT Pre-Allocated : 32M **
• Chipset → DVMT Total Gfx Mem : 128M **
• Chipset → Above 4G Decoding : Enabled
• Chipset → Wake on LAN Enable : Disabled
* Only visible if GC Titan Ridge Thunderbolt Card is installed in PCIe lane 4 (TB3 Card Optional)** Might require restart after setting Internal Graphics = Enabled before this becomes visible
2. Prepare USB Installer - thank you @psedog for providing so many fixes, also a huge shout out to @CaseySJ for the help with TB3
2a. UniBeast
• Format your >8GB flash drive as MacOS Journaled
• Run UniBeast, select your flash drive, Mojave, UEFI
• Should take approximately 5-15 minutes to create the drive
2b. EFI/CLOVER/config.plist Modifications
• Open config.plist in Clover Configurator
- Mount USB Stick EFI Volume using Clover Configurator → Mount EFI
- Open USB Stick EFI Volume, navigate to (your flash drive)/EFI/CLOVER/
- Drag config.plist onto Clover Configurator app icon to open
• Clover Configurator / Boot Tab
- change nv_disable=1 → slide=0
- Default Boot Volume : blank (you can later change this to your main HD name to make it boot straight into OSX)
- XMPDetection : 2
- CustomLogo : Theme
- Debug : False
• Clover Configurator / Devices Tab
- IntelGFX : blank
- Inject : 7
- ResetHDA : True
• Clover Configurator / Gui Tab → Hide Volume :
+ Windows
+ Preboot
+ Recovery
• Clover Configurator / Graphics Tab → Inject Intel : False
• Clover Configurator / Kernel and Kext Patches Tab
- Delete com.apple.iokit.IOUSBHostFamily
- Delete com.apple.driver.usb.AppleUSBXHCI
- Delete com.apple.iokit.IOUSBHostFamily
+ Add "Black Screen Patch Vega 56/64 ..."
• Clover Configurator / SMBIOS Tab
+ Product Name : iMac19,1
+ Board-ID : Mac-AA95B1DDAB278B95
+ Board Serial Number : C02909101CDLNV9AD
+ Serial Number : Generate
+ SmUUID : EC72EEB3-6498-42E2-8E29-5C31664A8DEC
+ Trust : -
• Clover Configurator / Gui Tab
+ CsrActiveConfig : 0x67
+ Click Generate
• System Parameters → Inject Kexts : Yes
• Text Mode
- Navigate to Devices/USB tree (or search for it by hitting cmd+F: "<key>USB</key>")
+ Paste the following code just before on a new line above:
Code:
		<key>Properties</key>
		<dict>
			<key>PciRoot(0x0)/Pci(0x1,0x0)/Pci(0x0,0x0)/Pci(0x0,0x0)/Pci(0x0,0x0)</key>
			<dict>
				<key>PP_DisableClockStretcher</key>
				<integer>1</integer>
				<key>PP_DisablePowerContainment</key>
				<integer>1</integer>
				<key>PP_DisableULV</key>
				<integer>1</integer>
				<key>PP_EnableUploadFirmware</key>
				<integer>0</integer>
				<key>PP_Falcon_QuickTransition_Enable</key>
				<integer>1</integer>
				<key>PP_GfxOffControl</key>
				<integer>0</integer>
				<key>PP_PhmSoftPowerPlayTable</key>
				<data>
				tgIIAQBcAOEGAADuKwAAGwBIAAAAgKkDAPBJAgCWAAgA
				AAAAAAAAAAAAAAAAAAIBXABPAkYClACeAb4AKAF6AIwA
				vAEAAAAAcgIAAJAAqAJtAUMBlwHwSQIAcQICAgAAAAAA
				AAgAAAAAAAAABQAHAAMABQAAAAAAAAABCCADhAO2A+gD
				GgQaBEwETAQBAUwEAQGEAwAIYOoAAABAGQEAAYA4AQAC
				3EoBAAOQXwEABAB3AQAFkJEBAAZssAEABwEI0EwBAAAA
				gAAAAAAAAByDAQABAAAAAAAAAABwpwEAAgAAAAAAAAAA
				iLwBAAMAAAAAAAAAAJj8AQAEAAAAAAAAAAAwNwIABQAA
				AAABAAAA4G0CAAYAAAAAAQAAALh8AgAHAAAAAAEAAAAA
				BWDqAAAAQBkBAACAOAEAANxKAQAAkF8BAAAACChuAAAA
				LMkAAAH4CwEAAoA4AQADkF8BAAT0kQEABdCwAQAGwNQB
				AAcACGw5AAAAJF4AAAH8hQAAAqy8AAADNNAAAARobgEA
				BQiXAQAG7KMBAAcAAWg8AQAAAQQ8QQAAAAAAUMMAAAAA
				AJBfAQACAACwrQEABAAAAQgAmIUAAEC1AABg6gAAUMMA
				AAGAuwAAYOoAAJQLAQBQwwAAAgDhAACUCwEAQBkBAFDD
				AAADeP8AAEAZAQCIJgEAUMMAAARAGQEAgDgBAIA4AQBQ
				wwAABYA4AQDcSgEA3EoBAFDDAAAGAHcBAAB3AQCQXwEA
				UMMAAAeQkQEAkJEBAAB3AQBQwwAAARgAAAAAAAAAC+QS
				vwOnCEYACgBUA5ABkAGQAZABkAGQAZABAAAAAAACBDEH
				3ADcANwALAEAAFkAaQBKAEoAXwBzAHMAZABAAJCSl2CW
				AJBVAAAAAAAAAAAAAAAAAAAAAAACAtQwAAACEGDqAAAC
				EA==
				</data>
				<key>PP_PhmUseDummyBackEnd</key>
				<integer>0</integer>
				<key>PP_ToolsLogSpaceSize</key>
				<integer>524288</integer>
			</dict>
			<key>PciRoot(0x0)/Pci(0x2,0x0)</key>
			<dict>
				<key>AAPL,ig-platform-id</key>
				<data>
				BwCbPg==
				</data>
				<key>device-id</key>
				<data>
				kj4AAA==
				</data>
				<key>framebuffer-con0-busid</key>
				<data>
				AAAAAA==
				</data>
				<key>framebuffer-con0-enable</key>
				<data>
				AQAAAA==
				</data>
				<key>framebuffer-con0-type</key>
				<data>
				AAgAAA==
				</data>
				<key>framebuffer-con1-busid</key>
				<data>
				AAAAAA==
				</data>
				<key>framebuffer-con1-enable</key>
				<data>
				AQAAAA==
				</data>
				<key>framebuffer-con1-type</key>
				<data>
				AAgAAA==
				</data>
				<key>framebuffer-con2-busid</key>
				<data>
				BAAAAA==
				</data>
				<key>framebuffer-con2-enable</key>
				<data>
				AQAAAA==
				</data>
				<key>framebuffer-con2-type</key>
				<data>
				AAgAAA==
				</data>
				<key>framebuffer-fbmem</key>
				<data>
				AACQAA==
				</data>
				<key>framebuffer-patch-enable</key>
				<data>
				AQAAAA==
				</data>
				<key>framebuffer-stolenmem</key>
				<data>
				AAAwAQ==
				</data>
				<key>framebuffer-unifiedmem</key>
				<data>
				AAAAgA==
				</data>
			</dict>
</dict>- Click Synchronize
• Close Clover Configurator, select "OK" if warning dialog for permanent volume storage
2c. EFI Kext Folder Setup
• Navigate to (your flash drive EFI volume)/EFI/CLOVER/kexts/Other
- Delete AtherosE2200Ethernet.kext
- Delete RealtekRTL8111.kext
+ Add AppleALC.kext
+ Add Lilu.kext
+ Add USBPorts.kext (find it within the SSDT_USB_blouse.zip attached this post)
+ Add Whatevergreen.kext
+ Add XHCI-unsupported.kext
+ VegaTab_64.kext (the file output from VGTab_en app that we made in step 2)
2d. Install Latest Clover w/ Additional Drivers
• Download and Open latest Clover build
• Select Change Install Location and select your flash drive
• Click Customize
• Enable Clover for UEFI booting only
• Enable Install Clover in the ESP
• UEFI Drivers
+ ApfsDriverLoader-64
+ AudioDxe-64
+ DataHubDxe-64
+ FSInject-64
+ SMCHelper-64
+ VBoxHfs-64
+ EmuVariableUefi-64
+ NvmExpressDxe-64
+ PartitionDxe-64
• FileVault 2 UEFI Drivers
+ AppleImageCodec-64
+ AppleKeyAggregator-64
+ AppleUITheme-64
+ FirmwareVolume-64
• Navigate to (your flash drive EFI volume)/EFI/CLOVER/drivers64UEFI/
- Delete AptioMemoryFix-64.efi
+ Download and Add OsxAptioFix2Drv-free2000.efi
2e. Add SSDT's for USB3 functionality (I used hackintool to create the included USB SSDT)
• Navigate to (your flash drive EFI volume)/EFI/CLOVER/ACPI/patched/
• Paste the following files (find the first 3 within the SSDT_USB_blouse.zip attached this post)
+ SSDT-EC.aml
+ SSDT-UIAC.aml
+ SSDT-USBX.aml
+ SSDT-DTPG.aml *
* Only needed if GC Titan Ridge Thunderbolt Card is installed in PCIe lane 4 (TB3 Card Optional)
2f. Create "Post Installation" Folder on your USB stick main partition and add a few things
+ Clover Configurator app
3. Install Mojave
3a. Restart
3b. Hold F12 during BIOS to enter boot menu
3c. Select your USB Stick EFI
3d. When installer boots, enter Disk Utility and format "Erase" the SSD. Choose the recommended filesystem option (Journaled)
3e. Create two partitions (a much smaller one for Windows) - GUID *
3f. Exit Disk Utility
3g. Install Mac OS X **
* if not installing TB3 card, you do not need Windows** if computer restarts during this time, do not worry. Installation will take a number of restarts before completion. From here on out, select your main SSD hard drive during the boot sequence.
4. Copy EFI from USB Stick to Main Hard drive
4a. Open Clover Configurator on your USB stick main Partition
4b. Mount EFI → SSD → Mount Partition
4c. Mount EFI → SSD → Open Partition
4d. Mount EFI → USB Stick → Mount Partition
4e. Mount EFI → USB Stick → Open Partition
4f. Copy the entire contents from the USB Stick EFI volume to the SSD EFI Volume (Replace)
5. First boot into macOS!
5a. Install FayTun USB Wireless Adapter drivers
5b. Restart
* if you are adding the TB3 card, it will not be activated yet. read below on how to activate it through Windows6. Install Windows (only necessary for TB3 or if you just want to have it)
6a. Create UEFI Installation Media using Rufus on a Windows computer
6b. Hold F12 during BIOS to enter boot menu
6c. Select your Windows Install Stick
6d. Erase and format your smaller (unused) partition
6e. Install Windows - if it asks for a key, just click "don't have one" and continue
6f. Install Gigabyte Thunderbolt 3 drivers
6g. Enter BIOS and select your Main SSD EFI as Boot option #1
6h. Restart into macOS, TB3 is now enabled.
7. Enjoy!
What Works
+ All USB ports (mapped with SSDT - USB3 supported)
+ TB3 with hot-plugging
+ TB3 will require activation in Windows only once
+ Integrated Graphics (iGPU with acceleration - see screenshot)
+ Native support for Vega64 (full utilization in graphics applications)
+ Integrated Ethernet
+ Integrated Audio
+ Sleep, Shutdown, Restart
+ WiFi (with USB Adapter)
What Doesn't Work
- A few of the USB ports that would have been USB 2+3 on the back are limited to USB3 only due to the 15 port limit. The set of four at the top are locked to USB2 natively, so no change there. As well, the front two ports on the case are fully USB 2+3 supported. I believe that this gives the most functionality and expandability, by leaving the internal USB2 jumpers enabled for future expansion (here you could connect an internal hub such as the NZXT Internal USB Hub and/or the Gigabyte Titan Ridge Add-In Card). Expansion options coming soon when I get the time to update the guide.


What's Next?
+ Try to find a way to install TB3 without needing Windows at all
+ Possibly native macOS WiFi + Bluetooth PCIe card w/ handoff & airdrop support
Final Thoughts
I am super happy with this machine. I took me very little time to build it up considering this was my first build and first hackintosh project. It would not have been possible without the amazing online communities here and elsewhere. Super thankful to all of the other contributing members especially here on these forums who made this a fun learning experience that has already been super rewarding. Thanks for reading and happy building
")
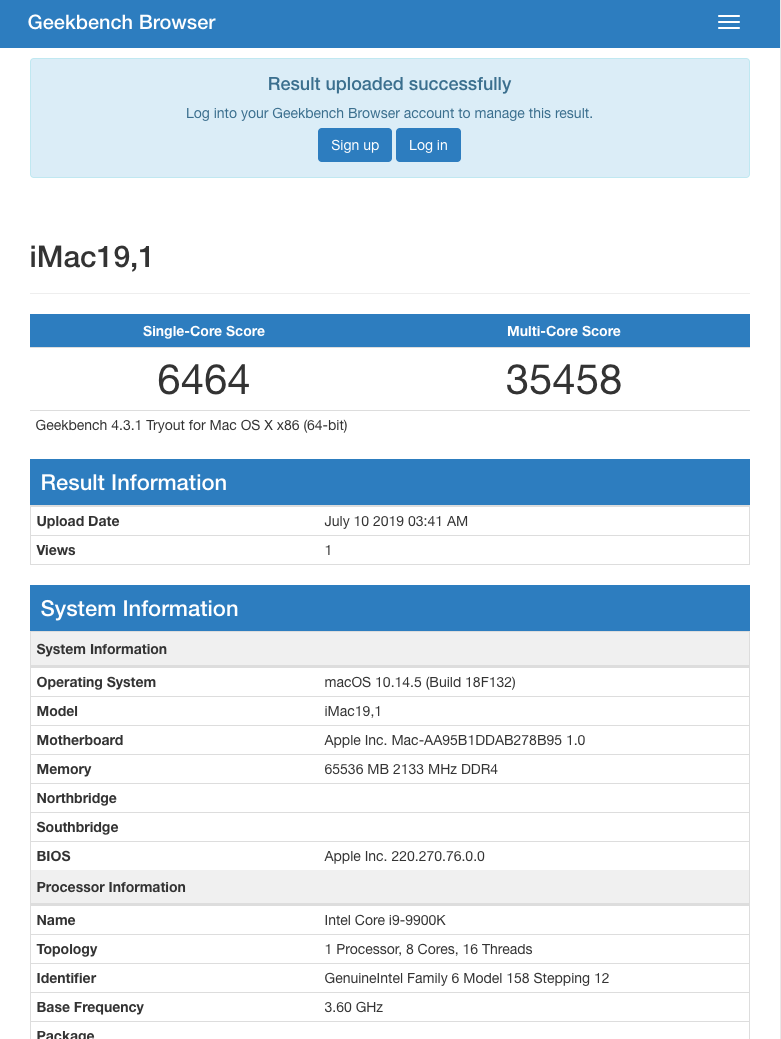
Benchmarks (stock, no overclock)


Attachments
Last edited:

