- Joined
- Sep 11, 2011
- Messages
- 10
- Motherboard
- P7P55D-E LX
- CPU
- Intel Core i7-870 @ 2.94GHz
- Graphics
- XFX Double D HD 7850 1GB
- Mac
- Classic Mac
- Mobile Phone
[Success] | ASUS P7P55D-E LX | i7-870 | XFX HD 7850 | 10.8.3 | White Screen + boot0 Fix!
As the title above suggests, I have successfully installed 10.8.3 w/ Radeon HD 7850, and everything seems to work wonderfully! I realize my motherboard is a bit old (still from my first tonymacx86 build - it had a 5770 in it before), but hopefully this will help someone out there, maybe even with the
HD 7xxx series problems.
Specs
ASUS P7P55D-E LX Motherboard
Intel Core i7-870 CPU
XFX Double D HD-7850 1GB Video Card
12GB Patriot G2 DDR3 Memory
2x500GB Western Digital HD (nothing special -- just file storage)
1x160GB Western Digital HD (for Boot - again nothing special - I'm getting a Solid State Drive next week)
Apple Wired Keyboard (w/ Numpad)
Logitech G300 Mouse
ViewSonic 24" (1920x1080) Monitor
Cooler-Master HAF 932 Case
If anyone's interested - the 7850 card I have is this one:
http://www.newegg.com/Product/Product.aspx?Item=N82E16814150656
Note: I have no integrated graphics, or any other video card. This was all done with only the HD 7850.
Shout-outs and Thanks
I used a couple guides and posts from the forums in order to get my setup to successfully work - all concerning the HD 7850 really - so I'm going to thank those posters and guidemakers here:
Hazemhazoom - for the edited kext files (in KNNSpeed's thread below), for the HD 7850 - and for continuing help in that thread:
http://www.tonymacx86.com/graphics/...eon-hd-7xxx-series-10-8-3-a-2.html#post570601
KNNSpeed - for this thread, which helped confirm device ID's, compatibility, and other great information!:
http://www.tonymacx86.com/graphics/92952-list-confirmed-radeon-hd-7xxx-series-10-8-3-a.html
MK500 - I used his guide in order to help determine the best order of steps to take concerning HD 7xxx series:
http://www.tonymacx86.com/user-buil...-3930k-radeon-hd-7970-ghz-3gb.html#post577520
dwbr - the white screen fix - automates getting past the sleep/white screen issue that currently plagues the 7xxx series:
http://www.tonymacx86.com/graphics/...xx-graphics-testing-thread-25.html#post579839
Thanks to all of these great users for your help! In the guide, I will just pull from all of these so that they may be in one simple spot! If that's
not okay, please let me know and PM me! All the credit goes to you!
The Guide
Files You'll Need
I attached all the kexts and things you'll generally need. The programs themselves (KextBeast, Multibeast, Chameleon Wizard) are all available on tonymacx86.com downloads. For simplicity's sake, I keep all these on a second flash drive.
Both AMDRadeonAccelerator.kext and ATI7000Controller.kext are for the 7850, but i've not confirmed if they also include DeviceID's from other 7xxx Graphics Cards! There's plenty of other DeviceID's there, so perhaps so, but I don't know for sure.
Step 1: BIOS Preparations
Make sure you have the matching BIOS for the DSDT - in my case, for the P7P55D-E LX, because the DSDT was for version 1602, make sure your motherboard is also 1602. Grab it from www.tonymacx86.com and go to Downloads, and then DSDT. Obviously, this is the P55 series from ASUS.
Step 2: USB Preparations
Prepare your USB for ML 10.8.3 - the guide to do this (by tonymacx86) can be found here:
http://www.tonymacx86.com/61-unibeast-install-os-x-mountain-lion-any-supported-intel-based-pc.html
Step 3: Initializing Mountain Lion Setup
Plug in the USB drive, restart the computer, and boot from USB (either automatically from BIOS - mine was, or by pressing F8/F2/whichever your mobo manufacturer states for Boot Drive Selection).
You'll see the Chimera screen, but don't immediately boot into the setup yet! You'll want to start the setup with these flags:
(Note, some people may need cpus=1, or npci=0x2000/3000 or PCIRootUID=0, but I did not, but I assume you know your setup well enough to know which flags you need.)
This puts the initialization into verbose mode, obviously, and the GraphicsEnabler=No portion disables graphics card injection, which disables setup from loading or accessing your framebuffer, among other things, for this session. (If you don't put this flag, you'll see in -v mode that it will hang almost immediately once it tries to ID your device and load the framebuffer, which I believe hangs at a black screen if you don't put -v)
Step 4: Mountain Lion Install Configuration
There's a few things that need to happen during this step that are important for other steps post-install. So follow closely!
First, continue through the setup screens as normal, but before you Install, load Disk Utility from "Utilities" on the bar at the top of the screen.
On the drive where you're going to install OS X, you'll need two partitions:
1) The main partition where you'll be installing OS X - This drive can be "Mac OS X Extended (Journaled)" - and under options needs to be "GUID," the first option. I named this one MacPro.
2) Another small (as small as you can, or want) partition that I leave unused - it needs to be FAT, and also GUID. (Chameleon Wizard uses this later to fix the boot0 problem.) I named this one BOOT.
Once this is done, install OS X to the main partition as normal. Restart the computer once the installation is done, but DO NOT BOOT into OS X just yet.
Step 5: Pre-First Boot Instructions
Now that we've installed OS X, we need to move a couple files around (concerning the 7xxx card) before we boot into the installation. Instead of heading straight into the installation, we actually need to boot from the USB setup again, so we can access Terminal. It's accessed the same way you used Disk Utility to make the above partitions.
Once in Terminal, we'll move a few ATI/AMD Related drivers to a different folder than S/L/E.
(Credit, again, goes to MK500)
This moves those two files into a folder and out of S/L/E because, even though we'll actually be putting in different/edited kexts back into S/L/E later, it's still good to have a backup.
Once you've completed these, go ahead and quit terminal and restart your computer. Once restarted, boot from the USB stick again and into Chimera.
Step 6: The First Boot
Boot into your Mountain Lion installation with, again, the following flags:
(Again, use your own flags if your motherboard is different.)
Go through your setup as usual, creating users/passwords, skipping registration, Location Services, etc. Afterwards, you'll be at your Desktop! Congratulations! Just a little ways to go..
Step 7: Post Installation Configuration
First, place the DSDT.aml file on your desktop as well as the two edited kexts I attached to this post(ATI7000Controller.kext, AMDRadeonAccelerator.kext) for the Graphics, and the edited kext(VoodooHDA VT1708S.kext) for the VIA VT1708S.
Run Multibeast. Click UserDSDT, as you have the DSDT file on your desktop. For the options, I chose
Drivers & Bootloaders->Drivers->Network->Realtek - Lnx2Mac's Realtek RTL81xx v0.0.90
Drivers & Bootloaders->Drivers->Miscellaneous->FakeSMC v5.1.61
Customization->Boot Options->GraphicsEnabler=No
Customization->Boot Options->Use KernelCache (I HAD to do this as performance was too slow. After I checked this, it's performed perfectly. Fast as hell)
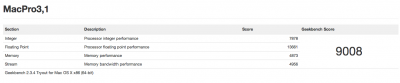
Customization->System Definitions->Mac Pro->Mac Pro 3,1
(Those are all I needed. Everything else works fine for me OOB. YMMV depending on your motherboard)
Hit Continue, then Install. Once it finishes, make sure those three kexts from above are on your desktop.
Use kextbeast (available in tonymacx86.com downloads) to install these.
NOTE: These two AMD/ATI kexts are for the 7850 series (all having the same device ID) only! If you have another card in the 7000 series, check KNNSpeed's thread I linked above for help!
NOTE: The VoodooHDA-VIA Kext above is only for the VIA VT1708S - If your motherboard doesn't have that audio on it, DON'T use it!
If you installed the VoodooHDA-VIA kext, then you'll want to navigate to S/L/E (that's System/Library/Extensions if you didn't know) and remove AppleHDA.kext and AudioAUUC.kext to avoid conflicts.
Now, on to problem/error prevention.
Step 8: boot0 gibberish/error fix, as well as automating past the White Screen
Let's nip the boot0 gibberish in the bud before it even starts. Remember the FAT partition we made earlier? Now we utilize it.
Run Chameleon Wizard - available from tonymacx86 downloads -> Community Software.
Once Chameleon Wizard opens up, let it update, install the update, and relaunch itself.
Once it's relaunched:
1) Select the boot0hfs method. It's the topmost one.
2) Ensure that your main install partition is the "Target Partition:". Hit Install. This enables us to boot without a) the USB stick or b) the boot0 error that comes up.
One last thing. If you restarted now, you would most likely get to the white screen that plagues the 7xxx series. The common approach is to hit your power button, wait an undetermined amount of time, and then wake it from sleep. I don't know about you, but that seems a bit silly. Let's automate things.
I'll just take this straight from dwbr's post that I linked above - thank you so much dwbr!
Note: I set my account to auto-login. If you don't, I assume it takes you to the login screen. Someone confirm this?
Step 9: Completion!
Once you've set in place the fix for the boot0 and white screen error, go ahead and restart! You should be able to boot with no flags (that you need to type, anyway) and the white screen will only appear for just a second before automatically starting your environment!
Again, thanks to all those that I linked above, and I hope this helps somebody!
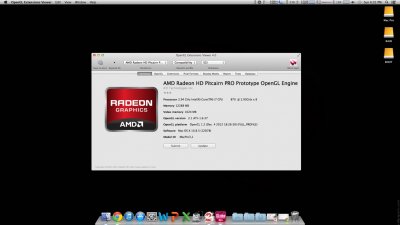
Working: Audio, Video (DVI and HDMI), Ethernet, USB (3.0 unconfirmed - I don't have a USB3.0 device to test)
Not Working: Not sure, don't have all the resources to test the different things. There's no IGFX or built in wireless to test.
As the title above suggests, I have successfully installed 10.8.3 w/ Radeon HD 7850, and everything seems to work wonderfully! I realize my motherboard is a bit old (still from my first tonymacx86 build - it had a 5770 in it before), but hopefully this will help someone out there, maybe even with the
HD 7xxx series problems.
Specs
ASUS P7P55D-E LX Motherboard
Intel Core i7-870 CPU
XFX Double D HD-7850 1GB Video Card
12GB Patriot G2 DDR3 Memory
2x500GB Western Digital HD (nothing special -- just file storage)
1x160GB Western Digital HD (for Boot - again nothing special - I'm getting a Solid State Drive next week)
Apple Wired Keyboard (w/ Numpad)
Logitech G300 Mouse
ViewSonic 24" (1920x1080) Monitor
Cooler-Master HAF 932 Case
If anyone's interested - the 7850 card I have is this one:
http://www.newegg.com/Product/Product.aspx?Item=N82E16814150656
Note: I have no integrated graphics, or any other video card. This was all done with only the HD 7850.
Shout-outs and Thanks
I used a couple guides and posts from the forums in order to get my setup to successfully work - all concerning the HD 7850 really - so I'm going to thank those posters and guidemakers here:
Hazemhazoom - for the edited kext files (in KNNSpeed's thread below), for the HD 7850 - and for continuing help in that thread:
http://www.tonymacx86.com/graphics/...eon-hd-7xxx-series-10-8-3-a-2.html#post570601
KNNSpeed - for this thread, which helped confirm device ID's, compatibility, and other great information!:
http://www.tonymacx86.com/graphics/92952-list-confirmed-radeon-hd-7xxx-series-10-8-3-a.html
MK500 - I used his guide in order to help determine the best order of steps to take concerning HD 7xxx series:
http://www.tonymacx86.com/user-buil...-3930k-radeon-hd-7970-ghz-3gb.html#post577520
dwbr - the white screen fix - automates getting past the sleep/white screen issue that currently plagues the 7xxx series:
http://www.tonymacx86.com/graphics/...xx-graphics-testing-thread-25.html#post579839
Thanks to all of these great users for your help! In the guide, I will just pull from all of these so that they may be in one simple spot! If that's
not okay, please let me know and PM me! All the credit goes to you!
The Guide
Files You'll Need
I attached all the kexts and things you'll generally need. The programs themselves (KextBeast, Multibeast, Chameleon Wizard) are all available on tonymacx86.com downloads. For simplicity's sake, I keep all these on a second flash drive.
Both AMDRadeonAccelerator.kext and ATI7000Controller.kext are for the 7850, but i've not confirmed if they also include DeviceID's from other 7xxx Graphics Cards! There's plenty of other DeviceID's there, so perhaps so, but I don't know for sure.
Step 1: BIOS Preparations
Make sure you have the matching BIOS for the DSDT - in my case, for the P7P55D-E LX, because the DSDT was for version 1602, make sure your motherboard is also 1602. Grab it from www.tonymacx86.com and go to Downloads, and then DSDT. Obviously, this is the P55 series from ASUS.
Step 2: USB Preparations
Prepare your USB for ML 10.8.3 - the guide to do this (by tonymacx86) can be found here:
http://www.tonymacx86.com/61-unibeast-install-os-x-mountain-lion-any-supported-intel-based-pc.html
Step 3: Initializing Mountain Lion Setup
Plug in the USB drive, restart the computer, and boot from USB (either automatically from BIOS - mine was, or by pressing F8/F2/whichever your mobo manufacturer states for Boot Drive Selection).
You'll see the Chimera screen, but don't immediately boot into the setup yet! You'll want to start the setup with these flags:
Code:
-v GraphicsEnabler=No(Note, some people may need cpus=1, or npci=0x2000/3000 or PCIRootUID=0, but I did not, but I assume you know your setup well enough to know which flags you need.)
This puts the initialization into verbose mode, obviously, and the GraphicsEnabler=No portion disables graphics card injection, which disables setup from loading or accessing your framebuffer, among other things, for this session. (If you don't put this flag, you'll see in -v mode that it will hang almost immediately once it tries to ID your device and load the framebuffer, which I believe hangs at a black screen if you don't put -v)
Step 4: Mountain Lion Install Configuration
There's a few things that need to happen during this step that are important for other steps post-install. So follow closely!
First, continue through the setup screens as normal, but before you Install, load Disk Utility from "Utilities" on the bar at the top of the screen.
On the drive where you're going to install OS X, you'll need two partitions:
1) The main partition where you'll be installing OS X - This drive can be "Mac OS X Extended (Journaled)" - and under options needs to be "GUID," the first option. I named this one MacPro.
2) Another small (as small as you can, or want) partition that I leave unused - it needs to be FAT, and also GUID. (Chameleon Wizard uses this later to fix the boot0 problem.) I named this one BOOT.
Once this is done, install OS X to the main partition as normal. Restart the computer once the installation is done, but DO NOT BOOT into OS X just yet.
Step 5: Pre-First Boot Instructions
Now that we've installed OS X, we need to move a couple files around (concerning the 7xxx card) before we boot into the installation. Instead of heading straight into the installation, we actually need to boot from the USB setup again, so we can access Terminal. It's accessed the same way you used Disk Utility to make the above partitions.
Once in Terminal, we'll move a few ATI/AMD Related drivers to a different folder than S/L/E.
(Credit, again, goes to MK500)
Code:
mkdir /Volumes/MacPro/ati_backup
mv /Volumes/MacPro/System/Library/Extensions/ATI7000Controller.kext /Volumes/OSX/ati_backup/
mv /Volumes/MacPro/System/Library/Extensions/AMDRadeonAccelerator.kext /Volumes/OSX/ati_backup/
This moves those two files into a folder and out of S/L/E because, even though we'll actually be putting in different/edited kexts back into S/L/E later, it's still good to have a backup.
Once you've completed these, go ahead and quit terminal and restart your computer. Once restarted, boot from the USB stick again and into Chimera.
Step 6: The First Boot
Boot into your Mountain Lion installation with, again, the following flags:
Code:
-v GraphicsEnabler=NoGo through your setup as usual, creating users/passwords, skipping registration, Location Services, etc. Afterwards, you'll be at your Desktop! Congratulations! Just a little ways to go..
Step 7: Post Installation Configuration
First, place the DSDT.aml file on your desktop as well as the two edited kexts I attached to this post(ATI7000Controller.kext, AMDRadeonAccelerator.kext) for the Graphics, and the edited kext(VoodooHDA VT1708S.kext) for the VIA VT1708S.
Run Multibeast. Click UserDSDT, as you have the DSDT file on your desktop. For the options, I chose
Drivers & Bootloaders->Drivers->Network->Realtek - Lnx2Mac's Realtek RTL81xx v0.0.90
Drivers & Bootloaders->Drivers->Miscellaneous->FakeSMC v5.1.61
Customization->Boot Options->GraphicsEnabler=No
Customization->Boot Options->Use KernelCache (I HAD to do this as performance was too slow. After I checked this, it's performed perfectly. Fast as hell)
Customization->System Definitions->Mac Pro->Mac Pro 3,1
(Those are all I needed. Everything else works fine for me OOB. YMMV depending on your motherboard)
Hit Continue, then Install. Once it finishes, make sure those three kexts from above are on your desktop.
Use kextbeast (available in tonymacx86.com downloads) to install these.
NOTE: These two AMD/ATI kexts are for the 7850 series (all having the same device ID) only! If you have another card in the 7000 series, check KNNSpeed's thread I linked above for help!
NOTE: The VoodooHDA-VIA Kext above is only for the VIA VT1708S - If your motherboard doesn't have that audio on it, DON'T use it!
If you installed the VoodooHDA-VIA kext, then you'll want to navigate to S/L/E (that's System/Library/Extensions if you didn't know) and remove AppleHDA.kext and AudioAUUC.kext to avoid conflicts.
Now, on to problem/error prevention.
Step 8: boot0 gibberish/error fix, as well as automating past the White Screen
Let's nip the boot0 gibberish in the bud before it even starts. Remember the FAT partition we made earlier? Now we utilize it.
Run Chameleon Wizard - available from tonymacx86 downloads -> Community Software.
Once Chameleon Wizard opens up, let it update, install the update, and relaunch itself.
Once it's relaunched:
1) Select the boot0hfs method. It's the topmost one.
2) Ensure that your main install partition is the "Target Partition:". Hit Install. This enables us to boot without a) the USB stick or b) the boot0 error that comes up.
One last thing. If you restarted now, you would most likely get to the white screen that plagues the 7xxx series. The common approach is to hit your power button, wait an undetermined amount of time, and then wake it from sleep. I don't know about you, but that seems a bit silly. Let's automate things.
I'll just take this straight from dwbr's post that I linked above - thank you so much dwbr!
Code:
Here is a small script that "fix" the "white screen" bug for those with "sleep" problems.

You have to blindly type your password or set auto-login. Not perfect, but at least I can use my desktop...

-----------------

First, boot with -x or another supported GPU

Get fp-rotate from this site and uncompress it somewhere:
http://modbookish.lefora.com/2010/06/29/a-unix-utility-to-change-the-primary-display-on-os/

Open Automator.app
Select "Application"
Choose "Run shell script" (from the Actions/Utilities)
Paste this script (change de path):


/Users/user/fb-rotate -d 0 -r 90
/Users/user/fb-rotate -d 0 -r 0


Save the script somewhere.

Go to System Preferences -> Accounts -> Login items and add the script.

(Optional: you can set auto login too).

Boot the same way you used to get the white screen.Step 9: Completion!
Once you've set in place the fix for the boot0 and white screen error, go ahead and restart! You should be able to boot with no flags (that you need to type, anyway) and the white screen will only appear for just a second before automatically starting your environment!
Again, thanks to all those that I linked above, and I hope this helps somebody!
Working: Audio, Video (DVI and HDMI), Ethernet, USB (3.0 unconfirmed - I don't have a USB3.0 device to test)
Not Working: Not sure, don't have all the resources to test the different things. There's no IGFX or built in wireless to test.