
- Joined
- Jul 28, 2010
- Messages
- 143
- Motherboard
- 10.11 and Windows 10
- CPU
- Core i5 4690k
- Graphics
- ASUS GTX 970 Mini 4GB
- Mac
- Classic Mac
- Mobile Phone
Ok, took me about a day, but I finally figured this out!
Chimera Method
1. Download and create a Unibeast installer for Yosemite
2. Reset your UEFI bios to default settings. Make sure Vt-D is disabled, and that CSM is enabled with all options set to legacy only.
3. Boot into your USB by setting it as the first boot priority.
4. When you are at the loader screen, pass in these args: `maxmem= 4096 no-zp -v -f -x nv_disable=1 GraphicsEnabler=No`
5. Once you have booted into the installer, go to Utilities -> Disk Utility and format your disk as GUID and have 1 partition that is HFS. Call it what ever you want.
6. Quit Disk Utility and run the installer, this should take about 20 minutes.
7. **On first boot you must use the same args that are listed above**
8. Run MultiBeast and use the EasyBeast Setting. I followed these settings listed here:
http://www.tonymacx86.com/user-buil...-4790k-gigabyte-r9-270x-2gb-osx-10-9-5-a.html
however the one difference is to use **iMac14,2** as the computer type, and **AtherosE2200Ethernet** for ethernet. Select the ALC892 driver for audio. In addition, you can install the Nvidia Web Drivers:
http://www.tonymacx86.com/graphics/...ate-graphics-drivers-10-10-4-346-01-03-a.html for your graphics card.
9. Reboot still using the USB drive, the args this time are `maxmem=4096 no-zp -v -nvda_drv=1`. You will get into the environment, but things will be laggy. Go to the top right icon for Nvidia and set it to the web driver. It will ask you reboot, do so.
10. Reboot with the same args as the prior step using the usb. You should have no problem loading with full acceleration now. Once you have gotten in, follow this guide to install chimera
http://www.tonymacx86.com/general-h...ithout-uni-multibeast-usb-heres-solution.html
Clover Method
1. Download and create a Unibeast installer for Yosemite
2. Reset your UEFI bios to default settings. Make sure Vt-D is disabled, and that CSM is enabled with all options set to legacy only.
3. Boot into your USB by setting it as the first boot priority.
4. When you are at the loader screen, pass in these args: `maxmem= 4096 no-zp -v -f -x nv_disable=1 GraphicsEnabler=No`
5. Once you have booted into the installer, go to Utilities -> Disk Utility and format your disk as GUID and have 1 partition that is HFS. Call it what ever you want.
6. Quit Disk Utility and run the installer, this should take about 20 minutes.
7. **On first boot you must use the same args that are listed above**
8. Once you are in, install Clover. You will need to have the following settings in the attached image
9. Use clover configurator to do the following to the config.plist:
- Uncheck everything under the ACPI tab
- Boot tab should have the following checked: `-v slide=0 nvda_drv=1 kext-dev-mode=1 rootless=0` and then add `no-zp` as a custom flag
- In the boot tab set the default volume to the name of your hard drive. Legacy should be set to `PBR` and default loader to `boot.efi`. XMPDetection is `No`
- Devices tab, set the audio inject to "1"
- Go to the SMBios tab, click on the wand, and select `iMac` and then `iMac 14,2`
Once you are done, save the config.
10. Run multibeast and install ALC892 audio codec only with the optional mapping of id 1
11. Reboot and make sure you can boot fine without the Chimera USB drive. I recommend always keep an /Extra folder on your drive should Clover ever fail so you can boot in using your USB to fix things.
And that's it! The only issue I have is I can't put my computer to sleep, but that isn't a huge deal for me. Any questions or comments, feel free to post below. This has really been quite a hack job for a board that is suppose to be so easily supported.
Upgrading to 10.11
If you are running the above, you should be able to upgrade directly to 10.11. It may take some time, so be patient.
1. Follow this guide: http://www.tonymacx86.com/el-capita...rect-update-os-x-el-capitan-using-clover.html
2. When you get to the part about running the installer, stop! You need to make some clover adjustments first. Go mount your EFI drive and navigate to your Kexts/ folder. Move all your current kexts to the "Other" folder and delete (or just move to your desktop for backup) the 10.x folders.
3. Edit your config.plist and set your boot options to "-v nv_disable=1 rootless=0" and save it. Now you can run the installer and reboot.
4. When you reboot, select the newly available "Boot OS X Installer" drive by hitting spacebar, and select "Boot with injected kext". This will force your rig to use those kexts in the "Other" folder.
5. Once the installer is done, reboot and update your graphics. You will need to also run the audio enabler script again that we used in Yosemite. Reboot once all that is done, and you should be good to go!
Chimera Method
1. Download and create a Unibeast installer for Yosemite
2. Reset your UEFI bios to default settings. Make sure Vt-D is disabled, and that CSM is enabled with all options set to legacy only.
3. Boot into your USB by setting it as the first boot priority.
4. When you are at the loader screen, pass in these args: `maxmem= 4096 no-zp -v -f -x nv_disable=1 GraphicsEnabler=No`
5. Once you have booted into the installer, go to Utilities -> Disk Utility and format your disk as GUID and have 1 partition that is HFS. Call it what ever you want.
6. Quit Disk Utility and run the installer, this should take about 20 minutes.
7. **On first boot you must use the same args that are listed above**
8. Run MultiBeast and use the EasyBeast Setting. I followed these settings listed here:
http://www.tonymacx86.com/user-buil...-4790k-gigabyte-r9-270x-2gb-osx-10-9-5-a.html
however the one difference is to use **iMac14,2** as the computer type, and **AtherosE2200Ethernet** for ethernet. Select the ALC892 driver for audio. In addition, you can install the Nvidia Web Drivers:
http://www.tonymacx86.com/graphics/...ate-graphics-drivers-10-10-4-346-01-03-a.html for your graphics card.
9. Reboot still using the USB drive, the args this time are `maxmem=4096 no-zp -v -nvda_drv=1`. You will get into the environment, but things will be laggy. Go to the top right icon for Nvidia and set it to the web driver. It will ask you reboot, do so.
10. Reboot with the same args as the prior step using the usb. You should have no problem loading with full acceleration now. Once you have gotten in, follow this guide to install chimera
http://www.tonymacx86.com/general-h...ithout-uni-multibeast-usb-heres-solution.html
Clover Method
1. Download and create a Unibeast installer for Yosemite
2. Reset your UEFI bios to default settings. Make sure Vt-D is disabled, and that CSM is enabled with all options set to legacy only.
3. Boot into your USB by setting it as the first boot priority.
4. When you are at the loader screen, pass in these args: `maxmem= 4096 no-zp -v -f -x nv_disable=1 GraphicsEnabler=No`
5. Once you have booted into the installer, go to Utilities -> Disk Utility and format your disk as GUID and have 1 partition that is HFS. Call it what ever you want.
6. Quit Disk Utility and run the installer, this should take about 20 minutes.
7. **On first boot you must use the same args that are listed above**
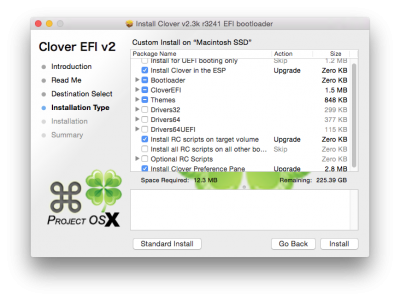
8. Once you are in, install Clover. You will need to have the following settings in the attached image
9. Use clover configurator to do the following to the config.plist:
- Uncheck everything under the ACPI tab
- Boot tab should have the following checked: `-v slide=0 nvda_drv=1 kext-dev-mode=1 rootless=0` and then add `no-zp` as a custom flag
- In the boot tab set the default volume to the name of your hard drive. Legacy should be set to `PBR` and default loader to `boot.efi`. XMPDetection is `No`
- Devices tab, set the audio inject to "1"
- Go to the SMBios tab, click on the wand, and select `iMac` and then `iMac 14,2`
Once you are done, save the config.
10. Run multibeast and install ALC892 audio codec only with the optional mapping of id 1
11. Reboot and make sure you can boot fine without the Chimera USB drive. I recommend always keep an /Extra folder on your drive should Clover ever fail so you can boot in using your USB to fix things.
And that's it! The only issue I have is I can't put my computer to sleep, but that isn't a huge deal for me. Any questions or comments, feel free to post below. This has really been quite a hack job for a board that is suppose to be so easily supported.
Upgrading to 10.11
If you are running the above, you should be able to upgrade directly to 10.11. It may take some time, so be patient.
1. Follow this guide: http://www.tonymacx86.com/el-capita...rect-update-os-x-el-capitan-using-clover.html
2. When you get to the part about running the installer, stop! You need to make some clover adjustments first. Go mount your EFI drive and navigate to your Kexts/ folder. Move all your current kexts to the "Other" folder and delete (or just move to your desktop for backup) the 10.x folders.
3. Edit your config.plist and set your boot options to "-v nv_disable=1 rootless=0" and save it. Now you can run the installer and reboot.
4. When you reboot, select the newly available "Boot OS X Installer" drive by hitting spacebar, and select "Boot with injected kext". This will force your rig to use those kexts in the "Other" folder.
5. Once the installer is done, reboot and update your graphics. You will need to also run the audio enabler script again that we used in Yosemite. Reboot once all that is done, and you should be good to go!
Attachments
Last edited: