Contribute
Register

Stork's Gene Build > ASUS MAXIMUS VIII GENE Z170 - i5-6600K - MSI Vega 56

Status
Not open for further replies.
I thought it only runs at 5G speeds though? Could be on the drive's side of course. Do the asmedia ports count towards the port limit with an ssdt in place or does the ssdt only touch the intel usb ports? Thanks!

If you are relying on System Information to tell you that it's running at 5GB, ignore it. It's wrong. Even the Sonnet USB 3.1 gen 2 card suffers from this incorrect reporting.
Screen Shot 2018-08-19 at 3.45.38 PM.png

Source: https://www.sonnettech.com/product/allegro-usbc-pcie
 
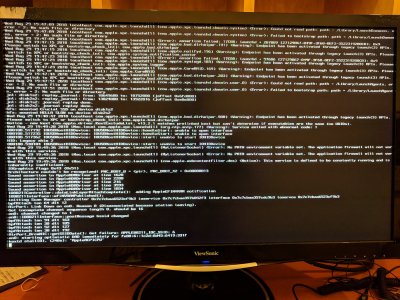
I'm trying to upgrade to High Sierra and I'm stopping at kextd stall[0], (240s): 'AppleACPICPU'

I was able to run through the installer earlier today using the same USB thumb drive. Has anyone had this problem using this configuration?
 

Attachments

  • IMG_20180829_195658.jpg
    IMG_20180829_195658.jpg
    5.3 MB · Views: 123
I'm trying to upgrade to High Sierra and I'm stopping at kextd stall[0], (240s): 'AppleACPICPU'

I was able to run through the installer earlier today using the same USB thumb drive. Has anyone had this problem using this configuration?
How are you doing the upgrade? Fresh install? Or over the previous macOS?
 
I was trying to upgrade over Sierra. The install completed using this USB drive but then clover no longer displayed the nvme hard drive which Sierra was on. So now I'm trying to boot back into the installer and see what's going on.
 
Last edited:
Hi Stork, I did a build about a year ago from your guide here and it worked out well (I have similar Hardware spec as in your build). Today I wanted to try to see if I could install High Sierra on a new ungraded drive (Samsung 960 1T M.2). I followed Tony's steps again and went through your check list as well, updated my BIOS and I even used the same thumb drive. I got to Step 4 installing the OS but when booting to the OS X installer the Apple changes to a circle with a line through it. I tried all my USB ports and tried disabling my NVIDIA Graphics card but I cant get past it. Is there anything you could suggest to get me to the install screen? Any help would be appreciated. Thanks!
 
Hi Stork, I did a build about a year ago from your guide here and it worked out well (I have similar Hardware spec as in your build). Today I wanted to try to see if I could install High Sierra on a new ungraded drive (Samsung 960 1T m.2). I followed Tony's steps again and went through your check list as well, updated my BIOS and I even used the same thumb drive. I got to step 4 installing the OS but when booting to the OS X installer the apple changes to a circle with a line through it. I tried all my USB ports and tried disabling my NVIDIA Graphics card but I cant get past it. Is there anything you could suggest to get me to the install screen? Any help would be appreciated. Thanks!

Are you booting from the EFI partition on the USB or is it maybe trying to boot from the NVME drive?
 
Are you booting from the EFI partition on the USB or is it maybe trying to boot from the NVMe drive?
I'm pretty sure I am. After holding down the F8 key, I see 4 partitions. The two internal storage (the 960 M.2 and a 4T standard 3.5) The other two are from the USB. The EFI and the OSX (Is it normal to have two partitions when creating the boot UniBeast USB?). If I did choose the NVMe drive, would I still see the Clover boot screen? Thanks for replying ddsmith!
 
I'm pretty sure I am. After holding down the F8 key, I see 4 partitions. The two internal storage (the 960 M.2 and a 4T standard 3.5) The other two are from the USB. The EFI and the OSX (Is it normal to have two partitions when creating the boot UniBeast USB?). If I did choose the NVMe drive, would I still see the Clover boot screen? Thanks for replying ddsmith!
As a principle I would disconnect all drives beside the one you are installing to and reconnect them after the installation. And yes, it is normal for the USB to have 2 partitions. Also, try different USB ports, USB 2 through chipset are recommended over controller-bound ones.
 
I updated Gene to High Sierra 10.13.6. I'm using AppleALC and Lilu. (MultiBeast v10.4.0 has the option of using AppleALC and Lilu. But, I'm using the procedures below instead because of I'm replacing the previous MultiBeast audio method which was used before this update. Be sure to read the Features document which comes with the zip file or on MultiBeast.com.)

There's two ways to modify an existing installation:
:ch: You'll need to replace the MultiBeast modified AppleHDA in /S/L/E/ folder. The easiest method is to run the latest High Sierra Combo Update (in this case 10.13.6). (Thanks, @pastrychef!)

:ch: You'll need to replace the MultiBeast modified AppleHDA in /S/L/E/ folder with the unmodified Apple HDA in the installer. I used Pacifist to open up the Installer app to file AppleHDA. (Pacifist has a trial version; I recommend it's purchase for use on your hackintosh(es).)

:ch: Run Pacifist and extract the AppleHDA to your Desktop. (Make sure it's the only kext on your Desktop.) AppleHDA will be in the .../Extensions/ folder shown below:

:ch:Right click on the AppleHDA, choose "Extract to Custom Location" and choose your Desktop.
:ch:Close Pacifist.

:ch:Go to your installation disk's /System/Library/Extensions/ folder and move AppleHDA to the Trash.
:ch:With the Installation app extracted AppleHDA the only kext on your Desktop, run KextBeast choosing the /System/Library/Extensions/ folder.
:ch:Move the AppleALC kext on your Desktop to a safe place to archive it or you can delete it.

:ch:Now update to High Sierra 10.13.16

Now, after the AppleHDA.kext has been replaced by the Easy Way or Adventuresome Method, do the following:


:ch: (Optional) If you using a Nvidia graphics card that requires the Nvidia drivers, you'll be prompted to update your driver; do so, but don't click on the reboot button until the following procedures are accomplished.
:ch: Download AppleALC and Lilu, extract the kexts from the zip files and put them on the Desktop. Again, only have these two kexts on your Desktop.
:ch: (Optional) Check the 3rd party kexts in the /Library/Extensions/ folder such as the IntelMausiEthernet.kext and USBInjectAll.kext. I had to update both and delete RehabMan's CodecCommander.kext. The latest IntelMausiEthernet.kext is in the Download > kexts (Menu bar on thetop of this page).
:ch: Run KextBeast choosing the /Library/Extensions/ folder.

:ch: Now we have to modify the .../EFI/CLOVER/config.plist file to remove all the old audio patches. So, using the Terminal command "diskutil list", find your EFI partition for installation drive and mount the EFI partition using EFI Mounter V3.
:ch: Backup up your current config.plist. Now open config.plist in Xcode or PlistEditorPro (my preference).
:ch: Make sure Audio Device ID = 1.
Code:
...
<key>Devices</key>
    <dict>
        <key>Audio</key>
        <dict>
            <key>Inject</key>
            <string>1</string>
        </dict>
...
:ch: Remove the audio patches in the KextsToPatch area. You should only have the "External Icons Patch" and the "USB 10.13.6+ by PMHeart,FredWst" patch:
Code:
<array>
            <dict>
                <key>Comment</key>
                <string>External icons patch</string>
                <key>Find</key>
                <data>
                RXh0ZXJuYWw=
                </data>
                <key>Name</key>
                <string>AppleAHCIPort</string>
                <key>Replace</key>
                <data>
                SW50ZXJuYWw=
                </data>
            </dict>
            <dict>
                <key>Comment</key>
                <string>USB 10.13.6+ by PMHeart,FredWst</string>
                <key>Disabled</key>
                <false/>
                <key>Find</key>
                <data>
                g32IDw+DpwQAAA==
                </data>
                <key>InfoPlistPatch</key>
                <false/>
                <key>MatchOS</key>
                <string>10.13.x</string>
                <key>Name</key>
                <string>com.apple.driver.usb.AppleUSBXHCI</string>
                <key>Replace</key>
                <data>
                g32ID5CQkJCQkA==
                </data>
            </dict>
        </array>
:ch: Now Reboot.​

Upon reaching the Desktop, you should have audio which will survive wake-up from sleep. :thumbup:
 
As a principle I would disconnect all drives beside the one you are installing to and reconnect them after the installation. And yes, it is normal for the USB to have 2 partitions. Also, try different USB ports, USB 2 through chipset are recommended over controller-bound ones.

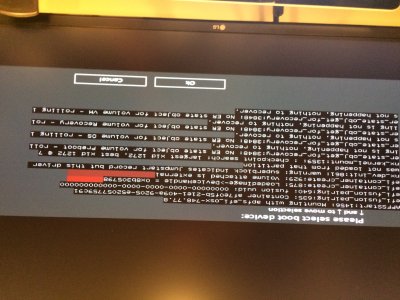
Thanks ddsmith only one USB port worked to install (the bottom front ports... very odd) also I did remove all other drives. That got me through the install 98% of the way. At the last step (to Change BOOT > Boot Options Priorities > Select your installation disk to either the:UEFI Samsung 960 Pro NVMe drive) when restarted I do not see my new internal Partition just the external USB on the Clover Boot Screen. Almost as if I never installed. Did it not take? is there something else I missed? Again any help is appreciated Thanks!

I also wanted to add if I boot from the USB I see 5 options on the Clover boot screen they are 1.External USB 2. Boot filevault 3. Preboot 4. Boot internal OS 5. Recovery. When I do select the USB to Boot some line commands flash up... see photo.
 

Attachments

  • IMG_4797.JPG
    IMG_4797.JPG
    1.4 MB · Views: 129
  • IMG_4800.JPG
    IMG_4800.JPG
    1.6 MB · Views: 123
Last edited:
Status
Not open for further replies.
Back
Top