
P1LGRIM
Moderator
- Joined
- Mar 2, 2012
- Messages
- 26,462
- Motherboard
- Lenovo ThinkStation p700
- CPU
- 2x E5-2620 V3
- Graphics
- RX 560
- Mac
- Classic Mac
- Mobile Phone
Spares Box HTPC POC Build - GA-B85M-DS3H-A - i3-4330
GeForce GT640 - 10.11.4
GeForce GT640 - 10.11.4
Components
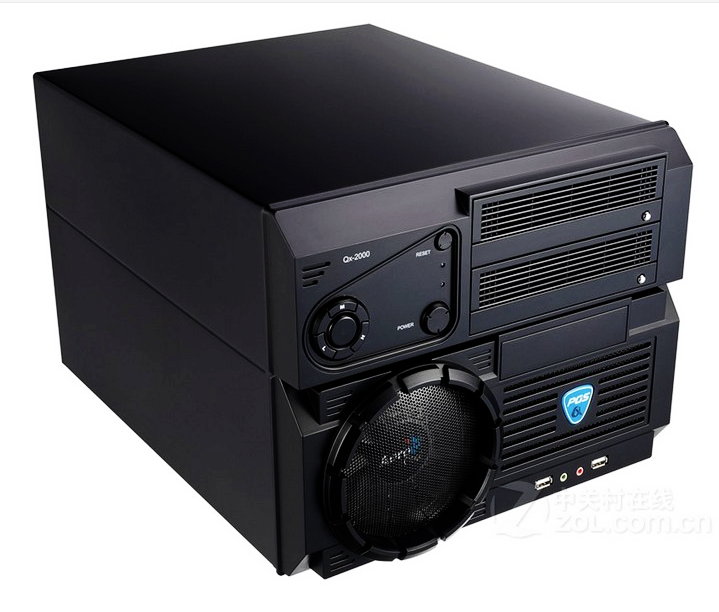
Case : Aerocool Qx-2000 Gaming Cube Case - Amazon
Motherboard : Gigabyte B85M-DS3H-A - Rev 1.0 - BIOS F2 - Amazon
Processor : Intel(R) Core(TM) i3-4330 3.5 GHz - Amazon
Memory : 2 x 2GB
Graphics : Gainward GeForce GT640 1024 MB - Amazon
SSD : SanDisk SSD PLUS 240GB - Amazon
PSU : Corsair CS450M - Amazon
Card reader : Sabrent CR-USNT - Amazon
SATA racks : x 2 - Amazon
Hard disk : Western Digital 1TB - Amazon
Audio : Logitech S150 USB speakers - Amazon
Comments
I was recently searching through my spares box(es) for a part for one of my builds when it occurred to me that there were probably more than enough spares available to enable me to create another machine.
I didn’t have a spare case so I purchased an Aerocool Qx-2000 ‘cube’ case because it looked different and interesting but more importantly, because it was inexpensive.
The motherboard was one of those bargains that you have to buy because it is so reasonably priced but then I never got around to actually using it.
The i3-4330 processor was redundant from my ThinkServer when I upgraded it to a Xeon E3-1245V3.
The GT640 graphics card was also used in my ThinkServer for a while before I replaced it with a GT740.
The 4GB of RAM came from another build that I later swapped out for 16GB.
The SSD was a Black Friday buy that although I didn’t need it at the time, I knew it would come in useful one day.
The PSU was intended for another build but turned out to be borderline for the requirements and so one with a bigger output was used instead.
The Sabrent card reader was installed for a while in another machine but I found that I wasn’t using it so I removed it. I installed it in this build because there was a FDD bay in the case and it gives me another USB port on the front. Incidentally, these card readers are stupidly expensive in the UK. I bought mine from the USA via eBay and even after paying the shipping charges it worked out much more reasonable.
There are also two 5.25” drive bays on the front panel and into these I added two SATA racks.
I use these in all of my builds so there are usually a few in the spares box.
I have several pairs of Logitech S150 USB speakers which have the distinct advantage that they have native support which means that you plug them in and they work without any additional configuration.
This build was started purely for my own amusement with no intended purpose as I already have way too many computers. At some point during the construction process I came across an article about a Mac based HTPC (Home Theatre Personal Computer).
I have my iTunes and an Apple TV and I only own around three DVDs as I usually just watch a film once (So many films and so little time), so I have never felt the urge to have a dedicated HTPC.
Therefore although it was questionable if I would fully use it, I decided that this build would serve as a test platform for the concept with a view to miniaturising the process if the results proved favourable.
Installation Notes
Preparation
BIOS Settings
First I checked with the Gigabyte website to see that the motherboard BIOS was the latest version (F2).
It is good practise to start with Optimized Defaults then tweak from there.
These are the only required changes to the default settings:
M.I.T. - Advanced Memory Settings - Extreme Memory Profile - Profile1
BIOS Features - Intel Virtualisation Technology - Disabled
Peripherals - XHCI - Auto (not Smart Auto)
Peripherals - Audio Controller - Enabled
Peripherals - Intel Processor Graphics - Disabled
Peripherals - EHCI Handoff - Enabled
Peripherals - SATA Configuration - Hot Plug - Enabled for ports connected to SATA racks
Peripherals - Super IO configuration - Serial Port A - Disabled
Peripherals - Super IO configuration - Parallel Port - Disabled
Save & Exit
UniBeast
I followed the guide : http://www.tonymacx86.com/el-capita...-el-capitan-any-supported-intel-based-pc.html

I used a 16GB SSD in an external USB case but the procedure is the same as for a USB flash drive.
UniBeast selections :
UEFI Boot Mode
No Optional Graphics Configuration required for Geforce GT 640
When UniBeast finished I created a UTILITIES folder on the USB installer to which I added the following :
MultiBeast - FakeSMC.kext - Clover - Clover Configurator - iMessageDebug - simpleMLB - DPCIManager
I installed by following the guide up to the end of STEP 4.
Post Installation
Here I deviated from the guide.
I copied the UTILITIES folder from the USB installer drive to the desktop.
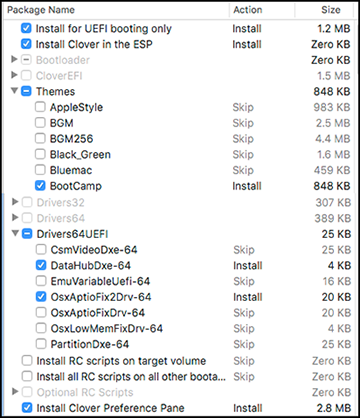
From the UTILITIES folder I installed Clover with these settings.
From the UTILITIES folder I copied Clover Configurator to the /Applications folder.
From the UTILITIES folder I copied FakeSMC.kext to EFI/CLOVER/kexts/Other
From the UTILITIES folder I ran MultiBeast and selected just :
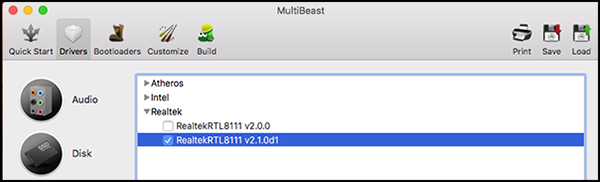
Drivers - Network - Realtek - RealtekRTL8111 v2.1.0d1. Build - Install etc.
Shutdown and then removed the USB installer
Power on - Press Del to enter BIOS
BIOS Features - Storage Boot Option Control - UEFI Only
BIOS Features - Boot Option Priorities - Boot Option #1 - UEFI Partition of Hard drive / SSD.
Save & Exit
At this point the Basic build is up and running.
_
The config.plist and iMessage
The one thing that seems to cause the most people problems is configuring for iMessage when actually it is a pretty straightforward (if somewhat lengthy) procedure :
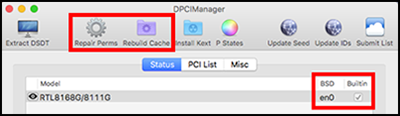
The first thing to do is to open DPCIManager and check that your Ethernet interface is active, set to en0 and BuiltIn. While you have DPCIManager open it’s a good idea to ‘Repair Perms’ and ‘Rebuild Cache’.
When complete quit DPCIManager.
The edits listed below are to the config.plist created during the UniBeast install process.
From the /Applications folder run Clover Configurator
Mount the EFI partition
File - Open - EFI/CLOVER/config.plist
Acpi - Deselect all of the fixes
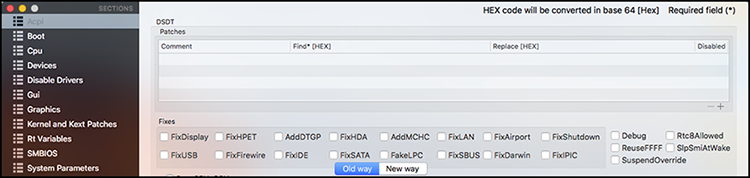
Boot - Select darkwake=0 - Slide=0 - dart=0 - XMPDetection=Yes

Cpu - No Action required
Devices - No Action required
Disable Drivers - No Action required
Gui - Select Language and Theme

Graphics - No Action required
Kernel and Kext Patches - KextsToPatch - Click +

Name = AppleAHCIPort Find = 45787465726E616C Replace = 496E7465726E616C Comment = External icons patch
Rt Variables - ROM = UseMacAddr0 MLB = Delete BooterConfig = 0x28 CsrActiveConfig = 0x67

SMBIOS - Click the Magic Wand tool
Click the iMac picture

Select iMac 14,2 from the dropdown list
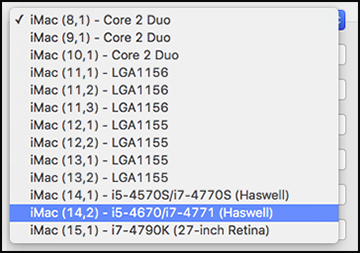
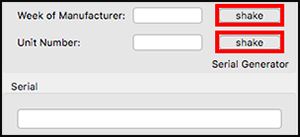
Click the Shake buttons several times to generate a serial number - Click OK.
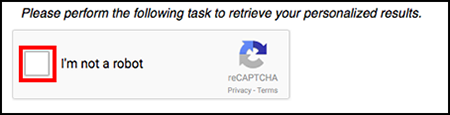
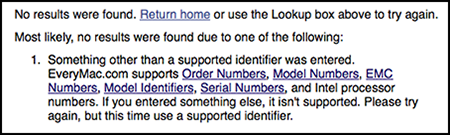
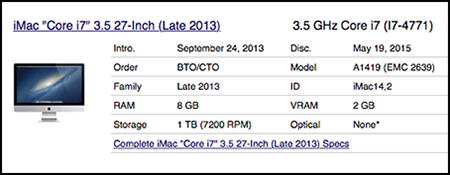
Check the serial number on everymac.com
Paste the serial number into the box and click Lookup

Prove that you are not a robot.
If you see this response your serial number is invalid - Go back to the magic wand and generate another one.
If you see this response it means that you have generated a valid serial number and it is ok to proceed to the next stage.
Paste the serial number onto the Apple Check Coverage page and pass the test.
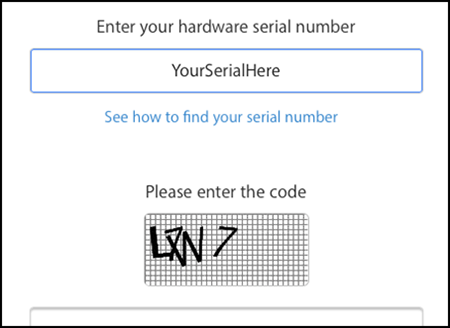
If you see this response it means that you have entered a serial number that is already registered in the Apple database. Return to the magic wand tool and generate another one.

If you see this response and your serial number has passed validation on everymac.com then all is ok.

Quit Safari
Open a Terminal window and type uuidgen several times to generate some random UUIDs.
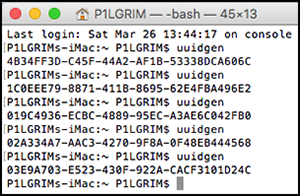
Copy one of your random UUID numbers from the Terminal window and paste it into the SmUUID box in Clover Configurator. Select Trust in the nearby box.

In Clover Configurator select File - Save
Quit Clover Configurator.
Restart
From your /Applications folder run Clover Configurator,
Mount the EFI partition.
Select File - Open - EFI/CLOVER/config.plist
Once your config.plist file has loaded into Clover Configurator :
Open a Terminal window
Open the UTILITIES folder in finder
Drag simpleMLB.sh from Finder onto the Terminal window, click inside the Terminal window and press Return
Copy the generated number into Clover Configurator - SMBIOS - Board Serial Number.

In Clover Configurator select File - Save
Quit Clover Configurator and Terminal.
Restart
Open the UTILITIES folder and run iMessageDebug.
Press y and Return to save a copy called iMessageDebug.txt to your UTILITIES folder.
Restart
Open the UTILITIES folder and run iMessageDebug.
Compare the output with the saved copy in the UTILITIES folder.
If the two copies are the same you may go ahead and set up iMessage.
It has been noted that the data may change on the last line of the output in iMessageDebug, this appears to be ok though.
Power Management
I followed the guide : http://www.tonymacx86.com/ssdt/177456-quick-guide-generate-ssdt-cpu-power-management.html.
Monitor with the Intel Power Gadget.
You can also use the Monity widget from the app store to monitor your system.
Resources
http://www.tonymacx86.com/el-capita...-el-capitan-any-supported-intel-based-pc.html
http://www.tonymacx86.com/ssdt/177456-quick-guide-generate-ssdt-cpu-power-management.html
http://www.tonymacx86.com/general-help/110471-how-fix-imessage.html
Clover Wiki
Last edited:

")