Contribute
Register

[Solved] UEFI clover boot option gone after BIOS update

Status
Not open for further replies.
Joined
Dec 31, 2016
Messages
23
Motherboard
Gigabyte Z170X-UD5
CPU
intel i7-6700K
Graphics
Gigabyte GeForce GTX 980ti
Mac
  1. MacBook Air
  2. Mac mini
  3. Mac Pro
Mobile Phone
  1. iOS
Following fixing a different issue, where Clover was making a new UEFI boot drive every time I restarted (causing 20+ boot drives in bios), my issues have gone the other way.

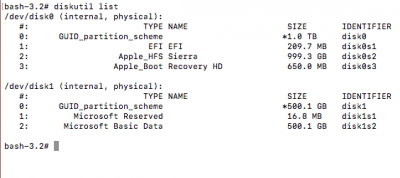
I updated BIOS to F20, and no longer see any UEFI drives to go to clover in the BIOS setup - only the two drives in the system. I have gone back and made the basic adjustments to the bios (UEFI enabled, etc), and I can still launch clover via a USB - it's just the onboard clover option that seems to have gone missing. Is there a way to restore it?
 
Last edited:
Still researching - to be clear, I can boot to Sierra and Win if I start up through a USB. What I can't do is remove the USB and direct BIOS to use Clover's UEFI to start - the option simply isn't there.

Only UEFI is enabled in BIOS.
I have tried going to Clover Options from the USB and adding the options, but that does nothing.
I can still mount the EFI drive in Sierra, so to the best of my knowledge, it is actually still there (and it's not the USB EFI).
I've seen a few people say "use EasyUEFI in windows" but I don't want to spend $30 to fix this.
BIOS doesn't let me manually add a drive - wish it did.
Attaching disk list in case you're curious
 

Attachments

  • Screen Shot 2017-01-07 at 12.23.06 PM.png
    Screen Shot 2017-01-07 at 12.23.06 PM.png
    35.1 KB · Views: 3,896
Tracked down a solution that didn't require new apps - and this worked for me.

Pre - get your system booted up off the USB and mount the system EFI drive (not the USB EFI drive) - check your directories and copy down the path to the \CLOVER\CLOVERX64.EFI file (I noticed this differs some amongst varying install procedures on the net). Also, doesn't hurt to open Terminal and run "disk util" - note the /dev/disk# location of the drive that has the EFI installed in it. Now, restart and proceed.
  • Boot into clover off of the USB
  • Start up the Clover EFI shell
  • Pull the USB (saves confusion in the next step)
  • Type "map" (no quotes)
  • Look at the drives and apply some thinking about which one is the drive where your Clover EFI drive is - the drive# from disk util will help if you have several drives/partitions showing up. Once you've got it, note the drive - e.g. mine was "FS2"
  • Type "bcfg boot dump" (no quotes)
  • You'll see each boot entry proceeded with a number. For the love of Pete, don't use any of those - determine the next number up. My highest was 03, so I used 04 in the next step.
  • Type the following to create the boot entry:
    bcfg boot add 04 FS2:\EFI\CLOVER\CLOVERX64.EFI CloverUEFI
  • In the above step, the path is helped out by having checked my mounted EFI drive on my system. The last part, "CloverUEFI" above is how the boot entry will appear in BIOS - name this as you will.
  • Type "bcfg boot dump" again to be sure your new entry made it.
  • Exit, shut down, pull the USB if you didn't already.
  • Hold down DEL to open BIOS settings - and in my case - CloverUEFI was in the Boot options. I set it as primary, and everything was back to normal with no more need to use the USB.

If you were near me right now I would kiss you; no homo. The UEFI option had inexplicably disappeared from my boot options but your guide helped me fix it. Thank you so much!
 
Thank you so much.
To add a little bit more details on the procedure.
You can identify your EFI partition by running "diskutil list"
Pay attention to it's identifier, in my case it is disk0s1
Then proceed "diskutil info disk0s1"
Take a picture or note down the Disk / Partition UUID.
When you run "map" in the Clover, match the UUID and the string of numbers/letter behind an FS, then you know which FS# to use for sure.
 
Tracked down a solution that didn't require new apps - and this worked for me.

Pre - get your system booted up off the USB and mount the system EFI drive (not the USB EFI drive) - check your directories and copy down the path to the \CLOVER\CLOVERX64.EFI file (I noticed this differs some amongst varying install procedures on the net). Also, doesn't hurt to open Terminal and run "disk util" - note the /dev/disk# location of the drive that has the EFI installed in it. Now, restart and proceed.
  • Boot into clover off of the USB
  • Start up the Clover EFI shell
  • Pull the USB (saves confusion in the next step)
  • Type "map" (no quotes)
  • Look at the drives and apply some thinking about which one is the drive where your Clover EFI drive is - the drive# from disk util will help if you have several drives/partitions showing up. Once you've got it, note the drive - e.g. mine was "FS2"
  • Type "bcfg boot dump" (no quotes)
  • You'll see each boot entry proceeded with a number. For the love of Pete, don't use any of those - determine the next number up. My highest was 03, so I used 04 in the next step.
  • Type the following to create the boot entry:
    bcfg boot add 04 FS2:\EFI\CLOVER\CLOVERX64.EFI CloverUEFI
  • In the above step, the path is helped out by having checked my mounted EFI drive on my system. The last part, "CloverUEFI" above is how the boot entry will appear in BIOS - name this as you will.
  • Type "bcfg boot dump" again to be sure your new entry made it.
  • Exit, shut down, pull the USB if you didn't already.
  • Hold down DEL to open BIOS settings - and in my case - CloverUEFI was in the Boot options. I set it as primary, and everything was back to normal with no more need to use the USB.

Hi, I tried to follow your guide today but have some questions. I did the same process on a DualBoot Hackintosh with EasyUEFI so I understand how the fix works but have some problems using Clover UEFI shell.

How can I use the Shift key in Clover UEFI without jumping to the beginning of the row? It took me a while to figure out the key mappings for my german keyboard but I found all keys I needed. The problem is every time I use the shift key, the cursor moves to the beginning of the row. I can use capslock to write uppercase letters but I can only insert symbols with shift key. I tried a generic Cherry keyboard and and Apple USB Keyboard.

Pulling out the USB while the UEFI shell is mounted (from the USB) and then entering "exit" crashed my system. Doesn't sound like a save thing to do...
 
please help me. I have the exact same problem. i don't know how to locate my cloverx64.efi file. i mean, i think i have.... but i'm not sure if it's right. i have an 'efi-backups' folder in my 'my computer' directory which takes me to it. aka: yomesmite/efi-backups/r4097/2017-06-26-08h29/EFI/CLOVER/COLVERX64.EFI. but when i typed the 'bcfg boot add 04 FS2:\EFI\CLOVER\CLOVERX64.EFI CloverUEFI' i get cannot found... please help.... i was booting between windows and Yosemite and i got 'repair windows' because it failed to boot and it broke my Yosemite boot..... now i'm really ****ing sad. after i'd just spent so long finally getting it to boot. any help is welcome, thanks :/
 
please help me. I have the exact same problem. i don't know how to locate my cloverx64.efi file. i mean, i think i have.... but i'm not sure if it's right. i have an 'efi-backups' folder in my 'my computer' directory which takes me to it. aka: yomesmite/efi-backups/r4097/2017-06-26-08h29/EFI/CLOVER/COLVERX64.EFI. but when i typed the 'bcfg boot add 04 FS2:\EFI\CLOVER\CLOVERX64.EFI CloverUEFI' i get cannot found... please help.... i was booting between windows and Yosemite and i got 'repair windows' because it failed to boot and it broke my Yosemite boot..... now i'm really ******* sad. after i'd just spent so long finally getting it to boot. any help is welcome, thanks :/

Please fix your profile, we do not support AMD builds here :
The Rules said:
AMD nor Atom CPUs and NVIDIA, ATI, VIA or SIS desktop chipsets are not supported by the methods and software on this site and will not work. Any post requesting help for or asking about these will be deleted.
 
Tracked down a solution that didn't require new apps - and this worked for me.

Pre - get your system booted up off the USB and mount the system EFI drive (not the USB EFI drive) - check your directories and copy down the path to the \CLOVER\CLOVERX64.EFI file (I noticed this differs some amongst varying install procedures on the net). Also, doesn't hurt to open Terminal and run "disk util" - note the /dev/disk# location of the drive that has the EFI installed in it. Now, restart and proceed.
  • Boot into clover off of the USB
  • Start up the Clover EFI shell
  • Pull the USB (saves confusion in the next step)
  • Type "map" (no quotes)
  • Look at the drives and apply some thinking about which one is the drive where your Clover EFI drive is - the drive# from disk util will help if you have several drives/partitions showing up. Once you've got it, note the drive - e.g. mine was "FS2"
  • Type "bcfg boot dump" (no quotes)
  • You'll see each boot entry proceeded with a number. For the love of Pete, don't use any of those - determine the next number up. My highest was 03, so I used 04 in the next step.
  • Type the following to create the boot entry:
    bcfg boot add 04 FS2:\EFI\CLOVER\CLOVERX64.EFI CloverUEFI
  • In the above step, the path is helped out by having checked my mounted EFI drive on my system. The last part, "CloverUEFI" above is how the boot entry will appear in BIOS - name this as you will.
  • Type "bcfg boot dump" again to be sure your new entry made it.
  • Exit, shut down, pull the USB if you didn't already.
  • Hold down DEL to open BIOS settings - and in my case - CloverUEFI was in the Boot options. I set it as primary, and everything was back to normal with no more need to use the USB.
Genius! Thank you dude!!
 
Status
Not open for further replies.
Back
Top