Contribute
Register

[Solved] Still waiting for root device

Status
Not open for further replies.
Ok, so I did a reinstall, and I tried doing a few things differently.

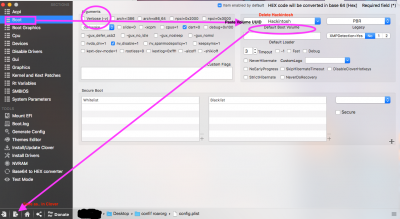
I followed the same procedure I described in my first post, up until running multibeast. This time, when I ran multibeast, I did more than just the quick start for UEFI. I did the quickstart UEFI, plus 200 series audio, intel mausi ethernet, Intel 6xx graphics, iMac14,2 profile, and I think a couple of other things. Anyway, I looked over my Clover config in Clover Configurator, and everything looked appropriate. I'll attach the new plist.

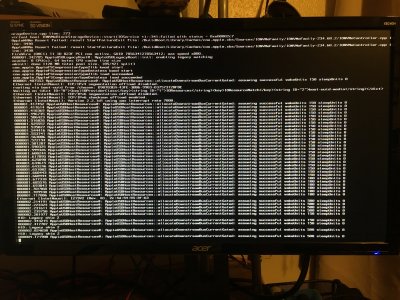
So, after all of that, I attempted to boot via Clover on internal SATA drive (the one with all the configurations applied) -> Sierra on internal SATA drive, and I get the same result! The same exact thing. It does not make sense to me that prior to running multibeast, booting my Sierra install works fine, but afterwards, it consistently causes this error.

Since you have z270 system( "Intel 200 series Chipset MoBo") which I don't personally own nor worked hands on, I am beginning to think, it might need a tweaked 200 series SATA kext to make its SATA hdd visible when the Sierra Kernel shows up to take control. This is just a thought as your current Clover config.plist I just looked at would have worked perfectly for earlier Intel Chip-set series [like 6, 7 , 8 , 9 series].

I am sure this Forum has the talent and expertise to find the answer for you.

All you have to do is to present all the information you have in a clear and explicit way as if the readers are totally ignorant with no background knowledge about computing in general and mac system in in particular and not to assume the readers may know what you alone may know about your system and the steps you have already taken to solve a problem you have faced. Believe me, that will also help those who read these posts to learn a thing or two.

Uploading images to clarify and support what you have observed on your computer screen with the post rather than providing a link and giving those who want to help you a 'home work', is not a good strategy to get help from very busy and knowledgeable guys like RehabMan and others like him in this Forum. That's my 2¢. I really wished I could help to fix the problem for you.
 
Uploading images to clarify and support what you have observed on your computer screen with the post rather than providing a link and giving those who want to help you a 'home work', is not a good strategy to get help from very busy and knowledgeable guys like RehabMan and others like him in this Forum. That's my 2¢. I really wished I could help to fix the problem for you.

Thanks for your input cmn699. I guess I just thought I was doing something simple wrong, so I didn't know that I'd need such detailed information.

I'll try to give a summary of what I've done as thoroughly as possible.
  1. I downloaded the most recent Sierra install application from the App Store
  2. I used the most recent Unibeast with the default options to create a UEFI installer USB on an 8GB USB 2.0 flash drive
  3. I copied the most recent Multibeast to the install USB.
  4. I copied AHCIPortInjector.kext to install USB/EFI/CLOVER/kexts/Other
  5. I plugged the install USB into a USB 3.0 port on my PC (I have no USB 2.0 ports)
  6. I booted to Clover on the USB, set FakeCPUID to 0x0506E3, and booted the Sierra installer from the USB
  7. I installed Sierra to an empty SATA drive on my PC
  8. I booted to Clover on the USB, then booted to Sierra on my SATA drive
  9. I ran Multibeast and did quick start UEFI to get Clover installed on my Sierra SATA drive
  10. I rebooted to Clover on the SATA drive, then attempted to boot Sierra on the SATA drive
Attached are pictures of what happens after the last step when verbose mode is enabled. First I get all of the text, and then after a little while, maybe 30 seconds, I get the prohibited sign.

If any more information is necessary, please let me know.
 

Attachments

  • 2017-07-10 21.11.25.jpg
    2017-07-10 21.11.25.jpg
    3.7 MB · Views: 493
  • 2017-07-10 21.12.06.jpg
    2017-07-10 21.12.06.jpg
    2.5 MB · Views: 463
Are those from an iPad or iPhone? Try to select edit option on iPad and rotate the picture 360 degrees and then hit the wand and save before posting. It makes it easier/possible to read.

Do you have another Mac to connect the drive to? If you run Multibeast you want to select fakeSMCkext and other options like symbios before rebooting. You can run it form another Mac or hack just select the Disk before you execute or run it. Just selecting fast boot may not be giving you enough support functions like Lan, Audio and USB fixes.
 
I've fixed the images, sorry about that! I edited my original post above to have the upright images.

I have another mac I can try booting the SATA drive from. What exactly would I be trying to do? I believe FakeSMC is a part of the quick start UEFI by default, so it should have been installed. Also, I've tried installing the iMac 14,2 profile along with quick start UEFI, and the same problem occurs regardless.

No problem, the pics upside down is a common issue and iPad related which is weird because this is OSX so it should be compatible.

When you run Multibeast if you only select quick boot then you are not using other fixes which may also be needed. Did you run through all the options and select what applies to your system?

USBHostController, go to Multibeast and check the appropriate drivers for 200 series boards, and also check Ethernet options. You may need to add USBinjectallkext or other fixes if it persists.
 
Well, I've tried going both ways. I've tried on one Sierra install with only the UEFI quick start, thinking that maybe all the other stuff I was installing might be the cause of my problem, and I've tried on a separate Sierra install with a bunch of Multibeast installations all at once.

For my current Sierra install, on first boot I installed the following from Multibeast:
  • UEFI quick start (Clover UEFI bootloader, FakeSMC, and iMac 14,2 system definition)
  • Series 200 Audio
  • Intel Mausi Ethernet
  • Increase max port limit 200 series (should include USBInjectAll.kext)
  • Intel HD 6XX graphics
Then, after rebooting to the newly installed Clover bootloader on the same SATA drive as the Sierra install, and booting Sierra from it, I get the problems I have been describing.
 
Try this, at boot before hitting enter hit the space bar. then select verbose, single user, don't reboot on panic, keep symbols, and debug kexts. It should stop at root#. type in without quotation marks"". " "mount -uw" hit enter then root#. " fsck -fy" hit enter and wait, then root# " exit". I t may boot or go to reboot or black screen, do this first then a normal boot.

*** The above was already posted so before you do this try added to boot args. PCIRootUID=1, or PCIRootUID=0 try both to see if anything changes.
 
Thanks for your input cmn699. I guess I just thought I was doing something simple wrong, so I didn't know that I'd need such detailed information.

I'll try to give a summary of what I've done as thoroughly as possible.
  1. I downloaded the most recent Sierra install application from the App Store
  2. I used the most recent Unibeast with the default options to create a UEFI installer USB on an 8GB USB 2.0 flash drive
  3. I copied the most recent Multibeast to the install USB.
  4. I copied AHCIPortInjector.kext to install USB/EFI/CLOVER/kexts/Other
  5. I plugged the install USB into a USB 3.0 port on my PC (I have no USB 2.0 ports)
  6. I booted to Clover on the USB, set FakeCPUID to 0x0506E3, and booted the Sierra installer from the USB
  7. I installed Sierra to an empty SATA drive on my PC
  8. I booted to Clover on the USB, then booted to Sierra on my SATA drive
  9. I ran Multibeast and did quick start UEFI to get Clover installed on my Sierra SATA drive
  10. I rebooted to Clover on the SATA drive, then attempted to boot Sierra on the SATA drive
Attached are pictures of what happens after the last step when verbose mode is enabled. First I get all of the text, and then after a little while, maybe 30 seconds, I get the prohibited sign.

If any more information is necessary, please let me know.

If you haven't already fixed the problem , let me add a few suggestions that I would do if I had the problem with all the information you have provided so far about your system and the untoward computer symptoms.

  1. One suggestion I have is to disconnect all other Disks from SATA ports EXCEPT your Sierra System Disk and similarly only your Installer USB to to the USB port until you get a good Sierra System fully working.
  2. Best to change a system name like Hackintosh to a VOLUME UUID in the config.plist for your System disk.
If you want to try that, here are the steps in detail:
  • At the current point with the :No Entry Sign" screen, shut down the Computer pressing the On/Off button
  • Disconnect unnecessary drives.
  • While inside the case , Short the Clear CMOS pins to clear CMOS of all entries that might include corrupt ones from your numerous troubleshoots.
  • Reboot with your working Sierra USB Installer in the USB port where it has worked to install the System.
  • At the Screen that shows "Load Optimized Default BIOS " choose the Reboot option
  • On reboot press Del key and Enter BIOS setup.
  • Make sure Year/Month/Date and Time are current to your time zone
  • Make all the proper Selections for Mac OS installation
  • Make your Sierra USB Installer Flash Disk as First boot device
  • Select each one listed there one by one and then select "Disable"
  • F10 , Save and Reboot
  • At CBM screen go to Options>Boot Args:- and note the Boot flags there. These are from your USB Installer
  • Return to CBM screen and boot the Sierra System Disk. I expect it to reach the login screen and Desktop.
  • Be prepared to take Screen shots of any problem Screen(s) to upload.
  • If you reach the Desktop, launch Terminal;
  • Type diskutil list
  • Note your System disk and its System partition in the Terminal output
  • Go to " IDENTIFIER" column which is the last column and next to "Size " column and note down System Disks System Partition ID [Example disk0s2]
  • Next type the command : diskutil info /dev/disk0s2 [ instead of disk0s2 your Sierra System disks ID]
  • From the output search for and find and copy with your mouse the "Volume UUID" which will be a long alpha-numric string in 5 groups separated by dashes.
  • Now launch Clover Configurator Vibrant downloaded from the Net:http://mackie100projects.altervista.org/download-mac.php?version=vibrant
  • Click on "Mount EFI: from its Left Panel where CCV menus are listed from top to bottom.
  • Locate EFI of EFI of your System Disk in the bottom half of CCV window
  • From the right end of that line, find and click on "Mount Partition" .
  • The EFI partition of your System disk will appear on the Desktop.
  • Click EFI >EFI >CLOVER and find and Right click config.plist and open with Clover Configurator Vibrant(CCV)
  • From its Left panel toward the top, go to "Boot " and open the page and paste copied "Volume UUID" to replace "Hackintosh" in the box for Default Boot Volume,; I also suggest you to [√] Verbose [See edited image of your config. plist Boot , Make a final check with the Boot flags you had noted earlier in CBM and the current one here to make sure they match]
  • Save by clicking the 2nd Arrow at the bottom of CCV screen as marked in my edited image.
  • Now reboot
  • Press F12 and SELECT "YOUR SYSTEM DISK"
  • Make a Final Check of Options>boot Args: for accuracy.
  • Boot and see if you succeed.
PS:Oops! forgot to upload image!
Edited to upload the image:
 

Attachments

  • ConfigPlist_CCV_Boot_DefaultVol_Verbose.png
    ConfigPlist_CCV_Boot_DefaultVol_Verbose.png
    264 KB · Views: 497
Last edited:
Try this, at boot before hitting enter hit the space bar. then select verbose, single user, don't reboot on panic, keep symbols, and debug kexts. It should stop at root#. type in without quotation marks"". " "mount -uw" hit enter then root#. " fsck -fy" hit enter and wait, then root# " exit". I t may boot or go to reboot or black screen, do this first then a normal boot.

*** The above was already posted so before you do this try added to boot args. PCIRootUID=1, or PCIRootUID=0 try both to see if anything changes.

If you haven't already fixed the problem , let me add a few suggestions that I would do if I had the problem with all the information you have provided so far about your system and the untoward computer symptoms.

  1. One suggestion I have is to disconnect all other Disks from SATA ports EXCEPT your Sierra System Disk and similarly only your Installer USB to to the USB port until you get a good Sierra System fully working.
  2. Best to change a system name like Hackintosh to a VOLUME UUID in the config.plist for your System disk.
If you want to try that, here are the steps in detail:
  • At the current point with the :No Entry Sign" screen, shut down the Computer pressing the On/Off button
  • Disconnect unnecessary drives.
  • While inside the case , Short the Clear CMOS pins to clear CMOS of all entries that might include corrupt ones from your numerous troubleshoots.
  • Reboot with your working Sierra USB Installer in the USB port where it has worked to install the System.
  • At the Screen that shows "Load Optimized Default BIOS " choose the Reboot option
  • On reboot press Del key and Enter BIOS setup.
  • Make sure Year/Month/Date and Time are current to your time zone
  • Make all the proper Selections for Mac OS installation
  • Make your Sierra USB Installer Flash Disk as First boot device
  • Select each one listed there one by one and then select "Disable"
  • F10 , Save and Reboot
  • At CBM screen go to Options>Boot Args:- and note the Boot flags there. These are from your USB Installer
  • Return to CBM screen and boot the Sierra System Disk. I expect it to reach the login screen and Desktop.
  • Be prepared to take Screen shots of any problem Screen(s) to upload.
  • If you reach the Desktop, launch Terminal;
  • Type diskutil list
  • Note your System disk and its System partition in the Terminal output
  • Go to " IDENTIFIER" column which is the last column and next to "Size " column and note down System Disks System Partition ID [Example disk0s2]
  • Next type the command : diskutil info /dev/disk0s2 [ instead of disk0s2 your Sierra System disks ID]
  • From the output search for and find and copy with your mouse the "Volume UUID" which will be a long alpha-numric string in 5 groups separated by dashes.
  • Now launch Clover Configurator Vibrant downloaded from the Net:http://mackie100projects.altervista.org/download-mac.php?version=vibrant
  • Click on "Mount EFI: from its Left Panel where CCV menus are listed from top to bottom.
  • Locate EFI of EFI of your System Disk in the bottom half of CCV window
  • From the right end of that line, find and click on "Mount Partition" .
  • The EFI partition of your System disk will appear on the Desktop.
  • Click EFI >EFI >CLOVER and find and Right click config.plist and open with Clover Configurator Vibrant(CCV)
  • From its Left panel toward the top, go to "Boot " and open the page and paste copied "Volume UUID" to replace "Hackintosh" in the box for Default Boot Volume,; I also suggest you to [√] Verbose [See edited image of your config. plist Boot , Make a final check with the Boot flags you had noted earlier in CBM and the current one here to make sure they match]
  • Save by clicking the 2nd Arrow at the bottom of CCV screen as marked in my edited image.
  • Now reboot
  • Press F12 and SELECT "YOUR SYSTEM DISK"
  • Make a Final Check of Options>boot Args: for accuracy.
  • Boot and see if you succeed.
PS:Oops! forgot to upload image!
Edited to upload the image:

Thanks for all the help guys! Unfortunately, the stuff y'all suggested did not help.

Gigamaxx, I tried both boot arguments you suggested, neither made any difference.

cmn699, I did not try the full set of instructions you provided, but I did change my Default Boot Volume to the partition UUID instead of the volume name and that did not work. I did not want to clear the CMOS because I was worried it might erase my RAID configuration, and I was hopeful that there would be another way to handle the situation.

Turns out, I was able to get things working! I simply followed the instructions here, and it seems that the custom Clover folder provided for post-installation did the trick. The only things I did differently than specified in that thread were to copy AHCIPortInjector.kext into my EFI/CLOVER/kexts/Other folder both pre and post-installation, just to make sure that all of the SATA drives would be detected properly. That might not have been necessary if I were able to set the SATA mode in my BIOS to AHCI, but I can't because of my RAID configuration. After installing Clover and successfully booting with the post-installation CLOVER folder from that thread on my EFI partition, I then used Multibeast to install FakeSMC, IntelMausiEthernet, Increase Max Port Limit 200 Series, Intel HD 6XX, and NVIDIA Web Drivers Boot Flag.

I don't have everything working yet. My NVIDIA card is not being utilized properly, and I haven't tested out audio yet. Plus, none of my NVMe drives are detected at all. And my PS/2 keyboard doesn't work. But the fact that it boots successfully from Clover installed on the same SATA drive as the Sierra installation WITH all of the most essential drivers and kexts installed is a big step forward.

Again, thanks for all of the help. I hope that maybe this thread will be of use to others who encounter the same issue. I still don't know what the problem really was, but I do know how to get around it!

Very nice of you to come back and post details in your original thread explaining how you solved the problem. This post from you can certainly serve as a good reference to those facing the same or very similar issue with same hardware or close to your Specs.
Thank you for your effort.
 
Status
Not open for further replies.
Back
Top