- Joined
- May 29, 2017
- Messages
- 14
- Motherboard
- Gigabyte Z370XP SLI
- CPU
- i5-8600K OC'd 4.5Ghz
- Graphics
- RX 580 // R9 390X
- Mac
- Mobile Phone
Hi guys,
I'm new to the Hackintosh scene.
My build:
Mainboard: Gigabyte Z370XP SLI
CPU: IntelCore I5 8600k
GPU: Sapphire RX 580 Pulse 8Gb
RAM: 32GB Ballistix Elite DDR4
SSD: Samsung 850 Evo 120Gb (for macOS) && Samsung 970 Evo M.2 500Gb (for Windows)
HDD: 2x3TB Seagate Barracuda (1 for Windows and 1 for macOS)
I've tried installing macOS Mojave on a FusionDrive. I once got macOS Mojave running on the Drive, sadly I forgot the post-installation and had to redo the whole process.
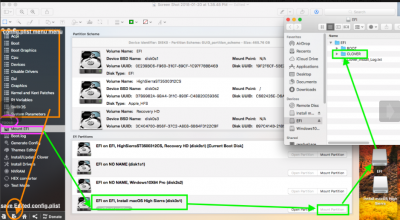
Now my problem is after I started the installation on the stick and the system finished the installation at the FusionDrive it reboots again and stucks in Clover at "Scan entries".
I've read that it is caused by FAT32 partitions. I looked all my drive up in Windows and saw that the installation formats my FusionDrive drives in FAT32.
I think that it is not normal, because the first time when it worked I had no problem like that.
Has anyone an idea what I can do and what the problem is?
If you need more files or specs let me know.
I'm new to the Hackintosh scene.
My build:
Mainboard: Gigabyte Z370XP SLI
CPU: IntelCore I5 8600k
GPU: Sapphire RX 580 Pulse 8Gb
RAM: 32GB Ballistix Elite DDR4
SSD: Samsung 850 Evo 120Gb (for macOS) && Samsung 970 Evo M.2 500Gb (for Windows)
HDD: 2x3TB Seagate Barracuda (1 for Windows and 1 for macOS)
I've tried installing macOS Mojave on a FusionDrive. I once got macOS Mojave running on the Drive, sadly I forgot the post-installation and had to redo the whole process.
Now my problem is after I started the installation on the stick and the system finished the installation at the FusionDrive it reboots again and stucks in Clover at "Scan entries".
I've read that it is caused by FAT32 partitions. I looked all my drive up in Windows and saw that the installation formats my FusionDrive drives in FAT32.
I think that it is not normal, because the first time when it worked I had no problem like that.
Has anyone an idea what I can do and what the problem is?
If you need more files or specs let me know.
")