Contribute
Register

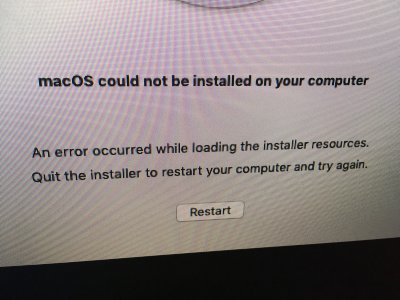
[Solved] macOS could not be installed on your computer...installer resources error

Status
Not open for further replies.
This worked for me (Mojave install):

At the "error restart screen" I started terminal;
There, I copied the file "InstallESDDmg.pkg" from the installer to the install volume. It's 5.5 gig, so the copy took a few minutes.

cp /Volumes/"Install macOS Mojave"/"Install macOS Mojave.app"/Contents/SharedSupport/InstallESDDmg.pkg /Volumes/"my install volume"/"macOS Install Data"

Then shutdown, restart; at Clover select target volume.

So on to the next hurdle...
 

Attachments

  • IMG_0581.JPG
    IMG_0581.JPG
    6.9 MB · Views: 867
  • IMG_0582.JPG
    IMG_0582.JPG
    2.4 MB · Views: 635
I know this is an old thread but the command line solutions mentioned helped me install Mojave.

I wanted to add a note that you need to be connected to the Internet for it to work, otherwise you get an authorisation error. It's possible this is what caused my installation to fail in the first place when following the installation guide.

I just connected directly to my router over the ethernet and had no issues. Once it starts to install, it counts up a percentage in the terminal and then it restarts a few times. Use Clover to boot each time, until the installation is complete and you can boot from your hard drive.

Note: the folder SharedSupport may instead be named SharedResources or vice versa.
 
now simply run `./startosinstall --volume /Volumes/<name of disk to install on>`

cd /
ls
cd Install macOS Mojave
cd Contents/Resources
./startosinstall --volume /Volumes/XYZ
 
Run the Yix method but ended up "could not find OSInstallerSetup.framework..." mistake...
Could anybody help?
Does this mean my installer is damaged? Thanks!
 
This worked for me (Mojave install):

At the "error restart screen" I started terminal;
There, I copied the file "InstallESDDmg.pkg" from the installer to the install volume. It's 5.5 gig, so the copy took a few minutes.

cp /Volumes/"Install macOS Mojave"/"Install macOS Mojave.app"/Contents/SharedSupport/InstallESDDmg.pkg /Volumes/"my install volume"/"macOS Install Data"

Then shutdown, restart; at Clover select target volume.

So on to the next hurdle...

How did you start the terminal? I see no option to run a terminal on that error screen.

EDIT: Nevermind, it showed up after a while
 
Last edited:
I faced that dreaded mistake couple of days ago, and just understood what it was and how I eventually fixed it!!
Found a clue in this python script. Was just scrolling through it and all of a sudden saw this:
Python:
print('*** Working around a very dumb Apple bug in a package ***')
print('*** postinstall script that fails to correctly target ***')
print('*** the Install macOS.app when installed to a volume  ***')
print('*** other than the current boot volume.               ***')
print('***       Please file feedback with Apple!            ***')

And that explained me everything, even how exactly I solved my particular case: none of the above mentioned methods helped me, I allready got all other disks but the target SATA SSD phisycally unplugged, was close to despair but decided to give it one more try. So after another "first installation phase", machine restarted and was boothing macOS installer from target disk in verbose mode... AND THEN MY CAT DID A MIRACLE: she dropped off to the floor the cardreader I had installation media on. The USB cord got unplugged several seconds before the GUI appeared and I saw that the installation just continued... I didn't even believe at first... I waited to see the error again in a moment... in a second... but no - it just worked as it should and I got into PostInstall and forgot about the issue until today, when I saw that python script...

SO the actual solution is (CHOOSE YOUR OPTION):
1) If you have unplugged ALL (even flash drives, memory cards etc.) other disks off the machine prior to the second Install stage - start it with clover menu and after a dozen of seconds simply unplug your installation USB. All the needed media would be on a target drive by then and in fact you needed just a bootloader to start it... and it will work, just by having the only drive to look on it won't throw an error!

2) Install Clover to target disk prior to installing/upgrading macOS e.g. make your target volume bootable by itself!

3) Use the script I already mentioned twice...


Good luck! And I guess now the thread can be rightfully marked as [SOLVED]
 
Mojave users:
This worked for me, as I just finished installing. The original code from Ylx is outdated
for Mojave. Whether it's a newer Mojave version, different folder names, etc...
who knows.

What I did, and what I suggest you do, is play around with 'ls' in your different sub-folders
once you are in Terminal.

The below code worked for me, because that is what my specific data was named.

Step 1. Start by getting into the home directory. You can do this typing 'ls' and seeing
where you are. If you are not seeing "Applications, System, Volumes, Library, etc" as some
the folders, you need to type "cd .." a few times. After each "cd .." type "ls" to see
where you are at.

Step 2. Once you are at your home directory, play around with the 'ls' function to see how
Unix names the folders, and how the sub-folders are spelled out with spaces, different style slashes, etc.

Step 3. Use the data below to run the code. This code is simply copying the data. One big
mistake I kept making, was I was using the code provided verbatim and never worked...so
that's when I started navigating through the sub-folders to see exactly what everything was named and
wrote it down (typed it out) on a separate document.

Step 4. After the *, is a (space)...so it should look like "/SharedSupport/* /Volumes/Mojave...etc"
What this is doing is before the space is your target, and after the space is your destination.
You are simply copying the data from the install media to your destination hard drive.

Step 5. After the data copies, Restart the computer, have your thumb drive in to load the
bootloader, select your HARD DRIVE, then remove your thumb drive before it gets past the initial
load screen. It will start the installation, restart a couple of times. When it restarts
you need to insert the USB to get to the bootloader, keep selecting your hard drive, and
remove thumbdrive each time after you select your hard drive.

This should get you going in the right direction.

I CANNOT STRESS ENOUGH...Browse your sub-folders to see exactly what your sub-folders are named,
otherwise the 'cp' code will not work.

Hope this helps. Below is the code I used that worked for me.

cp -rf /Volumes/Install\ macOS\ Mojave/Install\ macOS\ Mojave.app/Contents/SharedSupport/* /Volumes/Mojave/macOS\ Install\ Data


Remember, after /SharedSupport, there is a (space) and continue writing the code.
"/SharedSupport/* /Volumes/Mojave...etc."
 
Thank you Ylx and klaivu. After a day or so of troubleshooting, your help did the trick. Much appreciated.
 
what i need to do next

I wrote -

cp -rf /Volumes/Install\ macOS\ High\ Sierra/Install\ macOS\ High\ Sierra.app/Contents/Resources/* /Volumes/High\ Sierra/macOS\ install\ data/ . nothing happens. ready for new command. I checked in High Sierra there's no SharedResources, just resources
It's Supposed to be SharedSupport... not Resources :wave:
 
Hey i was able to cd into the app and get to startosinstall but when i try it i get the message
"Helper tool crashed..."
 
Status
Not open for further replies.
Back
Top