I am trying to now finally install BigSur. After reading up on what I need to change within the OC-config, I think I should be able to boot the installer. Only one problem... If I try to boot my Catalina disk without the "-cdfon", I get no image after the verbose boot. If I boot the Big Sur installer, the same thing happens. I've read that this boot-arg has been broken in 11.0+.
So: Is there a workaround? I think since I have the UHD630 with a 4K screen, I need something like this (it's a HDMI 2.0 enabler IIRC) to get the GUI working... :/. Any experiences over here?
with a 4k display you need -cdfon or (the same) enable-hdmi20 property or you get a black screen.
bigsur broke this patch. wait the new release of whatevergreen
with a 4k display you need -cdfon or (the same) enable-hdmi20 property or you get a black screen.
bigsur broke this patch. wait the new release of whatevergreen
I got a solution now. As I want to help out as many people facing this issue as possible, I will try to explain how this works in more detail, and I've wrote a script which helps you to patch your EDID.
First things first: Big thanks to @thefiredragon, who posted *here* and thus got the concept of how EDID patching works into my head.
What is EDID? EDID stands for "Extended Display Identification Data", and is basically a 128 byte long pack of information the monitor will send to the GPU, in order to negotiate resolution, refresh-rate, and many more things. You can read up on it here, if you're interested: https://en.wikipedia.org/wiki/Extended_Display_Identification_Data
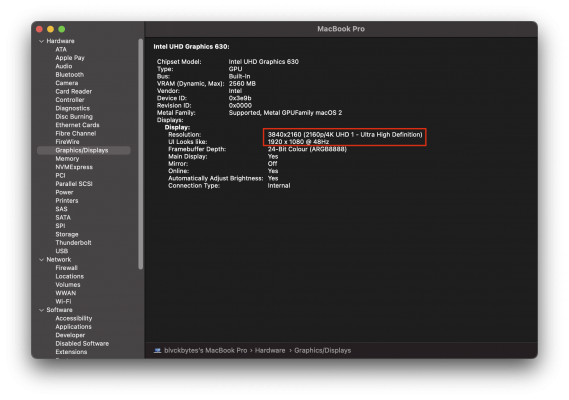
To make the 4K screen work, we need to change the standard refresh-rate of 60Hz (or more, who knows what people got these days) to 48Hz. Don't ask me why, I don't know how that fixes this issue at the moment, but hey - it works. This value consists of a few bits within the 128 bytes, which need hotpatching.
Step 2: WARNING: You should disconnect external monitors from your laptop at this point, to make your life easier.
Now, we want to get the output of 'xrandr --props' into a file, preferredly into a file on the built-in drive's EFI partition for easy access later on.
Code:
[manjaro /]# lsblk
NAME        MAJ:MIN RM   SIZE RO TYPE MOUNTPOINT
loop0         7:0    0  20.8M  1 loop /run/miso/sfs/livefs
loop1         7:1    0 570.1M  1 loop /run/miso/sfs/mhwdfs
loop2         7:2    0   1.6G  1 loop /run/miso/sfs/desktopfs
loop3         7:3    0 630.2M  1 loop /run/miso/sfs/rootfs
sda           8:0    1 119.3G  0 disk /run/miso/bootmnt
├─sda1        8:1    1   2.9G  0 part
└─sda2        8:2    1     4M  0 part
nvme0n1     259:0    0   1.8T  0 disk
├─nvme0n1p1 259:1    0   200M  0 part
├─nvme0n1p2 259:2    0 931.4G  0 part
└─nvme0n1p3 259:3    0 931.4G  0 part
[manjaro /]# mount /dev/nvme0n1p1 /mnt
[manjaro /]# cd /mnt
[manjaro mnt]# xrandr --props > display_info.txt
[manjaro mnt]# cd ..
[manjaro /]# umount /dev/nvme0n1p1
I just mounted the EFI of my NVME drive to /mnt, wrote the output into display_info.txt and unmounted again. BTW, I went for a root-terminal here. Just did a sudo /bin/bash, this makes your life easier.
You can transfer it back to OSX however you like to tho. The only important thing is that you get the full output of 'xrandr --props' into a single file with the name 'display_info.txt'.
Step 3:
* Copy my python-script into a file 'patcher.py', just put it on your desktop for now
Python:
import re
import sys

def patch_edid(value):
    # Set refresh rate to 48Hz
    # EDID structure: https://en.wikipedia.org/wiki/Extended_Display_Identification_Data
    edid = value[:108] + 'a6a6' + value[112:]

    # Recalculate checksum after change
    data = [int(edid[i:i + 2], 16) for i in range(0, len(edid), 2)]
    checksum = hex(256 - sum(data[:-1]) % 256)[2:]

    # Return value with new checksum
    return edid[:-2] + checksum

# Open input file
with open('display_info.txt', 'r') as inp_file:

    # Constants needed for processing
    begin_marker = 'EDID:' # xrandr starts of EDIDs like this
    edid_bytelen = 128 # There are 128 bytes within an EDID
    edid_hexlen = edid_bytelen * 2

    # Read all file lines
    # Strip \t, \n and spaces, since they're not needed for parsing
    lines = list(map(lambda x: re.sub(r'[\t\n ]', '', x), inp_file.readlines()))

    # Now concat the whole content into one single string
    info = ''.join(lines)

    # Create a list of EDID occurrences
    occurrences = []

    # Search all occurrence-indices of EDID beginnings
    occ_index = info.find(begin_marker)
    while occ_index != -1:
        # Substring without the begin-marker
        substr_index = occ_index + len(begin_marker)
        occurrences.append(info[substr_index:substr_index + edid_hexlen].upper())

        # Try to find another occurrence
        occ_index = info.find(begin_marker, occ_index + 1)

    # No EDIDs available
    if len(occurrences) == 0:
        print('Could not find any EDIDs, please check your input!')
        sys.exit()

    # Multiple EDIDs found, prompt for desired one
    desired_index = 0
    if len(occurrences) > 1:
        print('There are multiple EDIDs available, please choose one:')

        c = 0
        for edid in occurrences:
            print(f'[{c}]: {edid[0:30]}...{edid[edid_hexlen - 30:edid_hexlen]}')
            c += 1

        desired_index = int(input('Your selection: '))
        print()

    # This will now be the target EDID
    target_edid = occurrences[desired_index]

    # Patch the value
    patched_edid = patch_edid(target_edid)

    # Print patch-instructions
    print('Patched your EDID!')
    print('Please add it to DeviceProperties/Add/PciRoot(0x0)/Pci(0x2,0x0) like this:')
    print('Create a new entry: AAPL00,override-no-connect (with type data)')
    print('And set the value to:\n')
    print(patched_edid.upper())
* Now, make sure your previously created 'display_info.txt' is at the same location as this script - so on your desktop too.
Step 4:
* Run patcher.py with python from the terminal, for example: 'python3.8 patcher.py', depending on your version tho. Just tab the command like this: 'python<tab>'.
* You will get something like this:
Code:
Patched your EDID!
Please add it to DeviceProperties/Add/PciRoot(0x0)/Pci(0x2,0x0) like this:
Create a new entry: AAPL00,override-no-connect (with type data)
And set the value to:

00FFFFFFFFFFFF0006AFEB3100000000101B0104A522137802CEB5A65434B6250E505400000001010101010101010101010101010101A6A600A0F0703E803020350058C110000018000000000000000000000000000000000018000000FE0041554F0A202020202020202020000000FE00423135365A414E30332E31200A00BD
If you get a prompt where you need to choose between different EDIDs, you have multiple monitors connected. Disconnect them or just have a look at the options and find the one corresponding to your monitor (have a look into the display_info.txt and search for familiar names/values). This should almost never happen tho, I built the picker into the script just to make sure.
* Follow the instructions printed. Go to your config.plist and make this entry. Reboot - and you should be good to see the screen of your BigSur installer or already installed disk! Hoping to see a new release of WhateverGreen soon, so we can discard this hack again.
@BlvckBytes do you know if lower resolution like 3360x1890 can work with 60hz refresh rate in Big Sur for 4k laptop?
also, does ResXtreme work in Big Sur?
I actually haven't tried it and - imho - wouldn't recommend to. Why go about the headache of also modifying the resolution when there is next to no noticable difference between 60Hz and 48Hz? It's just a hack for a few weeks max.
But you could play around with it, if you'd like to , would be interesting, gotta say.
I haven't installed Big Sur as of yet. But id love to see if anybody here has tried lowering resolution a bit or using ResXtreme. And yes its a hack for few weeks, I'm almost certain Acidanthera and the team are working on solution as we speak
This site uses cookies to help personalise content, tailor your experience and to keep you logged in if you register.
By continuing to use this site, you are consenting to our use of cookies.

")