If anyone is reading this thread. Where is my config.plist which has the 5 seconds in it? I want to just edit in text editor and reboot. I used TonyMac clover method but cannot locate Clover anywhere and afraid to mess things up.
Apologies for the overly detailed reply. You may not need it, but with any luck it will help someone along the way. Clover Configurator can be really confusing at first. I've wasted far too many hours trying to do very simple things, simply because I was missing a small and obvious step. Cheers!
HOW TO EDIT THE 'COUNTDOWN TIMER' IN THE CLOVER BOOTLOADER
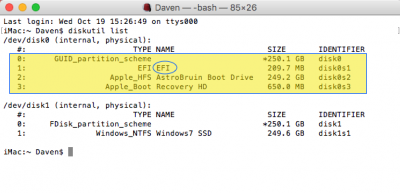
1. In your Terminal app, type "diskutil list". You'll see something like this:

I have two drives. My macOS boot drive is called "AstroBruin Boot Drive" (this is the name for my boot drive that appears on my desktop). It has three partitions: EFI, AstroBruin Boot Drive, and Recovery HD.
The
EFI partition is where your Clover bootloaders and your
config.plist are located. However, it is normally hidden (unmounted).
To access them, you need to run Clover Configurator, mount the EFI partition, then load the config.plist.
1.
Warning: it's possible that even a small change in Clover Configurator can break your build and prevent your boot drive from working. Before you begin, make a backup of your boot drive onto another drive (I highly recommend Carbon Copy Cloner). Make sure you can boot into your backup drive *without* your boot drive being plugged in.
2. Run Clover Configurator.
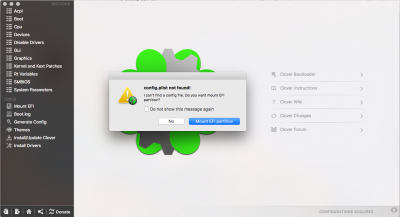
When you first run Clover Configurator, you get a misleading promp saying your
config.plist is not found, along with a big blue button that says "Mount EFI partition".
 3. Click the blue "Mount EFI partition" button.
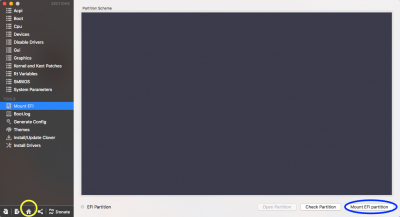
Note: this does not actually mount the EFI partition, it just takes you to the Clover Configurator tab on the left column that says "Mount EFI". ¯\_(ツ)_/¯ See here:
 4. Mount your EFI partition.
The button "Mount EFI partition" is in the bottom right corner. Click it, then enter your password.
You have just mounted your EFI partition. Hooray! While you're there, you can also click the button in the bottom right corner that says "Open Partition". This will pop up your EFI partition in a new window. (I'll come back to this in a moment)
5. Load your config.plist
See the
house icon at the very bottom of the lefthand column (circled in yellow above)? Click that.
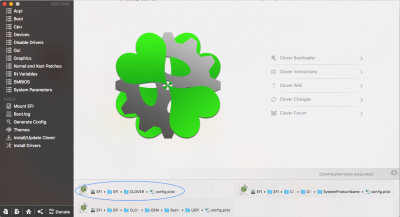
This brings up a page like this:

You'll see several listings for
config.plist - you want the one with the path
EFI>EFI>CLOVER>config.plist.
Note: confusingly, "
EFI" is the name of both the hard drive partition *and* the name of a folder inside it. Keep this in mind, so you don't get tripped up later when you make and restore local backups.
6. Make a local backup.
Continuing from above, now is a good time to backup your EFI drive. Ideally you want to make a full disc image backup of your drive in Carbon Copy Cloner before you begin. In addition, it may help to make a local backup on your desktop.
Remember the window that popped up in step 4? Go to the EFI window, then navigate up one directory level so you see a list of your drives:

While holding your option (or alt) key down, drag your "EFI" drive (it should have a "+" sign on it) to your desktop . It's small, about 200mb. Rename it "EFI root". I also like to append the date and military time, e.g. "EFI root 2016.10.10_2215".
For minor setting tweaks, you can just copy your config.plist -- located EFI>EFI>CLOVER>config.plist.
7. Change your "timeout" settings.
Go to the "Boot tab" (left hand column, second from top). Enter the name of your hard drive (as it appears on your list of drives) in the "Default Boot Volume" slot. Then adjust the "timeout" numbers as desired.
SAVE YOUR WORK! Done. Reboot and test.
------------------------------------------------------------------------------------------------------------------------------
How to restore from a backup
If you wish to restore your settings from your local backup, there are a couple of options. If all you did was make a few minor changes to settings, you can drag and drop your config.plist from your backup, i.e.
EFI root>EFI>CLOVER>config.plist to your EFI drive, i.e.
EFI>EFI>CLOVER>config.plist.
If that doesn't work, copy the contents of your EFI root backup to the contents of your EFI drive. Just be careful not to confuse the directory structure.
If your drive no longer boots, boot into your backup drive and try to copy the contents of your backup drive's EFI folder into your now broken boot drive's EFI folder. If that still doesn't work, restore with Carbon Copy Cloner.


