Contribute
Register

[Solved] Can someone translate to plain english these options

Status
Not open for further replies.
Joined
Aug 18, 2015
Messages
5
Motherboard
Intel DH55HC
CPU
Intel Core i3
Graphics
XFX 8500 GT
Mobile Phone
  1. Android
  2. iOS
  3. Windows Phone
I have a very simple question and I hope to get some straightforward answer in what Wikipedia calls Simple English.

I have an Intel DH55HC (LGA1156 core i5) mobo with a GeForce 520 card. For some reason, nothing works with the UEFI boot mode option enabled, it either fails immediately (Sierra setup with Drv2 error), hangs before finish (Yosemite on less than a minute remaining) or fails elsewhere. So I'm done with UEFI and I'm using the pen drive to boot and select the OS.

The question, if someone really knows the answer, is what exactly is each of these options for:

nvda_drv=1
nv_disable=1
inject nvidia
nvidia web driver

For the average user it's virtually impossible to figure their meaning, not to mention finding out their correct combination to make a system work. Also, do these options apply for UEFI boot mode only, or are they totally independent?

To make it even worse, I understand that the options for Yosemite won't necessarily work with Sierra, and you have to test again the 256 possible combinations of options to make it work. As you can see, this is more than frustrating.

Last, and this goes specifically to whoever implements these arguments: You should never implement contradictory options under any circumstance. Eg., if I implement the options enable_nvidia=1 along with disable_nvidia=1, who could possibly know the result? This is more or less what happens with the absurd amount of identical options to get a single result: tell the SW that I am or am not using an nvidia video card. Why couldn't you add a single option?

Notice: I'm not implying that all developers lack logical sense when adding options to uselessly complicate the user, neither I'm criticising the work of the Clover developers nor any other Hackintosh developer for the matter.
 
Last edited:
nvda_drv=1
nv_disable=1
inject nvidia
nvidia web driver

The first causes OSX to use the standard OSX native Nvidia driver if set to 1. This will only work with Nvidia chipsets that you can find in actual Macs (types that is). The second will cause NO Nvidia driver to be loaded if set to 1. Instead it will then use the VESA driver, which is slow and sluggish, but should at least provide you with -some- image. The third I am not entirely sure of, so I'll refrain from commenting on that :) The last was the old option to cause OSX to load the Nvidia Web drivers (i.e.: those you can download from the Nvidia site, not the native OSX ones). In Sierra, and with the latest Clover versions (not sure from which version onwards) this should be taken care by a flag set in NVRAM. NVRAM is a piece of Non-Volatile memory (i.e.: it will not loose it's contents if you turn off the computer) which can be used to store various configuration bits and bobs by the OS. Assuming your motherboard has NVRAM, or you've used multibeast to fake it for you, installing the web drivers will automatically set the right flags and cause the drivers to be loaded..... Provided you remove the nv_disable=1 from the command line at boot :)
 
I have a very simple question and I hope to get some straightforward answer in what Wikipedia calls Simple English.

I have an Intel DH55HC (LGA1156 core i5) mobo with a GeForce 520 card. For some reason, nothing works with the UEFI boot mode option enabled, it either fails immediately (Sierra setup with Drv2 error), hangs before finish (Yosemite on less than a minute remaining) or fails elsewhere. So I'm done with UEFI and I'm using the pen drive to boot and select the OS.

The question, if someone really knows the answer, is what exactly is each of these options for:

nvda_drv=1
nv_disable=1
inject nvidia
nvidia web driver

For the average user it's virtually impossible to figure their meaning, not to mention finding out their correct combination to make a system work. Also, do these options apply for UEFI boot mode only, or are they totally independent?

To make it even worse, I understand that the options for Yosemite won't necessarily work with Sierra, and you have to test again the 256 possible combinations of options to make it work. As you can see, this is more than frustrating.

Last, and this goes specifically to whoever implements these arguments: You should never implement contradictory options under any circumstance. Eg., if I implement the options enable_nvidia=1 along with disable_nvidia=1, who could possibly know the result? This is more or less what happens with the absurd amount of identical options to get a single result: tell the SW that I am or am not using an nvidia video card. Why couldn't you add a single option?

Notice: I'm not implying that all developers lack logical sense when adding options to uselessly complicate the user, neither I'm criticising the work of the Clover developers nor any other Hackintosh developer for the matter.

I have an Intel DH55HC (LGA1156 core i5) mobo with a GeForce 520 card. For some reason, nothing works with the UEFI boot mode option enabled, it either fails immediately (Sierra setup with Drv2 error), hangs before finish (Yosemite on less than a minute remaining) or fails elsewhere. So I'm done with UEFI and I'm using the pen drive to boot and select the OS.

Unfortunately Hackintoshing is not really meant for an 'average user'. It is for very determined learners who are prepared to spend hours reading from hardworking and dedicated hackers writing in Forums like this and willing to spend hours and hours experimenting with NON-APPLE hardware to create a mac-like system for their personal use.

Understandably it is going to be very frustrating for those who are new to this type of System building as there is no single manual or guide written for each and every Motherboard, CPU, Graphics Card that people buy or decide to combine to create their own Hackintosh. However Tonymac's Installation guide for Intel type of hardware gives a lot of help as a starting point for most beginners willing and patient to build their own system and asking for help in this Forum.

Those who are looking for help here are expected to provide their Hardware Specifications by editing their Build Signature ( see attached image for guidance)so that the Specs will be available through out the troubleshoot under the login name or
below each posted message and readers would not have to scroll back to the initial posted message to find that important information.

In posting for help, the questions are most often based on what was (or were) seen on the Monitor. Not uploading a picture of what was observed, deprives the readers from important visual data to help the poster.

Until a stable running System is obtained, booting the system using -v (verbose) boot flag in addition to other required flags (=boot arguments) is essential to get a text-based boot screen to upload image for any boot problems rather than an Apple logo that hides valuable data on screen if Verbose booting is not chosen.

Since in this Sierra Desktop Forum, the only bootloader used is CLOVER, boot flags used can only be the ones used in CLOVER not the ones in earlier Chameloen/Chimera bootloaders.


Whether you want to use a "UEFI" or "Legacy" mode macOS USB installer depends primarily on the type of Intel Motherboard. Older Intel Motherboards have only Legacy BIOS and they cannot have UEFI mode booting. Most recent MoBos have both UEFI and Legacy Boot Mode options and a person can choose either, but UEFI is a preferred method.

"Boot flags" are NOT dependent on the BOOT Mode UEFI vs Legacy. They are dependent on the hardware compatibility for CLOVER EFI bootloader to use the hardware during boot. Since the device drivers are not native for Mac , the system will not automatically recognize and configure them during boot and these various boot flags facilitate their recognition and proper use.
The question, if someone really knows the answer, is what exactly is each of these options for:

nvda_drv=1
nv_disable=1
inject nvidia
nvidia web driver


If you are using an NVIDIA Graphics card and that Graphics card has already a Mac driver the NVDIA.com has released in their website , that is called a Webdriver or Alernate NVidia driver . If you prepare your USB installer according the instruction from Nvidia ( and made easier by Tonymac) to use that particular Add on PCIE NVIDIA Graphics Card, you tell CLOVER it has a graphics card with Web driver and it should be enabled and this done by adding the boot flag nvda_drv=1

If you have not installed any driver and using an NVDIA card and would later on install it using Multibeast or other tweaks, you will disable the NVIDIA card and use its basic function only during boot
Injecting a Graphics Card is done at ACPI level or at Device and Graphics level of config.plist of the CLOVER . in Clover it is done by giving a Fake ID or Fake ID and a Frame Buffer Name . These things are the result of a lot of efforts by folks like Rehabman and others.
 

Attachments

  • Buid Signature Editing.png
    Buid Signature Editing.png
    106.4 KB · Views: 152
@Inuya5ha, please update your profile (personal details) with your build (Motherboard or Model, CPU and Graphics Card).
The Rules said:
Profiles need to contain at least your primary system to assist others with helping you.

Legacy Boot Mode is recommended for 5/6 Series CustoMac desktops and all BIOS based systems.
 
The first causes OSX to use the standard OSX native Nvidia driver if set to 1. This will only work with Nvidia chipsets that you can find in actual Macs (types that is).

If you are using an NVIDIA Graphics card and that Graphics card has already a Mac driver the NVDIA.com has released in their website , that is called a Webdriver or Alernate NVidia driver . If you prepare your USB installer according the instruction from Nvidia ( and made easier by Tonymac) to use that particular Add on PCIE NVIDIA Graphics Card, you tell CLOVER it has a graphics card with Web driver and it should be enabled and this done by adding the boot flag nvda_drv=1​

First, let me thank you for taking the time to clarify those points..

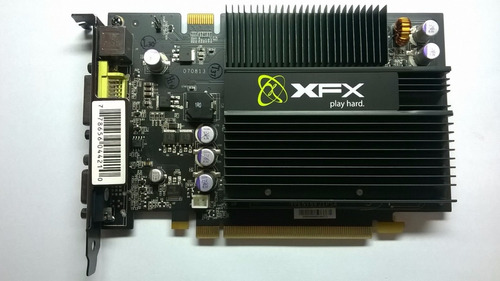
I have ditched the Biostar Geforce GT520 1GB card and replaced it with an XFX GeForce 8500 GT 512MB video card which I've found lying around... This card is 4 years older than the GT520, but it does have macOS drivers online and it also looks much better than the Biostar rubbish: :cool:

S_749221-MLB20735463783_052016-O.jpg


By simply installing this card and removing the nv_disable=1 flag, the system now features smooth, hardware-accelerated graphics with zero issues. :thumbup: I'll throw the GT520 card far away now.

Now, I've created the USB installer following this guide, but I forgot to apply step 16... yet everything works fine:

16. Drag MultiBeast to your completed USB drive.

I want to setup Clover (w/o UEFI) on the SSD with the nv_disabled flag clearly removed. Should I install Clover or UniBeast? Because I'm not sure which one is safer to install. Everything is working on the system, I'm using a TPLink USB WiFi adapter with its original drivers. Thanks in advance for your help again, you are very kind.
 
Last edited:
First, let me thank you for taking the time to clarify those points..

I have ditched the Biostar Geforce GT520 1GB card and replaced it with an XFX GeForce 8500 GT 512MB video card which I've found lying around... This card is 4 years older than the GT520, but it does have macOS drivers online and it also looks much better than the Biostar rubbish: :cool:

S_749221-MLB20735463783_052016-O.jpg


By simply installing this card and removing the nv_disable=1 flag, the system now features smooth, hardware-accelerated graphics with zero issues. :thumbup: I'll throw the GT520 card far away now.

Now, I've created the USB installer following this guide, but I forgot to apply step 16... yet everything works fine:


I want to setup Clover (w/o UEFI) on the SSD with the nv_disabled flag clearly removed. Should I install Clover or UniBeast? Because I'm not sure which one is safer to install. Everything is working on the system, I'm using a TPLink USB WiFi adapter with its original drivers. Thanks in advance for your help again, you are very kind.
Now, I've created the USB installer following this guide, but I forgot to apply step 16... yet everything works fine:
Even though "everything works fine" , you need to install a Bootloader on the new System Disk, and edit its config.plist to make the system to boot and function properly.
Pasting "Multibeast" [dragging and dropping Multibeast 9.01] on to the "Sierra USB Installer" created using "Unibeast (7.11) method" is to simply give the Multibeast a 'piggy-back ride" through the USB installer on to the Sierra System disk's Desktop once the Sierra System was installed on the Hard disk using the Sierra USB Installer" .

The software "Unibeast" is a multi-function software that installs the OS X or MacOS system, with some essential kexts on a Partitioned and formatted USB Flash disk (in the usual case, because of its portability) along with CLOVER EFI bootloader ( usually an older version available at the time this Software was created and released) .

The System that was installed on the HDD with that Unibeast Sierra USB Installer may not be fully equipped with all the required drivers for all the hardware in the computer, and it also lacks a Bootloader (CLOVER EFI) for that system to boot independently ( without the USB Installer as a 'constant companion' to reach the CLOVER Boot Manager screen and beyond without a boot failure) .

Multibeast, the multi-tooled software , that we paste on to the completed USB installer is an easy way to get that to our Computer. If it is not in that Flash disk or another portable device that can be attached to the computer, we may have to download it from the Internet. If our newly installed system does not have an Ethernet or WiFi connection for want of kexts or because of the lack of proper hardware, we won't be able to download Multibeast. Thus dragging & dropping MB on a completed SB installer is a neat trick!

Once we know from our MoBo documentation or add-on cards' documentation, the drivers we may need, we can navigate to appropriate menu in Multibeats to make the choice. [ Example : MoBO manual says the system has a Realtek ALC 898 Audio , then in Multibeast >Drivers>Audio>Realtek ALC xxx> expand and choose]

Like Unibeast , Multibeast also carries an older version of "Clover EFI Boot loader" that was available at the time it was created. If we need a newer CLOVER EFI Bootloader, we are better off downloading and installing it separately . But we can rely on Multibeast for the installation of Kexts , System Definitions (Mac Model). etc.

Multibeast installs a generic config.plist that may not be appropriate for your Specific system. Therefore you may need to edit the config.plist to suite your system's specific needs.

Once CLOVER EFI Bootloader is installed , often the "EFI partition" of the Disk may be seen 'mounted' on the 'desktop.'

It is in the EFI Partition of the disk a Special Folder with the same name "EFI" containing the important folder "CLOVER" will be located.

"CLOVER" contains other important folders and the file "config.plist" that we want to edit to make it similar to the config.plist of the USB Installer that could boot without any problem to the Installation screen.

In this respect the Unibeast created Sierra USB Installer and the Multbeast run Sierra System Disk are similar.

But to get to the config.plist in CLOVER folder, we will first have to 'mount' the "EFI partition" of the respective Disks on to the desktop.

EFI Mounting requires a software like EFI Mounter V3 or Clover Configurator -Vibrant edition downloaded from the Internet.

EFI Mounter just mounts the partition but CC-V can not only mount EFI partition but can also help to edit config.plist and hence a better choice in my opinion.

Once EFI Partition is mounted, using Mouse and Keyboard , we can navigate through EFI>EFI>CLOVER>confg.plsit and open it with CC-V or another text editor .
 
Last edited:
Status
Not open for further replies.
Back
Top