Contribute
Register

Solution For Fast Clock or Wrong FSB/CPU Speed All i3/i5/i7

Status
Not open for further replies.
Joined
Jul 1, 2010
Messages
5
Mac
  1. 0
Classic Mac
  1. 0
Mobile Phone
  1. 0
Hi Everyone,

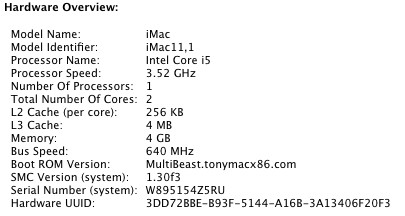
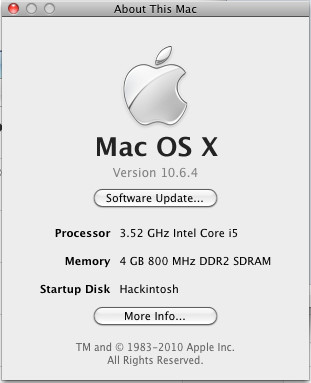
This site has been a huge help in getting my new i3 system working - one issue I had after I finished my OS X install was that the FSB was always detected wrong - CPU would be right, but it would stay the same even if I overclocked it. The bigger issue was my system clock running a bit too fast - doing some searching found that one reason it may be caused is because of the FSB being detected wrong (Chameleon defaults to a 100MHz FSB if it can't properly detect it, which for many 'unofficial' 'i' series CPUs like the i3 is a problem). This was even with the proper DSDT file for the MB / bios that I got here. I found a solution (posted in the thanks below) that worked, but it broke my Nvidia card, so I dug around and got it working right.

Special thanks go out to the original poster of the method that I found http://www.hackint0sh.org/f152/138168.htm#post557833 and for more information about the valv branch you can check out http://www.insanelymac.com/forum/index. ... pic=216726

What this will do: This will fix your system clock if it is running too fast as well as fix your FSB detection, at least with the i3 series CPUs - it SHOULD work with ALL Core 'i' series CPUs, as I've put in the model #s for all versions in the boot file - try using the DEBUG version first, to see if everything is detected properly and if all is good then you can switch to the regular version. If your 'i' series CPU FSB / Speed isn't detected please post your CPU type, # and Model (the Extended Model from CPU-Z or CPU-X).

To install, just unzip the file, back up your existing boot file and copy this one to wherever you boot from (EFI parition or root drive) - a pre-existing Chameleon RC4 install is needed, however, to ensure all of the other stuff is set up.

Confirmed Working:
- Core i3 530

Should be Working:
- Core i3 540
- Core i3 330M
- Core i5 430M
- Core i5 520M
- Core i5 540M
- Core i5 650
- Core i5 660
- Core i5 661
- Core i5 670
- Core i5 750
- Core i7 620M
- Core i7 860
- Core i7 870
- Core i7 920 to 975

Unknown:
- Core i7 980X (This has a new code - try out the 980X boot file to see if it works)
 

Attachments

  • boot-i3 i5 i7 Debug.zip
    101.7 KB · Views: 361
  • boot-i3 i5 i7.zip
    101.2 KB · Views: 657
  • boot-i7 980x Debug.zip
    101.7 KB · Views: 216
Re: Solution For Fast/Slow Clock or Wrong FSB Detection

I LOVE YOU MAN! :headbang: :clap:

I wasn't so concerned about Chameleon not detecting my FSB or my OCed CPU correctly, but what I *was* concerned about was the audio in Parallels Desktop not working correctly in Windows 7 WHEN I overclock. This has, as i was hoping it would, completely cleared up the sound issues when overclocking! :thumbup: :headbang: :mrgreen:

I'm currently booted up from your uploaded debug /boot file.

Now while I am perfectly capable of going through all those steps that you posted, I was wondering anyways: is there any chance you could post your NON-DEBUG bootloader? Since I have the same CPU model as you, and the debug version works perfectly on my i3-530, I was hoping to not have to install Xcode and do all the svn checkout and compiling. :p Would you mind?

P.S. I never had any issues with my clock running fast. I wonder why? :think:

These images show that I have set my BCLK from the default 133 to 160 MHz.
Screen%20shot%202010-07-01%20at%201.15.02%20PM.jpg


Screen%20shot%202010-07-01%20at%201.14.45%20PM.jpg
 
Re: Solution For Fast/Slow Clock or Wrong FSB Detection

First post updated, instructions are below though for how to manually make the patch if your CPU Model # doesn't match:

Beforehand:
1. Install XCode (from the Snow Leopard DVD) and make sure you have a pre-existing install of Chameleon RC4

2. Download Chameleon source code - go to Terminal and type:

Code:
svn co [url]http://forge.voodooprojects.org/svn/chameleon[/url]

This will download all of the Chameleon source code to your User folder

3. After the download has finished, go to /Users/YourUser/chameleon/branches/valv/i386/libsaio

4. Open up the file cpu.c in TextEdit and resize the window so that everything fits on one line like it is supposed to (makes it easier to go through)

If you already know your CPU model number (and are SURE) you can skip this section and go to Step 13 - the steps below will get you the one that for sure will work, but Geekbench also seems to detect the correct Model if you want to use that - just convert the Model # it gives you to hexadecimal (ie. for me, Model is 37, which is 25 is hex)

5. On line 10 of cpu.c look for where it says #define DEBUG_CPU 0 and change the 0 to 1 - then save the file and close

6 Open up Terminal and type
Code:
sudo -s
, and enter your password

7. In Terminal change the directory to the 'valv' branch in the chameleon folder:

Code:
cd /Users/YourUser/chameleon/branches/valv/

8. In Terminal, type make - this should build a Chameleon booter that has you changes built into it

9. In Finder, navigate to /Users/YourUser/chameleon/branches/valv/sym/i386 - you should have a nice full folder, including your boot file with its debug mode on

10. Make a backup of the bootloader you are currently using, and replace your old boot file with this new one - cross your fingers and reboot!

11, If everything goes well, before your system boots up it should show a DOS-like screen with a whole bunch of information - look for the line that says CPU VENDOR/MODEL/FAMILY - and write down the 4 digits in the middle group of numbers

CPU VENDOR/MODEL/FAMILY 0x12345678/0x25/0x06

Don't worry if a lot of the other information is wrong - it will be fixed by the time we are done

12. Hit any key to finish booting into OS X, and then go to /Users/YourUser/chameleon/branches/valv/ and delete the obj and sym folders, and continue on the steps below

Do this once you know your CPU Model!

13. Go to /Users/YourUser/chameleon/branches/valv/i386/libsaio

14. Open up the file cpu.c in TextEdit and resize the window so that everything fits on one line like it is supposed to (makes it easier to go through)

15. Scroll down or search for the word "Nehalem" - this is where the boot file detects the Core 'i' series CPUs - by default it only lists the ones used by Apple, but as they are all pretty similar you can plug in just about any model as long as you know the CPU Model number (determined previously)

16. In the line right under where it says "* Nehalem CPU model * look for where it lists p->CPU.Model == 0x1e - after that, add in the following (include the space at the start):

Code:
 || p->CPU.Model == 0x??
(?? is your CPU model in hexadecimal)

So to give you a bit of a visual, here was my before:

Code:
/* Nehalem CPU model */
			if (p->CPU.Family == 0x06 && (p->CPU.Model == 0x1a || p->CPU.Model == 0x1e)) {

And here is my after"

Code:
/* Nehalem CPU model */
			if (p->CPU.Family == 0x06 && (p->CPU.Model == 0x1a || p->CPU.Model == 0x1e || p->CPU.Model == 0x25)) {

My CPU is a Core i3 530 - the Debug/Geekbench mode identified it as Model 37.

17. Save the file and close

18. Open up Terminal and type
Code:
sudo -s
, and enter your password

19. In Terminal change the directory to the 'valv' branch in the chameleon folder:

Code:
cd /Users/YourUser/chameleon/branches/valv/

20. In Terminal, type make - this should build a Chameleon booter that has you changes built into it

21. In Finder, navigate to /Users/YourUser/chameleon/branches/valv/sym/i386 - you should have a nice full folder, including your boot file with your fixed FSB detection and clock

22. Make a backup of the bootloader you are currently using, and replace your old boot file with this new one - cross your fingers and reboot!

23. If everything goes well, you should be able to go to System Profiler and see the correct bus speed (it will show up as you actual bus speed x4) - your clock should be fixed, and even if you overclock it will still correctly determine bus speeds!

24. Theoretically this should work with any branch of the Chameleon bootloader, but I chose the valv branch as it is one of the more recent ones and has a lot of fixes (and autodetects my graphics card properly, which the Chameleon used in the original instructions I used didn't do)
 
Great Work.

Thanks.

rabbit.
 
Unknown:
- Core i7 980X (This has a new code - try out the 980X boot file to see if it works)

980x debug works very well but the " boot-i3 i5 i7" not so much. Boots okay but FSB is not showing correctly.

Just to let you know.

Thanks again.

r.
 
Just thought I'd post the i7-980x boot file with Debug turned off. Works perfectly. Using with 10.6.4 Kernel.

The file attached is the same as the one posted above but has debug turned off.

Thanks again to smitty244 Great post.

rabbit.
 

Attachments

  • boot_i7_980x.zip
    101.2 KB · Views: 173
Hey smitty244, I have the same setup as you just a different video card. How did you get your video to work? I downloaded your boot file, replaced mine, reboot, apple screen loading, then when it's about to get to the desktop I get a black screen. Monitor goes to sleep, but the systems still running.

I then did everything in your second post and still nothing.

I tried all kinds of boot strings to no avail. So I booted OS X installer and used terminal to replace my working file for now. How do I get this to work without breaking my video card?
 
I got bored and decided to try another branch. I used the andyvand branch, same instructions, booted up and now I have correct fsb :p along with working video.

New problem cropped up. Now my ram is being recognized as DDR2 667. Before it was reading it as DDR3 800. My ram is actually DDR3 1600. :think:

Any ideas let me know, for now I'm back to testing.


Edit: update - just tried rekursor branch, killed video. Next... :yawn:
 
Good to hear it is working out for people - in regards to the video, the only thing I could think of would be to make sure the GraphicsEnabler option is enabled in your com.apple.boot.plist file - but I've also heard some models of the 8400GS are picky (and the card itself has 2 significantly different models going round) - the one I'm using is an Asus passive model - the 567MHz model with the newer GPU core.

The RAM issue I think is more cosmetic - I tried the AsereBLN boot file and it detected the RAM as DDR3, but still only at 800MHz. The big goal with the revised boot file posted here was to fix the clock issue and wrong CPU speed - I can live with the wrong RAM speed being reported :)
 
Status
Not open for further replies.
Back
Top