
You are using an out of date browser. It may not display this or other websites correctly.
You should upgrade or use an alternative browser.
You should upgrade or use an alternative browser.
How to build your own iMac Pro [Successful Build/Extended Guide]
- Thread starter kgp
- Start date
- Status
- Not open for further replies.
kgp
Retired
- Joined
- May 30, 2014
- Messages
- 6,743
- Motherboard
- ASUS WS X299 Sage 10G
- CPU
- i9-7980XE
- Graphics
- Vega 64
- Mac
- Mobile Phone
Thanks guys!
First off, thanks to all that have contributed here and for KGPs work in creating a detailed and instructive guide. This is the 4th hack I've built, and I learned the most about why and how things work with this guide, so thanks again for taking the time to do a little teaching and explaining about what's going on behind the scenes of some of these patches, kexts, etc.
I have a stable system running these components:
ASUS Prime X299 Deluxe (Newest Firmware)
i9 7980XE (Sync all cores, w/ AVX offsets)
NVMe Sys. Drive.
32 GB 3000mhz ram
GTX 970 (For testing, replacing with Titan X tomorrow)
I ran a Geekbench before I enabled all cores and got a multicore "43926" and after enabling sync all cores, received a "50081."
From KGP's benchmarks, I am wondering why mine are so much lower... Any insight or tips on what I should be investigating or studying up on, would be greatly appreciated! Thank you!
Did you check if XCPM is properly implemented?
- Joined
- Sep 26, 2013
- Messages
- 256
- Motherboard
- Asus TUF Gaming Z790 PLUS WIFI DDR5
- CPU
- i7-13700KF
- Graphics
- RX 570
- Mac
hi man, do you have SSDT for your CPU? What is your cinebench score?Thank you !! you just fixed my sync all cores problems !!")
RuleBreaker01
Banned
- Joined
- May 31, 2018
- Messages
- 1,274
Has anyone seen this message?

I updated to 10.13.1 and can't boot into OS no more,
Thanks in advance,
Edit:
Nvm, copy the EFI from @kgp EFI-X299-10.13.1-Release-061117.zip and got its running now, yay,
Thanks
I updated to 10.13.1 and can't boot into OS no more,
Thanks in advance,
Edit:
Nvm, copy the EFI from @kgp EFI-X299-10.13.1-Release-061117.zip and got its running now, yay,
Thanks
Last edited by a moderator:
kgp
Retired
- Joined
- May 30, 2014
- Messages
- 6,743
- Motherboard
- ASUS WS X299 Sage 10G
- CPU
- i9-7980XE
- Graphics
- Vega 64
- Mac
- Mobile Phone
Has anyone seen this message?
View attachment 294028
I updated to 10.13.1 and can't boot into OS no more,
Thanks in advance,
What about using OsxAptioFix2Drv-free2000.efi to by-pass the OsxAptioFix2Drv.efi problem?
RuleBreaker01
Banned
- Joined
- May 31, 2018
- Messages
- 1,274
What about using OsxAptioFix2Drv-free2000.efi to by-pass the OsxAptioFix2Drv.efi problem?
I was gonna do it and I saw your new EFI, lol, tried it and bam, works like a champ,
<----- lazy to troubleshoot things, "Copy" and "Paste" people works seem faster, lmao..
Also I noticed my Red Devil RX580 performance better after put the System into "Sleep mode" and wake it up,
Ran Cinebench and the score goes from 80 fps to 160 fps, no clue why
However the same card runs in the new Coffee-lake 8700K got 160 fps everytime,
If anyone know the answer, pls share, thanks!
- Joined
- Nov 4, 2011
- Messages
- 677
- Motherboard
- Gigabyte GA-Z170X-UD3 F23g
- CPU
- i7-6700K
- Graphics
- RX 580
- Mac
KGB hats off to you. What you have accomplished with the USB configuration section of your guide is just phenomenal.
I adapted the USB section of your guide and created kexts for both of my builds listed in my signature. With the appropriate kext, for the build intended, placed into Clover/.../other and USBIncetAll.kext removed from /Library/Extension, all the USB ports are working like a dream. For my Haswell build I configured my bios to ensure that the EHCI USB controller is disabled so that I can focus only on configuring the XHCI controller of the GA-Z97X-UDRH mobo. That also worked like a dream. I do not require more than 15 ports, that is the reason why disabling the EHCI controller was feasible for my particular environment.
What also helped me a lot is Brumbaer's superb explanation of the intricacies of the procedure to facilitate the removal of the USBInjectAll kext. As a "Leerling" he provided an exceptional technical write up explaining how "kext" related matters fit together.
Well done to both of you.
I adapted the USB section of your guide and created kexts for both of my builds listed in my signature. With the appropriate kext, for the build intended, placed into Clover/.../other and USBIncetAll.kext removed from /Library/Extension, all the USB ports are working like a dream. For my Haswell build I configured my bios to ensure that the EHCI USB controller is disabled so that I can focus only on configuring the XHCI controller of the GA-Z97X-UDRH mobo. That also worked like a dream. I do not require more than 15 ports, that is the reason why disabling the EHCI controller was feasible for my particular environment.
What also helped me a lot is Brumbaer's superb explanation of the intricacies of the procedure to facilitate the removal of the USBInjectAll kext. As a "Leerling"
he provided an exceptional technical write up explaining how "kext" related matters fit together.Well done to both of you.
- Joined
- Sep 29, 2017
- Messages
- 66
- Motherboard
- ASUS Prime X299 Deluxe
- CPU
- i7 7820X
- Graphics
- EVGA GeForce GTX 1080 Ti SC2 HYBRID GAMING
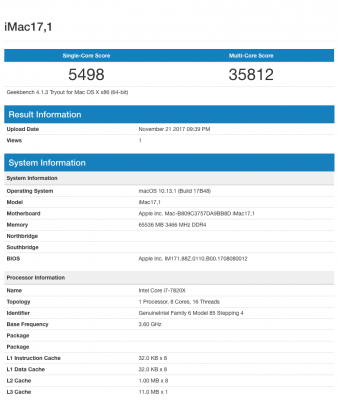
hi man, do you have SSDT for your CPU? What is your cinebench score?
i don't use SSDT, that's my score:
Attachments
kgp
Retired
- Joined
- May 30, 2014
- Messages
- 6,743
- Motherboard
- ASUS WS X299 Sage 10G
- CPU
- i9-7980XE
- Graphics
- Vega 64
- Mac
- Mobile Phone
@mgregrs ,
I guess I found the source and a solution for your iCloud/Appstore/iMessage/Facetime problems.
In order to successfully register for the above services, you need an ethernet port defined as build in and termed "en0". If the latter is not the case, you have to reset your ethernet settings as detailed below:
1.) System Preferences -> Network -> mark e.g. Ethernet 1 and subsequently press the "-" bottom, which will remove the respective network setting. If you use the second LAN-port on the ASUS Prime X299 Deluxe, also mark e.g. Ethernet 2 and subsequently press the "-" bottom, which will also remove this respective network setting.
2.) Now enter the following terminal commands:
3.) Reboot
4.) On Reboot, OSX will renew your former network settings and you should be finally able to successfully register for the above services, as long your SMBIOS credentials are correct and you also use EmuVariableUefi-64.efi in the /EFI/Clover/drivers64UEFI/ directory of your system disk.
Good luck!
I guess I found the source and a solution for your iCloud/Appstore/iMessage/Facetime problems.
In order to successfully register for the above services, you need an ethernet port defined as build in and termed "en0". If the latter is not the case, you have to reset your ethernet settings as detailed below:
1.) System Preferences -> Network -> mark e.g. Ethernet 1 and subsequently press the "-" bottom, which will remove the respective network setting. If you use the second LAN-port on the ASUS Prime X299 Deluxe, also mark e.g. Ethernet 2 and subsequently press the "-" bottom, which will also remove this respective network setting.
2.) Now enter the following terminal commands:
Code:
sudo rm /Library/Preferences/SystemConfiguration/NetworkInterfaces.plist
Code:
sudo rm /Library/Preferences/SystemConfiguration/preferences.plist4.) On Reboot, OSX will renew your former network settings and you should be finally able to successfully register for the above services, as long your SMBIOS credentials are correct and you also use EmuVariableUefi-64.efi in the /EFI/Clover/drivers64UEFI/ directory of your system disk.
Good luck!
- Status
- Not open for further replies.
Copyright © 2010 - 2024 tonymacx86 LLC