- Joined
- Jul 24, 2015
- Messages
- 64
- Motherboard
- Gigabyte GA-Z370-HD3P
- CPU
- i7-8700K
- Graphics
- Vega 56
- Mac
- Classic Mac
- Mobile Phone
Hi
Today I'm going to talk about my last mod on a PowerMac G5.
My target was to change less possible the magnifique G5 case.
I get the case from a friend of mine: he wanted to trash it, because it doesn't work anymore.
So I fitted the "new" PSU inside the original one.
Let's start:
I unmonted all the PowerMac g5 and opened the old PSU(Not working):

I realise the real cause of working problem: dust!

After this I unmonted all and clean the steel. I unmonted the "new" PSU(recycled a normal PSU to start this hackintosh mod) and I tried to fit it in the steel G5 PSU case.

I wasn't able to use original AC ingress because this PowerMac have american cable ingress, but I have only European cable, so I workaround in this way:

I've been using the original HD fan support to insert two original PSU fans in their original base.
The fans support are these:


I used these support because are less noising and I used original fans because there isn't any 0dB little fan on amazon.
I've lost some work in progress photos, so I've found a similar thread about creating the mobo screw support
(https://www.tonymacx86.com/threads/a-simple-g5-case-mod.81930/)
I've removed the original screw support with tongs and the I used Bostik "Metallo Liquido" glue (Liquid metal, its a glue that became as hard as steel) to reattack them in the correct location.
I put the PSU in the original location and used the original ways to get cable.

Behind i use the angle grinder to create a rectangular hole to fit the external cable.

I tried to use original 92mm fans, but also at 5V they make too much noise.
So I bought 2x92mm F9 arctic fans and fit them in original support.


I also removed the plastic shoulder because I noticed that the support isn't symmetrical and I could get about 3mm placing it upside down (The audio output is very high and touch the fans support).
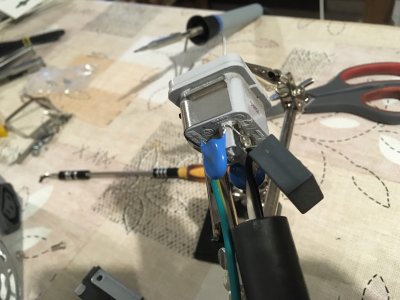
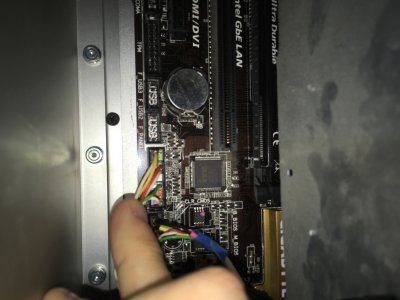
Then I searched a lot in the web to get this horrible front panel pinout.... And I get USB2, Power Led and Power Button to work without problems.


With 3(+2PSU's) fans and all this place free its very quiet and cool.
Outside it's identical to a PowerMac G5.
Today I'm going to talk about my last mod on a PowerMac G5.
My target was to change less possible the magnifique G5 case.
I get the case from a friend of mine: he wanted to trash it, because it doesn't work anymore.
So I fitted the "new" PSU inside the original one.
Let's start:
I unmonted all the PowerMac g5 and opened the old PSU(Not working):
I realise the real cause of working problem: dust!
After this I unmonted all and clean the steel. I unmonted the "new" PSU(recycled a normal PSU to start this hackintosh mod) and I tried to fit it in the steel G5 PSU case.
I wasn't able to use original AC ingress because this PowerMac have american cable ingress, but I have only European cable, so I workaround in this way:
I've been using the original HD fan support to insert two original PSU fans in their original base.
The fans support are these:
I used these support because are less noising and I used original fans because there isn't any 0dB little fan on amazon.
I've lost some work in progress photos, so I've found a similar thread about creating the mobo screw support
(https://www.tonymacx86.com/threads/a-simple-g5-case-mod.81930/)
I've removed the original screw support with tongs and the I used Bostik "Metallo Liquido" glue (Liquid metal, its a glue that became as hard as steel) to reattack them in the correct location.
I put the PSU in the original location and used the original ways to get cable.
Behind i use the angle grinder to create a rectangular hole to fit the external cable.
I tried to use original 92mm fans, but also at 5V they make too much noise.
So I bought 2x92mm F9 arctic fans and fit them in original support.
I also removed the plastic shoulder because I noticed that the support isn't symmetrical and I could get about 3mm placing it upside down (The audio output is very high and touch the fans support).
Then I searched a lot in the web to get this horrible front panel pinout.... And I get USB2, Power Led and Power Button to work without problems.
With 3(+2PSU's) fans and all this place free its very quiet and cool.
Outside it's identical to a PowerMac G5.