
BoomR
Moderator
- Joined
- Dec 18, 2011
- Messages
- 1,256
- Motherboard
- Gigabyte Z490 VISION D
- CPU
- i9-10850K
- Graphics
- RX 580
- Mac
- Classic Mac
- Mobile Phone
BoomR's Recording Studio Rig v2.0: Core i7 3770K | GA-Z77X-UP5 TH | 32GB | HD4000 + G5 Case Mod
This new build replaces my original Golden Build as the hub of my home/project recording studio

This new build replaces my original Golden Build as the hub of my home/project recording studio
Preface:
The focus of this post is the actual build (components used, UEFI/BIOS settings, MultiBeast settings, installation process, optimization, etc.). There is a companion post here that details the G5 case mod project with plenty of pictures. Make sure to check out that thread as well, but please post your question or comments that relate to the G5 case/case mod over there. THANKS! Now...on with the show & away we go!
Components
Mac OSX Mountain Lion Mavericks Retail (downloaded from App Store)
[url]https://macappsto.re/us/3M3pO.m[/URL]
Motherboard: Gigabyte GA-Z77X-UP5 TH
http://www.newegg.com/Product/Product.aspx?Item=N82E16813128559
CPU: Intel Core i7 3770K
http://microcenter.com/product/388575/Core_i7_3770K_35GHz_LGA_1155_Processor
CPU Cooler: Noctua 6 Heatpipe 140mm SSO Bearing Quiet CPU Cooler NH-C12P SE14 UPDATED
http://www.amazon.com/gp/product/B003JME1CO/ref=oh_details_o03_s00_i00?ie=UTF8&psc=1
RAM: CORSAIR Vengeance 8GB 240-Pin DDR3 SDRAM DDR3 1600 (CL9) x 2 4 (16GB 32GB) UPDATED
http://www.newegg.com/Product/Product.aspx?Item=N82E16820233298&Tpk=N82E16820233298
Boot Drive: Samsung 840 EVO 250GB UPDATED
http://www.newegg.com/Product/Product.aspx?Item=N82E16820147248
Optical Drive: Sony Optiarc 24x DVD Burner
http://www.newegg.com/Product/Product.aspx?Item=N82E16827118067
Power Supply: Corsair TX650M 650w Modular Enthusiast Series
http://www.newegg.com/Product/Product.aspx?Item=N82E16817139031
Case fans/cooling
CoolerMaster 120mm Blue LED (2)
http://www.newegg.com/Product/Product.aspx?Item=N82E16835103060
SilenX 80mm (2)
http://www.newegg.com/Product/Product.aspx?Item=N82E16835226001
USB/FireWire
StarTech 2 Outlet USB2.0 Bridge Cable
http://microcenter.com/product/222948/2_Outlet_USB_Plate_Motherboard_Bridge_Cable
Cables To Go 13413 FireWire Cable Adapter with Panel Bracket
http://www.newegg.com/Product/Product.aspx?Item=N82E16812791185
IOGear Bluetooth 4.0 USB
http://microcenter.com/product/387794/Bluetooth_40_USB_Micro_Adapter
Already Owned
Syba Low Profile PCI-Express 1394b/1394a (2B1A) Card, TI Chipset
http://www.amazon.com/dp/B002S53IG8/
BELKIN FireWire 3-Port PCI Express Card Model F5U504 - Newly Added
http://www.newegg.com/Product/Product.aspx?Item=N82E16815108009
Apple Wireless Keyboard
http://www.amazon.com/dp/B005DLDO4U
Apple Trackpad
http://www.amazon.com/dp/B003XIJ3MW/
Apple 27" Cinema Display (mini-DP version)
http://store.apple.com/us/product/MC007LL/A/apple-led-cinema-display-(27"-flat-panel)?fnode=53
Storage (pulled from Golden Build)Western Digital 500GB RAID-class SATA drive (for project files/working drive)
Samsung 1TB RAID-class SATA drive (for sample/VST libraries)
Seagate 1.5TB Barracuda (for TimeMachine/file backup)
Comments
Process Overview
This is my 5th CustoMac build and probably was the smoothest, most trouble-free build I've done (with two small exceptions, one of which was a known/common issue & was quickly/easily resolved).
I actually did most of the assembly, loading of the OS, MultiBeast, etc. prior to the case mod project being done. This was your typical process for any CustoMac (Mountain Lion + UEFI board) build project:
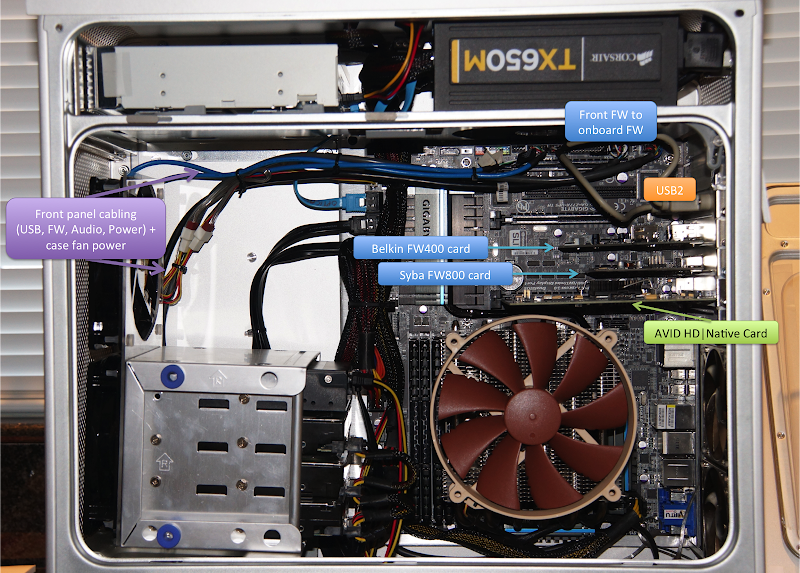
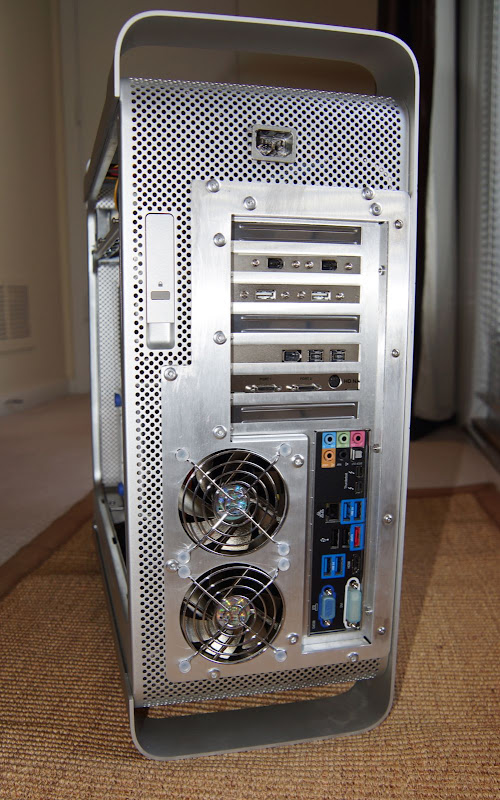
- Assembling all the components in the case, making necessary connections, etc. Note in my components list I have listed both a USB2 and FW400 rear panel so I can take advantage of the extra USB2 motherboard headers, as well as the onboard FW400. UPDATE: The new configuration includes adding the Belkin FW400 card in addition to the existing Syba FW800 card. Also, now I'm connecting the front panel FW400 to the mobo 1394 header. I've also since removed the FW400 backplane since adding in the Belkin card. Here's an illustrated image of the insides, including all the configuration changes, plus the additional RAM and Noctua CPU cooler:
- Build my UniBeast install key on my MBP using the latest Mountain Lion version of UniBeast. Tip: I partitioned my SanDisk 8GB USB flash drive used for my UniBeast install key as follows: 7GB = UniBeast install key; 1GB = MultiBeast Lion 5.2.1
- Power on system and go into UEFI/BIOS and set proper CustoMac-recommended settings (screen shots to follow)
- Reboot & follow all UniBeast instructions for initial OSX install/setup/config. I also cross-referenced Stork's Golden Build/Thunderbolt Build instructions as well.
UEFI/BIOS Settings
Thelostswede has a great quick guide for Gigabyte 7-series motherboards with UEFI bios - see link in #3 above. Stork also had a few notes on UEFI/BIOS settings in his golden build instructions as well (see link in #4 above). The following are some screen shots of my UEFI/BIOS settings (vanilla build - no overclocking):
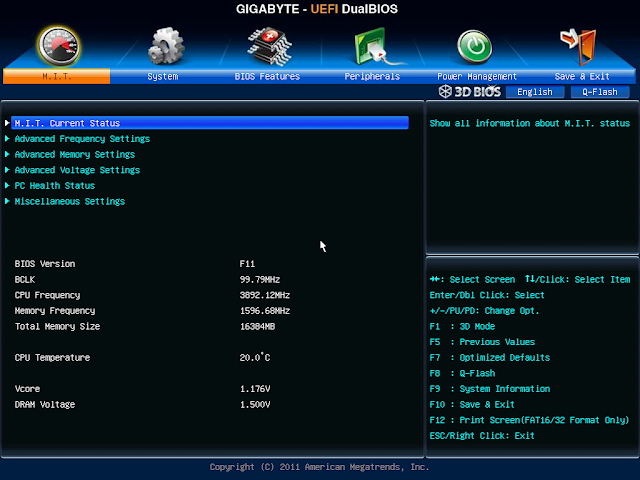
Here's the M.I.T. overview when you first enter UEFI and are past the 3-D BIOS screen (press F1 to exit 3-D). I think it's cool as heck that you can press F12 to do screen grabs of the UEFI (just make sure to have a FAT32 USB stick connected - that's where screen grabs are stored):
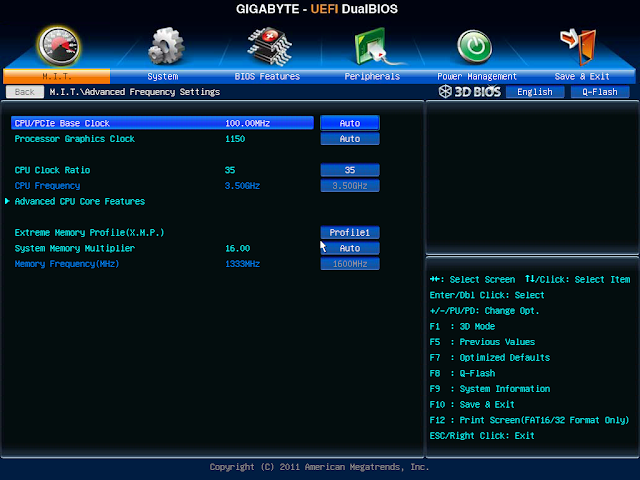
First place you need to make a change is in M.I.T. > Advanced Frequency Settings. Make sure to set X.M.P. to Profile1:
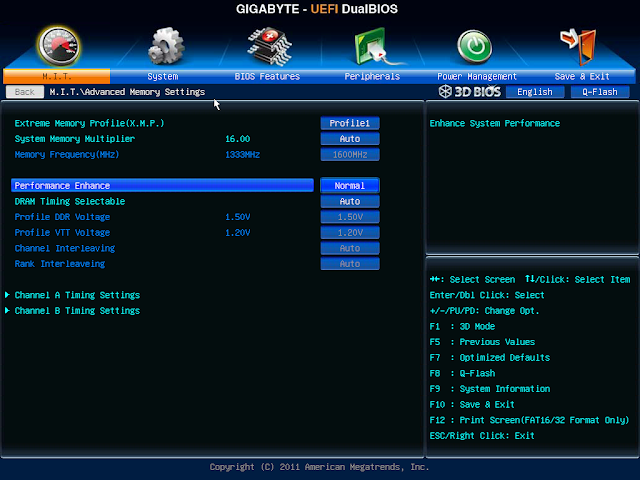
Next, I went into M.I.T. > Advanced Memory Settings and set Performance Enhance to Normal. By default, my board (F11 BIOS) was set to Turbo, but I noticed my GeekBench scores were 1,000-2,000 points lower when I was using Turbo mode. Go figure:
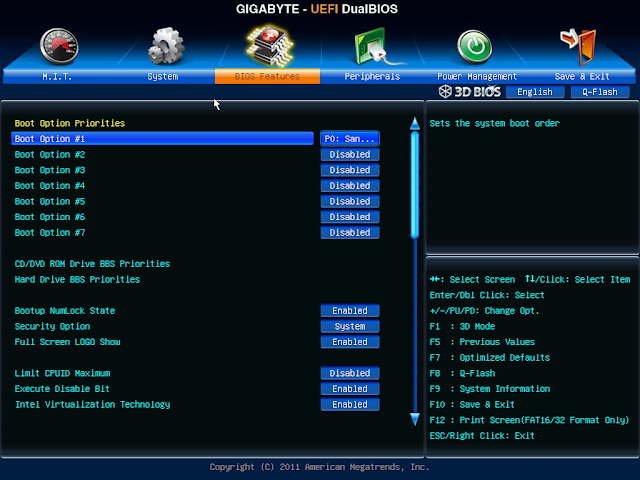
So now, on to BIOS Features. Here I did 3 things:
- Chose the "Legacy" ("P0") version of my SSD drive as the first boot drive. Mac/OSX doesn't much like the UEFI instance of the same device, so make sure your Boot Option #1 is not the UEFI instance.
- Disable all remaining drives. My build has 3 additional SATA HDs, as well as the optical drive. In past builds & tutorials, disabling any additional drives really improves boot time, so I've just made this a best practice.
- I also chose to enable Intel Virtualization Technology - I think this option was in a couple other people's build instructions. I may be installing VMWare Fusion on this machine, and by the description of this setting - it made sense to activate. Here are my settings for BIOS Features:
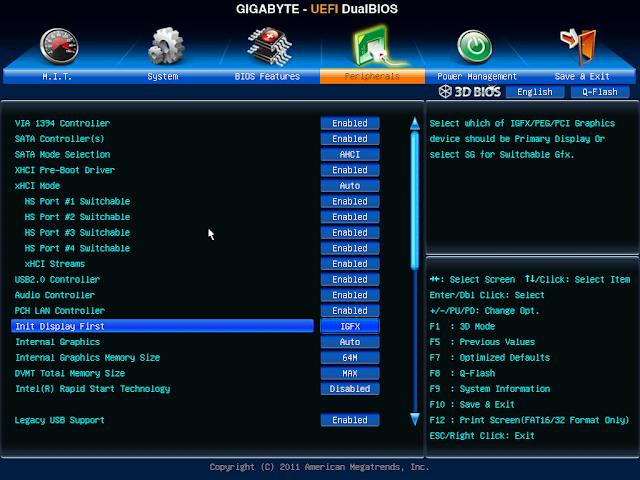
In Peripherals (the upper portion of this page), note the settings shown below (these were the page defaults as I recall):

My only real hiccup initially was not paying close attention to the Intel(R) Thunderbolt setting option at the bottom of the Peripherals page:
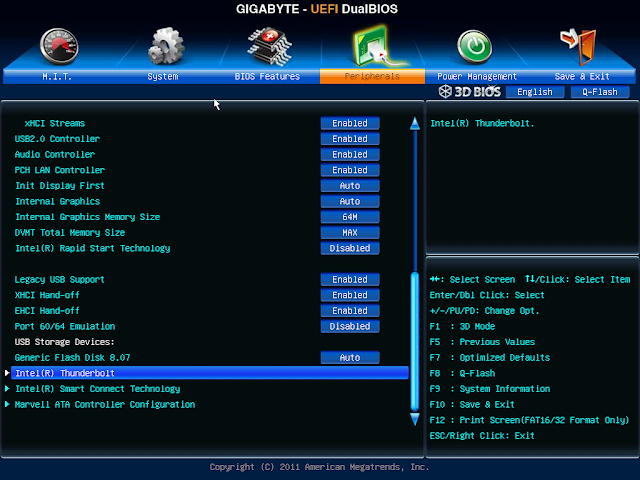
What seemed to be happening was that upon initial system power-up, the TB devices would receive power, but then go to sleep during boot. Once the desktop would render, the TB devices would then power back up again...and BAMM-O: my system would lock up. When poking around the UEFI and finally taking a moment to ponder this Thunderbolt setting, I got to thinking: People report their systems locking up when trying to hot-swap their TB devices. Maybe my TB devices were "off" during boot, then powering back on (in essence, a "hot swap connection") once bootup was complete. Long story short: with my build, setting Wake From Thunderbolt Devices = Disabled fixed this issue! Now all my TB devices work just fine:

Last but not least, Power Management settings: Make sure to disable Wake from LAN to avoid the dreaded shut down > reboot loop. Now save & exit, and you're ready to install OSX!!
Unibeast & MultiBeast
Since I already had my UniBeast flash drive connected when I set my BIOS, I'm now ready to reboot the system & begin the OSX Install. Again I followed the UniBeast instructions for OSX Mountain Lion install to a T. For me, I needed no extra boot flags or anything - it was actually smooth sailing! I had success using both the DVI and HDMI video connections on the motherboard.
Once the initial OSX install was done, my system rebooted. Per instructions, don't forget to press F12 at the POST screen to select your UniBeast key as your boot drive one last time, then at the Chimera screen, select your fresh install of Mountain Lion to complete the setup wizard.
I must say there was a lot of trial & error for me trying to find the right combinations of settings that gave me both the features I wanted on this build + the best possible GeekBench scores. This board doesn't require a DSDT, and honestly, you can get this system up & running with just 2 MultiBeast settings: Audio & Network (see Stork's guide). Fortunately for me, I have an extra 60GB SSD and a 2.5" eSATA drive that I use during my build process. That SSD is partitioned into 2 sections: a "boot" partition with a "vanilla" & basic OSX install, and a partition where I keep Carbon Copy Cloner images of things so I can play around with settings but re-image if I muck up the works.
Once I got a "clean" OSX load, I made a CCC image of that so I could start playing & experimenting, but then "shake the Etch-a-Sketch" and start over quickly if needed.
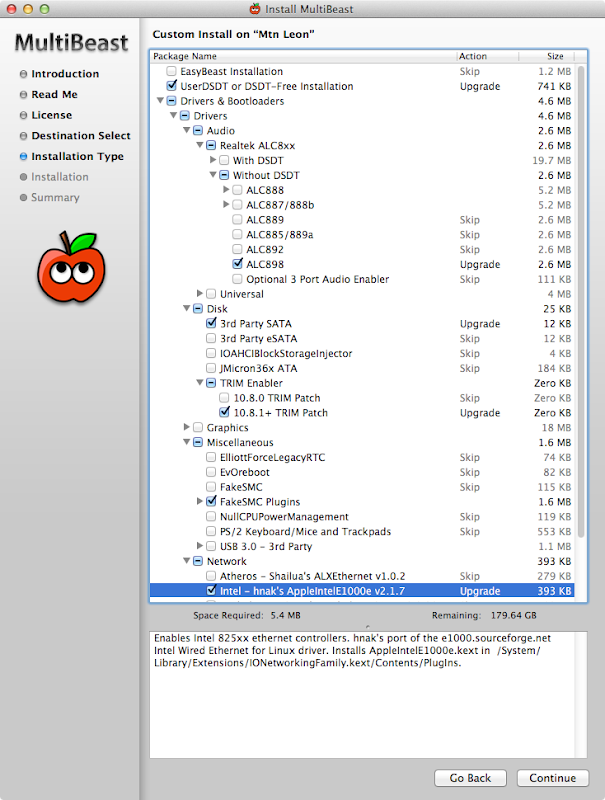
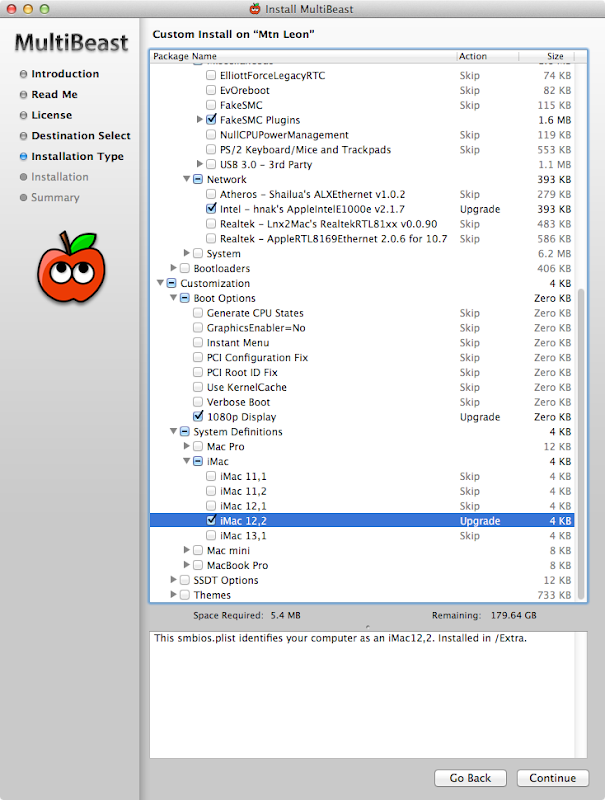
My current MultiBeast settings for fresh install of Mountain Lion 10.8.2:
MultiBeast & misc. notes:
- The very first time I rebooted the system after installing MB, I got the dreaded "scrambled video" problem. Had I used the Tonymacx86.com search feature in the troubleshooting forum, I would have discovered I was not the only one to have this problem.
 I made a posting about this (as well as my Thunderbolt issue) and thanks to Tonymacx86, I have not had the issue since. I now use the 1080p Display boot option in MultiBeast.
 - I chose the iMac 12,2 definition. Again, for whatever reason, the GeekBench scores using this definition (vs. MacPro3,1 which is assigned by default if you don't choose a definition) were considerably faster (14,600+ for iMac12,2 vs. ~13,400 for MacPro3,1). The only "down side" that I find using the iMac 12,2 definition is that I have the dreaded "audio 'pop' noise" either during boot up, or the first time audio plays. You don't get this anomaly with the MacPro3,1 definition. This is not a show-stopper for me by any means, as I am not using the on-board audio for daily work with this machine. So non-issue for me.
- I have not done anything about trying to get HDMI audio working with this build. Again, I use my mini-DP Cinema Display, as well as pro audio interfaces for my audio on this one, so not a priority to fix HDMI audio. (BTW, Cinema Display USB audio works!)
- I **used to** have the dreaded iMessage issue. But with latest Chimera, I no longer have this issue. iMessage etc. works fine.
UPDATED: My GeekBench Score (as of 06Mar2014):

That's it! Hope this is helpful for many of you! Again, happy to answer any questions about build components, install/config, MultiBeast, etc. here in this post. But please make any questions about the G5 case mod over on my other thread. Thanks, gang!

The END!
UPDATE 1/26/2013: Shortly after the first inquiry as to why I selected both "3rd party SATA" and "3rd party eSATA," I ended up doing a quick reload from my "clean" CCC image, then re-running MB. This time only selecting 3rd party SATA. Initially it was just my stupidity and/or lack of understanding of the function of these kexts that led me to select both options intially. The MB screens above reflect the current (and working) MB settings.
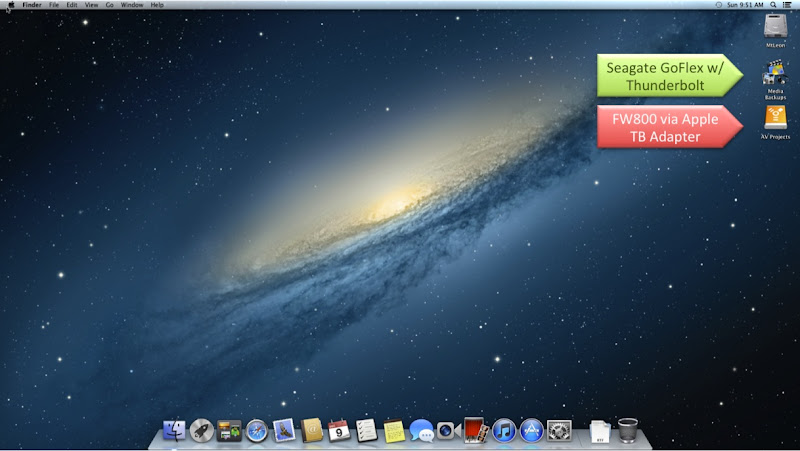
In addition, for those curious about Thunderbolt working for me, please see the link in the first bullet of the MultiBeast & misc. notes section above. That post provides the original details on my challenges getting TB working. As originally noted above in the TB UEFI settings section, YES - all my TB devices are working fine (driving my 27" mini-DP Cinema Display + all TB devices I listed above in my original post). Here's a shot of my Seagate GoFlex drive with TB adapter and my OWC FW800 drive via Apple TB > FW800 adapter both running on this build:
UPDATE 17Feb2013: I was trying to use the onboard VIA chipset FW for one of my Mackie Onyx FW audio interfaces, but would periodically experience some audio drop-outs during simple playback tasks like listening to iTunes. After this happening a few times, I decided to disable the onboard VIA FW chipset, and remove the 1394a backplate that was connected to the onboard header. As I headed to my local MicroCenter who had one of the Syba FW cards in stock, I remembered that I already had a Belkin PCIe card (it was at one time in my PowerMac G5 ages ago) sitting in a box of random unused computer parts. Long story short, I plugged in the card & rebooted. Worked out of the box (as I had expected), and both of my Mackie FW audio interfaces now work like a champ during initial play testing. If you're having better luck with onboard VIA FW chipset than I am, then good on ya! But I prefer to use something that I know has a proven track record already. BTW, Belkin card uses TI FW chipset. From the Belkin card's UG:
Features
• Complies with one-lane 2.5Gbps PCI Express specifications and PCI Express 1.0 specifications
• Offers 1394a data-transfer rates of up to 400Mbps
Specifications
• Interface: PCI Express
• Mode: 1394a PCI Express
• Controller: Texas Instruments XIO2200
• Channels: 2 external 1394a ports and 1 internal port
UPDATE 20June2013: Had a request from our fearless leader beelzebozo to post a few more pics & show how my CustoMac is connected to the rest of my studio, as well as some additional information on gear. His inquiry in particular was my ProTools HD|Native setup. Initially, I only ran regular ProTools 10 using the CoreAudio drivers. My audio interface is the Apogee Symphony I/O with the Analog 8in/8out + optical in/out options. For lowest latency & best performance, I **used** to have the companion Apogee Symphony 64 PCIe card driving the I/O. But I was having some random problems with rebooting/power-cycling that were not related to the normal Gigabyte issues that drive this behavior. Problems would cease when the Symph64 card was removed; put it back in, and they would begin appearing randomly. I finally attributed this to the fact that Symphony 64 card is a Mac-only solution, and I surmised that there were some unique incompatibilities with this card & non-Apple hardware. SO...
I got on eBay and found an AVID HD|Native card (with accompanying software license for PT HD 9/10) that was a "demo" with full warranty. Since the HD|Native card is a cross-platform solution (ProTools runs on both Mac & Win), I figured I would not have the same problems with this card. Plus, since the Symphony I/O is designed to work & integrate tightly into AVID systems, I was still getting the great A/D & D/A converters. So long story short: I run PT 10 on an HD|Native card driving the Apogee Symphony I/O - which has a "ProTools HD" mode and connects directly to the AVID HD|Native card using the same cable as I used with the Symphony 64 card.
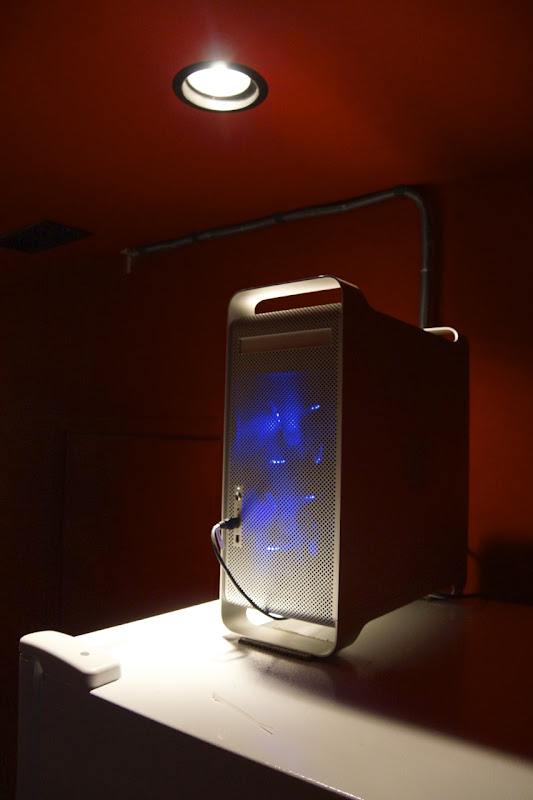
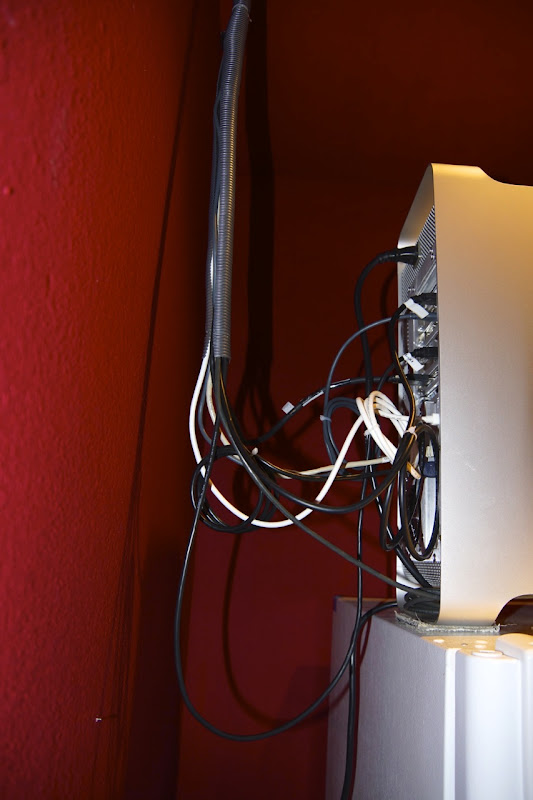
My studio is actually in a "bonus room" that was built above the 3-car garage. The room below my studio is a combination of 2nd home studio for my partner (who is a musician/guitarist/singer/composer and a Berkeley College of Music grad), plus equipment storage (sound system, cases, old LPs), and most importantly: the "party fridge" with all the beer & sodas LOL!! My CustoMac sits atop the party fridge in the downstairs studio, and all of the cabling (USB, FW, mini-DP for video, and DigiLink cable from the PCIe card to the audio interface) run up through the floor into my studio:
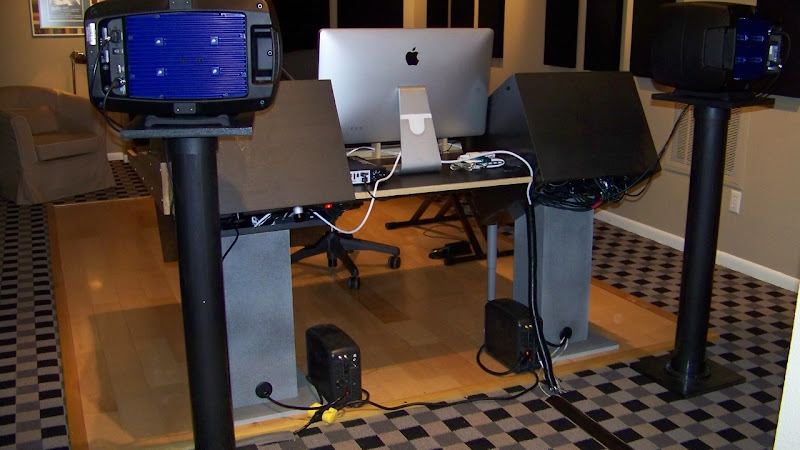
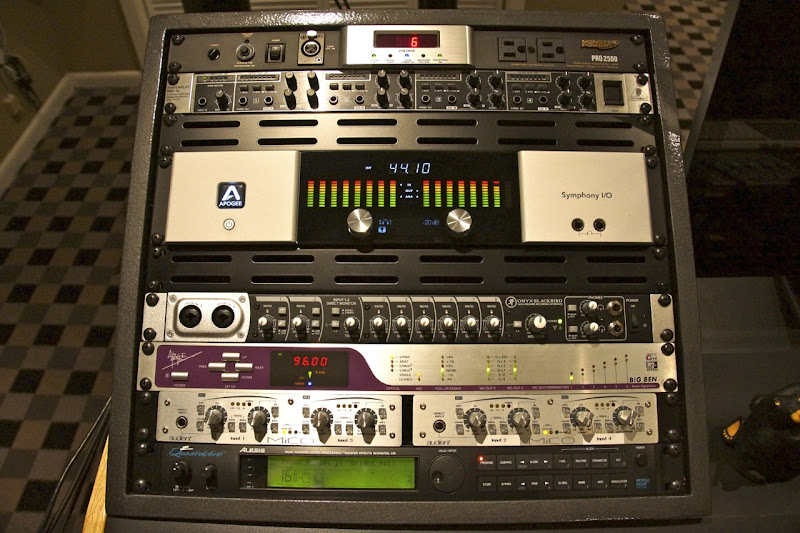
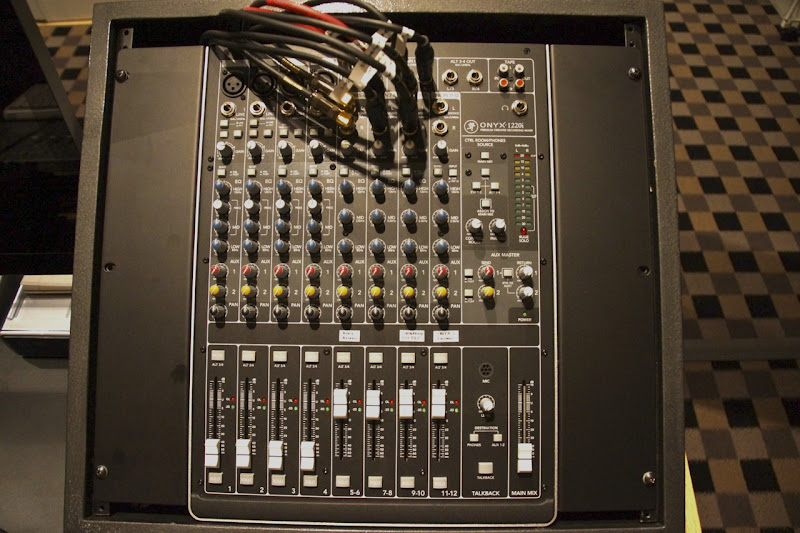
Here's a couple shots of my gear that's in the studio desk I built, starting with the rack on the left:
There you have it! Hope this gives some additional insight into using a CustoMac with ProTools HD|Native (and I'm sure equally as well with the new HDX systems). Plus I also run Logic Studio and have been a LONG-time user of Digital Performer (recently updated to DP8, but have yet to get back to work in it).
UPDATE 06March2014: Now that we're a couple dot releases into Mavericks (and all of my go-to apps & plugs are now certified for Mavericks), it was time to take the plunge - err.. ride the Mavericks Wave!! Rather than trying to update to Mavs over my existing Mountain Lion, I got a nice deal on the new Samsung 840 EVO SSD, so swapped that out for my old SanDisk Extreme. Did a clean install using the 10.9.2 installer from the App store. Went without a hitch - REALLY digging the new MultiBeast where you can save your configurations for recall later! Thanks Tonymacx86 dev team!! As soon as I get home, I'll upload the MB config file that's working for me. I've also updated my post with the new parts & software, plus added a new screen grab of my latest GeekBench scores. I think the combination of Mavs and the new SSD (but probably mostly Mavs) gets me about another 1,000+ points faster machine!!