Contribute
Register

PowerMac G5 - The Somewhat Better Budget Kludge

Status
Not open for further replies.
Joined
Aug 8, 2017
Messages
23
Motherboard
Gigabyte H110M-A
CPU
i5-6500
Graphics
RX 570
Mac
  1. iMac
  2. MacBook
  3. MacBook Pro
  4. Mac mini
Classic Mac
  1. eMac
  2. iBook
  3. Power Mac
  4. PowerBook
  5. SE
Mobile Phone
  1. iOS
You might recognize me from the Mac Pro 1,1 Ultimate Budget Kludge Job.

Recently, I came into possession of some super awesome old Apple stuff while working at Experimax. I guy brought in several old Macs to see what they were worth to us for trade in or to make working or something. He wanted just a general family computer and some such.

Now the computers in question are PowerMacs which are beyond obsolete at this point in 2019. But I really couldn't help myself from just up and buying the stuff from him anyways. At least, some of it.

I got two Powermac G5's and a fantastically awesome 30" Cinema HD Display for $110. I consider that a pretty freakin' awesome deal, considering what the cost of a Cinema display is nowadays on the secondhand market. And Luckily for me, it works great! I love these things. They came out over ten years ago but still look amazing. And the picture quality is to my eyes, still really really good.

Of the Powermac's, one of them actually still works! It's a dual processor 2.3GHz model with 2x 500GB HDD's and 6GB of ram. Back in 2005 that would've been absolutely mental specs. And because it's in great working shape, it's been put into a special place with the rest of my old Macs. Sadly, the other one is having problems. It didn't come with any ram, but did power on. I suspected that maybe it was just a ram problem and swapped some ram from my good machine to the bad one, but still, no dice. For some reason the mobo doesn't like the ram. Aw well, I've heard of these things being picky with the types of ram you put in them. Or I'm just using the wrong ram. I dunno.


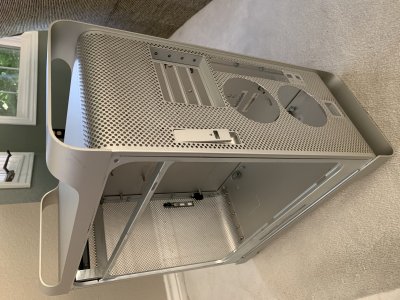
But this did get me thinking. What if I were to swap my old Mac Pro hackintosh case for this one? Wouldn't be terribly difficult would it? But of course, I'd set myself some more challenges than the previous time around.

- Keep everything in more or less the same place.
- Re-use the Mobo, CPU, Ram, and various fiddly bits from my Mac Pro mod.
- Leave the front panel untouched. We're gonna wire up that sucker.
- Replace the fans but use the original brackets.
- Use an extension from the back power connecter to the PSU so I can keep it on the floor.
- Keep the look somewhat original on the inside.
- Make it easily upgradable.
- Upgrade the PSU and GPU from my Mac Pro build. (I've been itching to ditch the GTX 1050 ti for an RX570 or 580 a while anyways, besides I'd really really like to upgrade from High Sierra at some point...)

And that's it so far. The current plan is to get my build working fully before actually cutting the case up. I feel better doing it that way for some reason. I still got my Mac Pro case to test everything in and get it working, even if it is ugly as sin right now. I guess that's why I call it the budget kludge.
 
So, plans have slightly changed. Car repairs unfortunately come first. But along with that, they're also horribly expensive. So I've had to change course slightly. Nevertheless, I have most of the stuff in order to accomplish most of my goals.

I started out with the PSU. The one in this PowerMac is a 450W Samsung unit. I could rewire it and all that, but I realized that I just couldn't be bothered. Plus, these old PSU's are much less efficient and can have some dodgy capacitors.

1sP%dsikR7m9YVsJPrLzEQ.jpg

FAKRNrpwRiSEBgrEHGtHAQ.jpg

Since I want a mostly unaltered look outside and in, I transferred the plug from the original PSU to my ATX unit, and also transferred the whole board and everything into the old PSU case. Luckily it all fit. I had it secured with some foam pads and one corner screwed into the original mounting point.

LXoFhmzNTnqO+BLUWDZzIg.jpg

vmlzu1RoSJmEBFOOCAHZxA.jpg

95%wKR1FRzakAL9JWmNXpg.jpg

bP4KkGHwQhSM%6s+DrTU3A.jpg

The nice thing about the small intake fans on the Powermac's PSU is that they're easily re-wired. Just swap the wires in the connector to where they'd normally be on a PC fan. Though they do make a bit of noise when the computer is running, they do shift a lot of air.

hjrcy0YDQbi5U32dBht7wg.jpg

NfQyT2DIQum4E6u32kwPbg.jpg


With it sitting back in place all the wiring fits very nicely. And it works just as it should!

I'm also gonna attempt to use the shelf that runs through the middle of the motherboard in this computer, so I'm swapping out the fans that normal sit where the intake, exhaust, and GPU fans are. So I'm gonna have to figure out how that's all gonna fit in there.

Originally, I was gonna use the motherboard tray from this really dated but very cool little server case I just got for free. But I didn't wanna ruin that one either, so I just decided I'll do what I did last time and glue my standoffs to the wall of the case with JB Weld and cut out my space for the ports.

Luckily I did have a fan lying around to reuse, so I'll only have to buy four more. And a fan controller. And possibly buy an extension for my Sata ports.

LQVtyTbSRCq5pRoiMPQ78Q.jpg


kCdlqIV1ShqqIP4eRgzU0Q.jpg


qrT8xy52R5mdN49uP1YKHw.jpg


Now the part I'm not excited for...rewiring the front. Still have to make sense of the diagrams.

That's all for now.
 
Work has progressed slowly, but surely.


I got my Mobo set in place, the standoffs are welded to the sidewall of the case. It looks a million times better than the last time I tried this.

+nNS7+CRSKaIb9V7sxJAjQ.jpg


The clearance between the exhaust fans and the Mobo is very VERY tight. It's actually resting on the top of the audio outputs here. But only just barely, it should work just fine. if not, I can shave a little bit off the fan bracket to make it work a little better.

OM1VYiY6R+2RTNM1oO4fCA.jpg


Very nice and clean. I love it. Though the front grille does need a bit more scrubbing.

fullsizeoutput_805.jpeg

fullsizeoutput_808.jpeg

Masking off for cutting. The shelf that sits in the middle of the computer normally, I'm cutting part of the right side off of it. There's no way for me to attach it to the motherboard directly, and it blocks my Sata ports and my first PCI slot. I figure that this way, I'll still have the actual shelf more or less, it'll give me more clearance to route cables, and I'll still get to use the GPU and intake fans in the same spot. Plus that sweet sweet G5 cover that sits inside these powermacs.


Now here's where I'm stumped a bit.

I've got two wiring diagrams.
fullsizeoutput_80b.jpeg


I had a thought, and that was to not wire in the FireWire at all. Number one, I won't use it, number two, my Mobo doesn't have a 1394 header, so I couldn't use it even if I wanted to wire it up. So my question is, can I wire just the usb, audio, and power (just use the FireWire Ground for the Power Switch Ground) and leave the FireWire out?

Also, which way should I be looking at my cable?

This way? (away from me)

fullsizeoutput_80d.jpeg

Or this way? (towards me)

fullsizeoutput_80e.jpeg

I've heard that I'm supposed to interpret the diagram like the cable is pointing away from me. But I'm honestly not sure.
 
Hi,

when I did my build I struggle with the same, thus made my own diagram. If I remember right diagram is pointing to connector in the view as you shown on your last picture.

More details in my build log: PowerMac G5 Mod - Untouched Exterior


front_panel_pinout-jpg.304429
 
Hi,

when I did my build I struggle with the same, thus made my own diagram. If I remember right diagram is pointing to connector in the view as you shown on your last picture.

More details in my build log: PowerMac G5 Mod - Untouched Exterior


front_panel_pinout-jpg.304429

Yep! I quickly came to the conclusion that yes, the connecter is pictured like that. I don't know why they have the weird description under the picture like in the diagram I had stating that this was the view from top-down for the motherboard or whatever. Whatever it said, it confused the heck outta me. But regardless I figured it out in a couple of hours.

How do putting your front panel connector go? Mine went okay I think, but heck it turned out looking like a hand-made mess. But it works! For the most part. After much swearing and yelling and re-soldering and splicing wire lengths to my amazement the Power Button, LED, and USB works! Firewire is simply left out. Unfortunately, the Audio does NOT work.

I honestly don't know if I have the patience right now to fix it. It was a tremendous pain to solder all those tiny wires together and get heat-shrink small enough to look half decent. I wrapped it all up in electrical tape in the end anyways, so it doesn't get caught on anything.
 
Cutting the Case!

Jl8oxVusRvS2WLEXPQr00w.jpg


1n40oywaSoayHiCjiKj2Qg.jpg


iboucs2-sr2kpr-l8h3czw-jpg.423748


GnBbz+gHQYSDqDbjDDUBBw.jpg


After cutting all the stuff I used a file to sand off the rough edges and to clean it up a little bit. Overall, I think it turned out really good.

PhSyaHZ+Rj2Fq%eoO+iEtQ.jpg


I was actually expecting to not have any clearance for the ethernet or top audio port. Much better than I thought it'd come out.

I did have to trim the exhaust fan bracket, since it was hitting the top of the audio port stack and bending the motherboard. Luckily, I'll still have enough room to be able to fit the rear fans in there.

UmiksmT9SCOq9pNXLsXjEA.jpg
 

Attachments

  • ibOUcS2+Sr2KPr%L8h3Czw.jpg
    ibOUcS2+Sr2KPr%L8h3Czw.jpg
    2.2 MB · Views: 843
My front panel cable looks quite good, pulled off all not used wires with pins, custom sleeved each wire and put large heat shrink on the connector side. Initial thoughts was to make brand new connector but I didn't found such a connector with proper raster and pins in any store around.
One thing to audio. It might actually work. With this straight connection audio sense is not working. I switched off audio sense feature in W10 and manually set audio output. Not sure if this is possible in macos, never used. I saw somewhere around circuit diagram fixing audio sense but never tried.
 
It's been a while, sorry for lack of updates. Here we can see my absolute mess of wiring. In the end, the Front USB, POWER LED and Switch all work fine, but my front audio port does not. It might be a loose solder connection or something. I'm not sure. But for now, I don't really care to be honest.

Also picked up some Arctic Silent Fans for the exhaust as well as a fan splitter, so they're both plugged into the fan connector on the motherboard. Plus a SATA extension so that I can plug in both my drives and my disc drive. Buttoning it all up, it looks fantastic on the inside.

For the most part, the computer runs fairly quietly, minus the two 60mm(?) fans on the front of the PSU. I might replace those with quieter Noctua units in the future, since they make the most noise. Also in the pipeline for the future, is two intake fans, a fan controller for everything, and replacement fan for the one that sits in front of the GPU, and eventually a new higher wattage PSU and Radeon GPU so I can upgrade to Catalina when it finally releases.

UV2vx6v4RQibH1tqj2kFHg.jpg


5YxnELMGQdaBOg9S0+iY3g.jpg
uVCeLX7uT%2MowG8qL5wDg.jpg
TAxGEwhvSTiuUI39j11PVQ.jpg
9mJFj%UdTH2pKu81ebONqA.jpg

fullsizeoutput_82a.jpeg
fullsizeoutput_82b.jpeg
fullsizeoutput_829.jpeg


The clearances in here are super tight. Not a whole lot of room to move stuff around.

Also, I modded the stock CPU cooler with this cooler master fan I had lying around. Cools way better than the stock intel fan, but makes more noise as well. Not a lot, only just barely. I'm just biding time until I buy a proper CPU cooler.

SaLPTL51Ti+nWCo16TCBNw.jpg


That's all for now! The computer is happily running High Sierra and Windows 10 on two different drives. I'd like to upgrade High Sierra, but since Nvidia lacks driver support on anything Mojave and up, well oh well. I still have my MacBook Pro for modern software and it does that just fun. I mostly end up using this computer for gaming and whatnot anyways.

Qj2CahzzTx6yxE4sEeQ5Fw.jpg

45N5fZr6Qk2N7y0aC+qohw.jpg
 
Status
Not open for further replies.
Back
Top