- Joined
- Apr 24, 2019
- Messages
- 27
- Motherboard
- Asus Tuf Gaming B550M-Plus Wifi
- CPU
- Ryzen 9 3950x
- Graphics
- RX 560
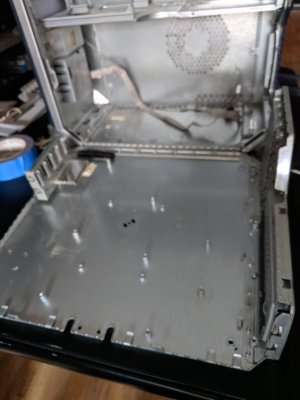
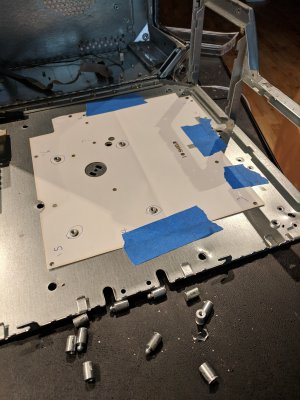
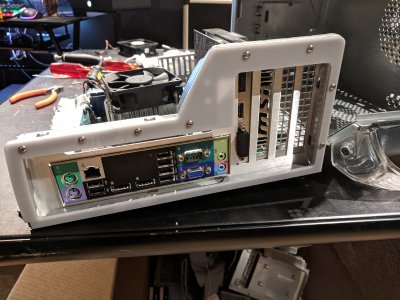
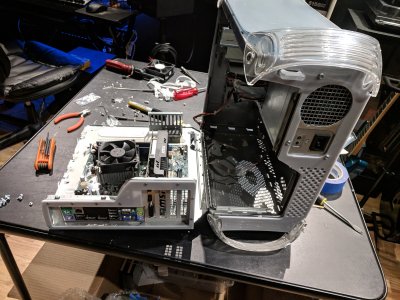
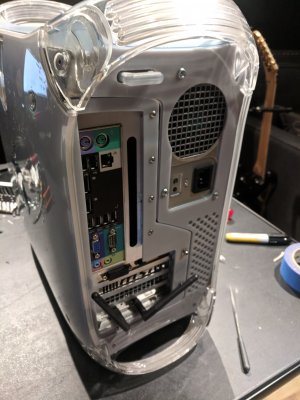
Hey guys, I've hackintoshed my Optiplex 7010 MT, and the plan is to move it into my PowerMac G4 case. I am mostly done with the process, I chose to wait to post until I had the fabrication at least done. I used the Laser Hive ATX kit. First I had to strip the case completely, and pull out the current standoffs for the Apple motherboard with pliers. Then I applied the template provided by the Laser Hive to drill the new holes. Once that was complete I was able to drill the rivets for the old I/O plate, dremel away the old I/O cross bar, and attached the new I/O plate from the Laser Hive. Following that I mounted the standoffs for the 7010 motherboard. One of the holes did not line up, nearest the first PCI slot, but I had broke a standoff so there was no point in widening the hole since I didn't have a spare standoff.
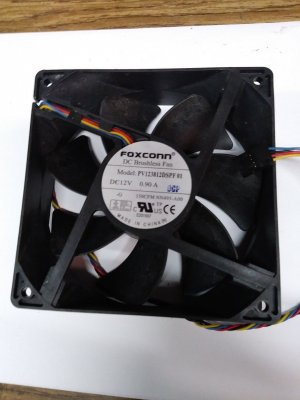
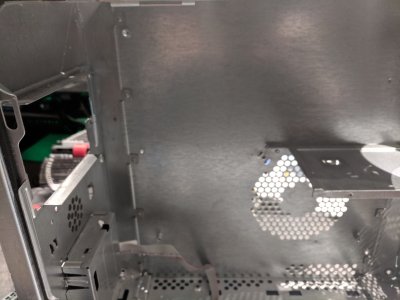
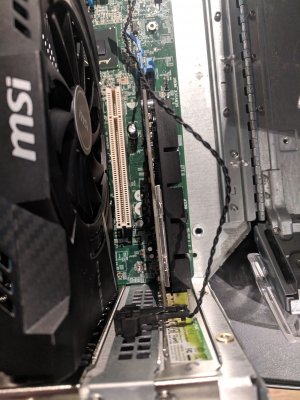
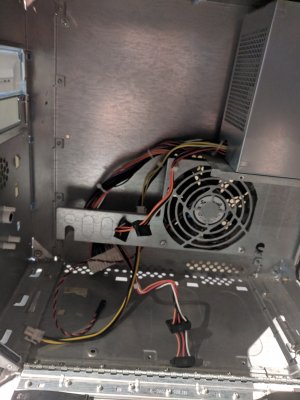
After mounting the motherboard, I learned the case wouldn't close due to the shelf that sits above the case fan. I cut half of the shelf closest to the front of the case, but decided to keep the rear to support the 7010 power supply. Also the stock CPU fan / heatsink was millimeters away from the power supply, so I bought a Dynatron K199 CPU blower which I also use in a rack build I did for my Dell XPS 8500. It's a great fan, and I will have it blowing out the back towards the slot that is cut out on the Laser Hive I/O plate. I did use the TP Link wireless card that was recommended in the 7010 Mojave guide, though I haven't tested it, it arrived after the casemod had begun. Notice above the wireless card, I mounted the temp sensor from the 7010, it snaps right into the I/O card blank plate that came from the 7010.
I did have to file away a tiny bit of plastic from the rear handle so the door would close smoothly, no worries. Now everything closes nicely. I ordered a new PWM 120mm Delta fan which is rated to move 150-180cfm of air, while i read the stock fan moves aproximately 90cfm. This will hopefully keep me from having to add another case fan. Also I bought Arctic Silver 5 thermal paste, even though the Dynatron CPU fan comes with paste. The Artic Silver 5 stuff is very effective. What is helpful is that the vents for the 7010 MT PSU are in the front and rear, so there was no need to drill holes in the side of the case.
I've ordered a 5.25 Slim DVD drive bay housing with 2 USB 3.0 ports which i will mount after cutting the drive bay bracket and the bay housing.
Notice in the picture of the rear of the tower standing up, at the very bottom there were 2 holes in the plastic right half of the molding, which I used to drill through the sheet metal and used the 2 left over screws and mushroom nuts to fasten. I put the nuts on reverse with the shank facing towards the front of the case.
Also, there are 2 tiny screws that come with the kit that attached where the I/O cards are. The instructions say to have the nuts inside the case, and the screw heads outside the case, but I felt this interfered with installing/removing the GPU, so I decided to mount those screws reverse.
I still need to wire up the control panel and will document that as well when ready. I also have extension cables coming from Amazon for the ATX and 4 pin power connectors, as well as dell fan adapters, and pwm fan extension cables. I plan to use the original wiring layout utilizing the black wire loom to keep things nice and tidy.
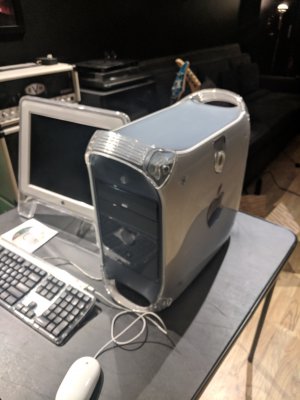
I've also purchased a 23" Apple Cinema Display and ACD DVI adapter, which looks just like the monitor in the first picture, except much larger. The one in the photo is a 15" Studio Display which I inherited with the G4.
I figured though that since most of the "fabrication" work is done with the dremel, now would be a good time to post.
After mounting the motherboard, I learned the case wouldn't close due to the shelf that sits above the case fan. I cut half of the shelf closest to the front of the case, but decided to keep the rear to support the 7010 power supply. Also the stock CPU fan / heatsink was millimeters away from the power supply, so I bought a Dynatron K199 CPU blower which I also use in a rack build I did for my Dell XPS 8500. It's a great fan, and I will have it blowing out the back towards the slot that is cut out on the Laser Hive I/O plate. I did use the TP Link wireless card that was recommended in the 7010 Mojave guide, though I haven't tested it, it arrived after the casemod had begun. Notice above the wireless card, I mounted the temp sensor from the 7010, it snaps right into the I/O card blank plate that came from the 7010.
I did have to file away a tiny bit of plastic from the rear handle so the door would close smoothly, no worries. Now everything closes nicely. I ordered a new PWM 120mm Delta fan which is rated to move 150-180cfm of air, while i read the stock fan moves aproximately 90cfm. This will hopefully keep me from having to add another case fan. Also I bought Arctic Silver 5 thermal paste, even though the Dynatron CPU fan comes with paste. The Artic Silver 5 stuff is very effective. What is helpful is that the vents for the 7010 MT PSU are in the front and rear, so there was no need to drill holes in the side of the case.
I've ordered a 5.25 Slim DVD drive bay housing with 2 USB 3.0 ports which i will mount after cutting the drive bay bracket and the bay housing.
Notice in the picture of the rear of the tower standing up, at the very bottom there were 2 holes in the plastic right half of the molding, which I used to drill through the sheet metal and used the 2 left over screws and mushroom nuts to fasten. I put the nuts on reverse with the shank facing towards the front of the case.
Also, there are 2 tiny screws that come with the kit that attached where the I/O cards are. The instructions say to have the nuts inside the case, and the screw heads outside the case, but I felt this interfered with installing/removing the GPU, so I decided to mount those screws reverse.
I still need to wire up the control panel and will document that as well when ready. I also have extension cables coming from Amazon for the ATX and 4 pin power connectors, as well as dell fan adapters, and pwm fan extension cables. I plan to use the original wiring layout utilizing the black wire loom to keep things nice and tidy.
I've also purchased a 23" Apple Cinema Display and ACD DVI adapter, which looks just like the monitor in the first picture, except much larger. The one in the photo is a 15" Studio Display which I inherited with the G4.
I figured though that since most of the "fabrication" work is done with the dremel, now would be a good time to post.
Attachments
-
 IMG_20190418_210138.jpg2.9 MB · Views: 209
 -
 IMG_20190501_164818.jpg2.6 MB · Views: 279
 -
 IMG_20190501_171427.jpg3.8 MB · Views: 233
 -
 IMG_20190501_211849.jpg3.7 MB · Views: 251
 -
 IMG_20190501_220929.jpg3.9 MB · Views: 236
 -
 IMG_20190502_171325.jpg2.8 MB · Views: 224
 -
 IMG_20190502_182130.jpg3.3 MB · Views: 210
 -
 IMG_20190502_182136.jpg3.6 MB · Views: 200
 -
 IMG_20190502_195535.jpg2.6 MB · Views: 301
 -
 IMG_20190502_195551.jpg2.8 MB · Views: 225
 -
 IMG_20190502_195602.jpg3.2 MB · Views: 216
Last edited: