Contribute
Register

Please Help Fix Wrong Screen Resolution in Clover Boot Stage 1

Status
Not open for further replies.
Joined
Nov 19, 2010
Messages
243
Motherboard
Gigabyte EX58 UD3R
CPU
X5650
Graphics
Asus RX580 8GB
Mac
  1. Mac Pro
This is a small yet annoying issue I think can be fixed. See the log image and note the highlighted text. It describes the problem. Basically when the clover boot screen first appears it is in 1024x768 ratio. It should be 1920x1080. It corrects during the last stage of the boot process and is fine once logged in. I'm trying to fix the initial Clover boot screen and the first boot stage wherein the ratio is not 1920x1080 like it should be so the Apple Logo appears too large and stretched.

I'm hoping the log info will aid someone in diagnosing a solution for me to try.
Screen Shot 2019-12-23 at 10.55.49 AM.png
 
@RandomNumber,

Thats pretty much normal,

Clover is limited to the resolutions provided by the VESA driver backed in to the VBIOS of your active GPU. Most VESA resolutions are based on the old VGA standards. Many older GPU's such do not support 1920 x 1080 as a VESA resolution.

As you can see from your boot log, your VBIOS/VESA Drivers do not support 1920 x 1080.

The VBIOS usually only supports a handful VESA low resolutions, just enough to support the BIOS/UEFI UI and to boot an operating system, once the OS loads the native video driver then all resolutions become available.

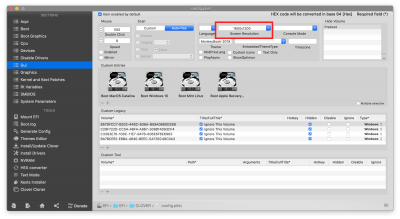
You maybe able to get 1600 x 900 or 1600 x 1200 working by manually specifying the resolution in the "GUI" section of your config.plist, for example :-

Code:
        <key>ScreenResolution</key>
        <string>1600x1200</string>


If your not sure about manually editing your config.plist you can use Clover Configurator :-

Screenshot 2019-12-23 at 16.48.31.png

You can try each resolution in turn and make a note of the ones your GPU and Monitor supports, some resolutions may appear as stretched but this is a function of your Monitor and is completely normal. If you try a resolution that is not supported by the VBIOS/VESA driver of your GPU, Clover will always fall back to the default VESA resolution of 1024 x 768 which is a standard that all display adapters must support.

The only other option is to try installing CsmVideoDxe.efi which is included in the Clover installer package and should be installed in /EFI/Clover/Drivers/BIOS (on latest builds of Clover)

Depending on the VBIOS of your GPU, the driver can make some 'hidden' VESA resolutions available to Clover.

However it does not work on all systems/GPU's and it may require you to enable CSM support in the BIOS, but there should be no harm in giving it a try, you will still need to specify the required resolution in your config.plist.

I've attached the latest version of CsmVideoDxe.efi (included in Clover r5100) below, if your running an older version of Clover then you should really use the version included the installer.

If you need more info on what the driver does just google "CsmVideoDxe.efi"

Personally I don't really care what resolution is used by Clover as long as its readable, in some cases using a lower resolution is preferable on HD and 4K screens as it makes the Verbose boot more readable (I have bad eyes). :)

Cheers
Jay
 

Attachments

  • CsmVideoDxe.efi
    22 KB · Views: 178
Last edited:
@RandomNumber,

Thats pretty much normal,

Clover is limited to the resolutions provided by the VESA driver backed in to the VBIOS of your active GPU. Most VESA resolutions are based on the old VGA standards. Many older GPU's such do not support 1920 x 1080 as a VESA resolution.

As you can see from your boot log, your VBIOS/VESA Drivers do not support 1920 x 1080.

The VBIOS usually only supports a handful VESA low resolutions, just enough to support the BIOS/UEFI UI and to boot an operating system, once the OS loads the native video driver then all resolutions become available.

You maybe able to get 1600 x 900 or 1600 x 1200 working by manually specifying the resolution in the "GUI" section of your config.plist, for example :-

Code:
        <key>ScreenResolution</key>
        <string>1600x1200</string>


If your not sure about manually editing your config.plist you can use Clover Configurator :-

View attachment 441740

You can try each resolution in turn and make a note of the ones your GPU and Monitor supports, some resolutions may appear as stretched but this is a function of your Monitor and is completely normal. If you try a resolution that is not supported by the VBIOS/VESA driver of your GPU, Clover will always fall back to the default VESA resolution of 1024 x 768 which is a standard that all display adapters must support.

The only other option is to try installing CsmVideoDxe.efi which is included in the Clover installer package and should be installed in /EFI/Clover/Drivers/BIOS (on latest builds of Clover)

Depending on the VBIOS of your GPU, the driver can make some 'hidden' VESA resolutions available to Clover.

However it does not work on all systems/GPU's and it may require you to enable CSM support in the BIOS, but there should be no harm in giving it a try, you will still need to specify the required resolution in your config.plist.

I've attached the latest version of CsmVideoDxe.efi (included in Clover r5100) below, if your running an older version of Clover then you should really use the version included the installer.

If you need more info on what the driver does just google "CsmVideoDxe.efi"

Personally I don't really care what resolution is used by Clover as long as its readable, in some cases using a lower resolution is preferable on HD and 4K screens as it makes the Verbose boot more readable (I have bad eyes). :)

Cheers
Jay
I am using UHD 630 on Dell U2718Q with HDMI to HDMI connection but I am still getting 1600x1200 resolution on boot screen. is it possible to fix this?
 
I am using UHD 630 on Dell U2718Q with HDMI to HDMI connection but I am still getting 1600x1200 resolution on boot screen. is it possible to fix this?

Disable CSM in the BIOS setup, if it is enabled by default

CSM Support Enables or disables UEFI CSM (Compatibility Support Module) to support a legacy PC boot process.Disabled Disables UEFI CSM and supports UEFI BIOS boot process only.Enabled Enables UEFI CSM. (Default)
 
Disable CSM in the BIOS setup, if it is enabled by default

CSM Support Enables or disables UEFI CSM (Compatibility Support Module) to support a legacy PC boot process.Disabled Disables UEFI CSM and supports UEFI BIOS boot process only.Enabled Enables UEFI CSM. (Default)
Thanks. I already tried those. But none of them work. I also tried CsmVideoDxe.efi and it's just broke the system and does not allow to boot.

Too many boot arg, different framebuffers, patch Vbios, load vbios, Inject Intel, fakeID, setup boot graphics etc. none of the worked. what can I try more I dont know?
 
Last edited:
The Clover boot screen resolution was also driving me nuts, especially when whatever I set it to was completely ignored at startup. Did some searching on here on TonyMacx86 and found the following worked for me:
Went into the UEFI Bios settings - Disabled full screen logo, set 'OS Type' to 'Windows 8 WHQL' and 'CSM Support' to 'Never'. All good now. Thanks.
GA-Z68X-UD3H-B3 UEFI Bios U1n
 
@jaymonkey
Here is a strange one.... Last night I was getting ready to select which system to boot to in the Clover menu. Recall this thread is about my over sized stretched Clover boot menu. I inadvertently pressed what I now know was the letter "U" key. It caused the screen to go black then a series of things appeared quickly scrolling on the screen (too quick to read) and it then reloaded the Clover boot menu...and here it is...in the proper size ie. 1920x1080. It does not survive reboot but it works to press "U" each time at the enlarged boot menu and returns it to correct size. What gives??? Is there a way to use this info to make it survive a reboot so I no longer have to press "U" to get the correct size? What actually is going on here?

I'd love a way to make this survive a reboot!
I appreciate and welcome thoughts and comments.
 
Last edited:
Status
Not open for further replies.
Back
Top