Contribute
Register

pastrychef's Asus ROG Strix Z370-G Gaming (WI-FI AC) build w/ i9-9900K + AMD 6600 XT

Personally, I try to stay away from water cooling. I remember how even many of the Apple made Power Mac G5s ended up leaking. If Apple couldn't do it right, what chance do I have? That's a worry I don't need in the back of my mind.

I considered for a long time which case to buy... I ended up choosing one that allowed for air flow to go straight from front to back and similar to how the air flows in the Mac Pro 1,1-5,1. I have been very happy with my decision.

I'm enjoying this thread and your build :thumbup:

My own new build is based on the i3-8350K and a Gigabyte board - so not really relevant here, however on the cooling front I'm totally with you. I've considered water-cooling in the past but always steered-clear, remembering my old engineering training telling me water and electricity don't mix! LOL!

For air-cooling a straight through flow, front to back gives best results, in my opinion. Good quality quiet fan(s) to pull air in from the front, similar size CPU cooler fan(s) and then enough vent area at the back to let the air out unimpeded That's usually fine for my i3 builds - we'll have to see how the new quad-core fares! Nowadays the majority of cases feature PSUs that don't mix their air-flow with the case, so it doesn't stir things up.

:)
 
I'm enjoying this thread and your build :thumbup:

My own new build is based on the i3-8350K and a Gigabyte board - so not really relevant here, however on the cooling front I'm totally with you. I've considered water-cooling in the past but always steered-clear, remembering my old engineering training telling me water and electricity don't mix! LOL!

For air-cooling a straight through flow, front to back gives best results, in my opinion. Good quality quiet fan(s) to pull air in from the front, similar size CPU cooler fan(s) and then enough vent area at the back to let the air out unimpeded That's usually fine for my i3 builds - we'll have to see how the new quad-core fares! Nowadays the majority of cases feature PSUs that don't mix their air-flow with the case, so it doesn't stir things up.

:)

Thanks.

Yeah, I really spent a lot of time considering which case to buy. Although this case is nowhere near the quality of Apple's cases, it's design is very good. I also went with all Noctua fans despite the questionable color scheme. Lol

I will be taking the Z170 motherboard and i7-7700K that I pulled and putting together a new build for a friend. She chose the Cerberus case which is considerably smaller than what I'm using but seems to be extremely high quality. I will document the build a little and give some impressions on whether cooling is affected with such cramped quarters.
 
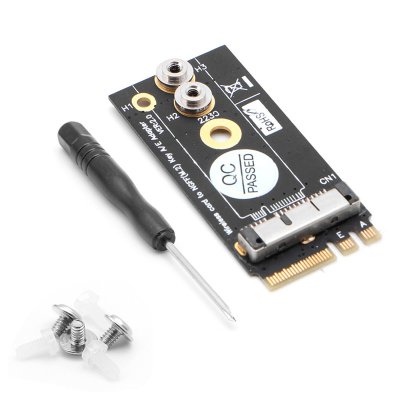
As I noted in the first post, I had been using a Dell DW1830 M.2 Wi-Fi/Bluetooth card. It had been working well but I wanted to use a Wi-Fi/Bluetooth card from a real Mac. So, I ordered a BCM94360CS2 that is found in 2013-2017 MacBook Airs and an appropriate M.2 adaptor for it.

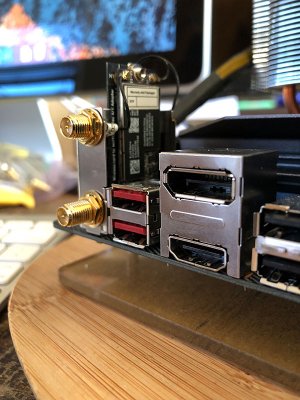
The BCM94360CS2 and M.2 adaptor is too tall to close the bracket casing that's included with the motherboard, but that's fine. Securing both to the bracket works fine. Because it's taller, one of the pigtail antennas will not be able to reach. I swapped it with one of the pigtails from the PCI-e adaptor I used for my previous build.

In my particular case, the height of the BCM94360CS2 and adaptor forced me to shave off a little bit of the rear case fan in the corner.

Reasons:
  • The BCM94360CS2 only requires 2 antennas vs the 3 required for the DW1830. This works out better with this motherboard because the bracket and backplate on this motherboard were designed for 2 antennas.
  • Guaranteed 100% compatibility.
  • No need for additional kexts or patches.
Advantages/Disadvantages:
  • The DW1830 was too wide to fit in to the bracket that came with the motherboard, so I just had it plugged in to the M.2 connector with nothing securing it.
  • There has been some reports that the DW1830 would be slow after sleep in macOS. I didn't test this.
  • The DW1830 is capable of 1300Mbps. The BCM94360CS2 is only capable of 867Mbps.
  • The BCM94360CS2 is true plug-n-play with macOS. The DW1830 required two kexts for Bluetooth to work.
Here are the items I purchased:
299927335800

MacBook Air 13 A1465 A1466 2013 2014 WiFi Bluetooth Air Port Card BCM94360CS2 AP | eBay
Amazon.com: New WiFi Bluetooth Card BCM94360CS2 For MacBook Air 13'' A1465 A1466 Mid 2013: Computers & Accessories

299928
BCM94360CS2 Card To NGFF(M.2) Key A/E Adapter For Mac OS and Hackintosh | eBay
Amazon.com: Hobbypower BCM94360CS2/BCM943224PCIEBT2 Card To NGFF(M.2) Key A/E Adapter For Mac OS: Computers & Accessories


Here it is with everything assembled:
299931
Here's a picture of it installed. (Thanks @Lestliness for the picture!):
309254
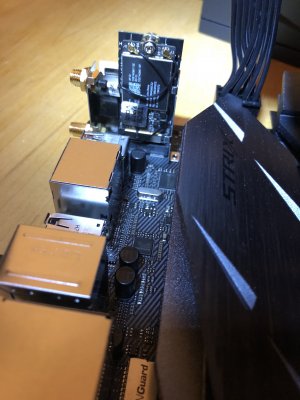
Here's another angle.
332425


Edit (January 19, 2018):
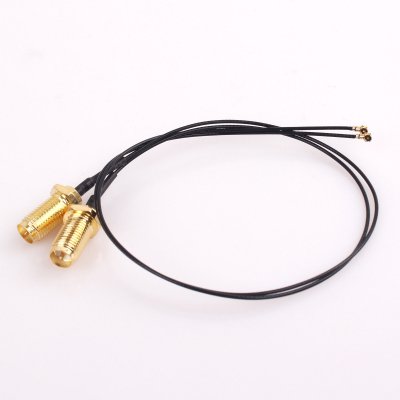
As I noted above, one of the stock pigtail antennas will be too short to reach the BCM94360CS2. You can replace the pigtail with something like this:
307021
4X IPEX /MHF4 to RP-SMA Antenna Pigtail for NGFF/M.2 WIFI/WLAN/3G/4G Modules-US | eBay


Real world speed tests:
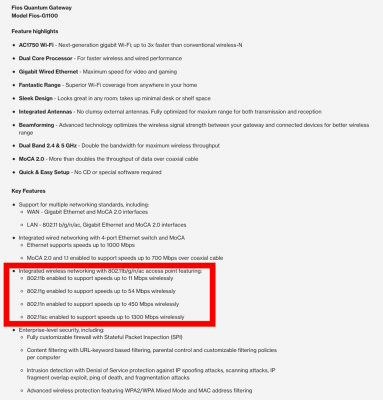
Specs of routers used for tests:
390109
Source: https://www.verizon.com/home/accessories/fios-quantum-gateway/

Broadband connection is rated 880Mbps up and down.

BCM94360CS2 with M.2 adaptor @ 867Mbps Tx Rate on 802.11ac 5GHz:
390110
390111


BCM94360CSAX with PCI-e adaptor @ 1170Mbps Tx Rate on 802.11ac 5GHz:
390112
390113

Motherboard gigabit ethernet:
390114
390115

Syba SD-PEX24055 10GbE:
390118
390119

I was extremely surprised to see such a small difference between the BCM94360CS2 and BCM94360CSAX. I'm not sure if it's due to the Verizon router that I used but it's the only 802.11ac router that I have to do testing on.
 
Last edited:
Very nice, technical build write up...specifically most guides get any of my builds to about 90% there and I figure the remaining out myself.

Since there are enough common parts these days (such as the MB), its nice to see someone like pastrychef go the extra mile and detail the USB port mapping as well as other more specific items for the exact parts in the build.

I'm not sure if I have seen very many builds where here is the exact shopping list, set up each component exactly in this way and at the end, you have a 99% to 100% operating clone of a Mac. This isn't to say we don't have great builders and documenters...we do! Trust me I would not be anywhere on my build(s) without those dedicating personal hours to this hobby.

I think that Golden Builds are more along what I am thinking we can use more of...especially with each iteration of OS update, CPU Update and underlying system architecture changes (Nvidia to AMD for example.). This pastrychef build is so precise that if I were to take my semi-technical butt, sit down with their guide, I could build a very powerful, 99% working system. The odd things out at this point to me makes it a 99.8% and 100% with the name change natively...upcoming changes within the Mac system will no doubtably account for that piece with Intel staying as primary CPU supplier.

Anyway...rambling now..time for another dab

Peace
 
As I noted in the first post, I had been using a Dell DW1830 M.2 Wi-Fi/Bluetooth card. It had been working well but I wanted to use a Wi-Fi/Bluetooth card from a real Mac. So, I ordered a BCM94360CS2 that is found in 2013-2017 MacBook Airs and an appropriate M.2 adaptor for it.

The BCM94360CS2 and M.2 adaptor is too tall to close the bracket casing that's included with the motherboard, but that's fine. Securing both to the bracket works fine. Because it's taller, one of the pigtail antennas will not be able to reach. I swapped it with one of the pigtails from the PCI-e adaptor I used for my previous build.

In my particular case, the height of the BCM94360CS2 and adaptor forced me to shave off a little bit of the rear case fan in the corner.

Reasons:
  • The BCM94360CS2 only requires 2 antennas vs the 3 required for the DW1830. This works out better with this motherboard because the bracket and backplate on this motherboard were designed for 2 antennas.
  • Guaranteed 100% compatibility.
  • No need for additional kexts or patches.
Advantages/Disadvantages:
  • The DW1830 was too wide to fit in to the bracket that came with the motherboard, so I just had it plugged in to the M.2 connector with nothing securing it.
  • There has been some reports that the DW1830 would be slow after sleep in macOS. I didn't test this.
  • The DW1830 is capable of 1300Mbps. The BCM94360CS2 is only capable of 867Mbps.
  • The BCM94360CS2 is true plug-n-play with macOS. The DW1830 required two kexts for Bluetooth to work.
Here are the items I purchased:
View attachment 299927
MacBook Air 13 A1465 A1466 2013 2014 WiFi Bluetooth Air Port Card BCM94360CS2 AP | eBay
Amazon.com: New WiFi Bluetooth Card BCM94360CS2 For MacBook Air 13'' A1465 A1466 Mid 2013: Computers & Accessories

View attachment 299928
BCM94360CS2 Card To NGFF(M.2) Key A/E Adapter For Mac OS and Hackintosh | eBay
Amazon.com: Hobbypower BCM94360CS2/BCM943224PCIEBT2 Card To NGFF(M.2) Key A/E Adapter For Mac OS: Computers & Accessories


Here it is with everything assembled:
View attachment 299931

Make you all laugh on this one. I started an ITX build a couple of months ago and ordered one of these adapters for the wifi card. It *still* hasn't arrived from overseas and in the mean time I've abandonned the ITX (too small for me) and now begun another MATX !!

:crazy:
 
Thanks.

Yeah, I really spent a lot of time considering which case to buy. Although this case is nowhere near the quality of Apple's cases, it's design is very good. I also went with all Noctua fans despite the questionable color scheme. Lol

I will be taking the Z170 motherboard and i7-7700K that I pulled and putting together a new build for a friend. She chose the Cerberus case which is considerably smaller than what I'm using but seems to be extremely high quality. I will document the build a little and give some impressions on whether cooling is affected with such cramped quarters.

Very curious what you think about the Cerberus case once you build it. I've been looking at that as well as the Cerberus X. Excellent design seemingly but cramped for the front-to-back airflow. No opportunity to place a 120mm on the back plate. Other compromises depending where you place the PSU... Challenging all around. Hence, folks seem to orient toward water cooling for higher temp CPUs.

Look forward to seeing what you come up with.
 
Make you all laugh on this one. I started an ITX build a couple of months ago and ordered one of these adapters for the wifi card. It *still* hasn't arrived from overseas and in the mean time I've abandonned the ITX (too small for me) and now begun another MATX !!

:crazy:

Lol. It took almost 2 weeks for me to receive the adaptor from China. When I found out that an Amazon seller had it domiesticly, I ordered a second one and I got it before the one I ordered from Ebay. That's why I included links to both sources.
 
Very curious what you think about the Cerberus case once you build it. I've been looking at that as well as the Cerberus X. Excellent design seemingly but cramped for the front-to-back airflow. No opportunity to place a 120mm on the back plate. Other compromises depending where you place the PSU... Challenging all around. Hence, folks seem to orient toward water cooling for higher temp CPUs.

Look forward to seeing what you come up with.

I will be building for a female who placed form before function... Lol

Since she will not be overclocking, my thought was that the delidded CPU would be fine with the more constricted air flow. My intention is to build using an SFX power supply situated in the font, top of the case (in front of the CPU heatsink). This alllowed for a Noctua NH-D9L to fit.

I'm hoping that the perforated top will allow for enough air for the Noctua heatsink/fan cool the CPU. Additionally, I will have a 120mm Noctua fan in the front and a 92mm Noctua in the rear behind the CPU heatsink.
 
Last edited:
Hi Pastrychef -- this is a really great guide. It's giving itchy fingers about the same upgrade, but I'll have to wait a while with my relatively young Gene build.

I read the [Guide] Generate SSDT For Coffee Lake CPU | tonymacx86.com and I see that RehabMan has posted there
"No need for ssdtPRgen.sh generated SSDT.aml for any CPU Haswell and newer.
Only requirement: SSDT-XCPM.aml or SSDT-PluginType1.aml orconfig.plist/ACPI/SSDT/Generate/PluginType=true."

Is there any reason why you used an ssdt.aml?
 
Back
Top