Contribute
Register

pastrychef's Asus ROG Strix Z370-G Gaming (WI-FI AC) build w/ i9-9900K + AMD 6600 XT

Hi pastrychef,

many thanks for the quick response. The issue is now solved. It happend due to one monitor was connected to motherboard. So I connect both monitors to VEGA 56 card and now it's up&running. Unfortunately BIOS can't be seen during boot. So hopefully BIOS 1602 will solve this issue.

The pictures whas taken from screen after kernel panic.

Oh... Yeah, no monitors should be connected to the motherboard video outs if you have a discrete graphics card.

BIOS 1802 will fix the video on post.
 
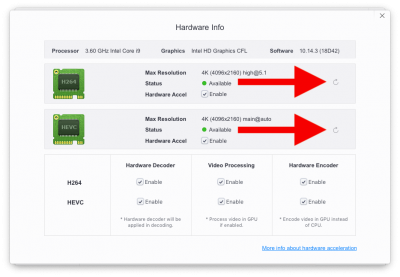
The new Shikigva=1 doesn't work for me. Or rather, the machine boots and everything, but iTunes is still defunct and h264 hard encoding is lost. Confirmed by VideoProc.
Are there any alterations to the EFI folder, config.plist, that should be made regarding IGPU for this to work ?
 
The new Shikigva=1 doesn't work for me. Or rather, the machine boots and everything, but iTunes is still defunct and h264 hard encoding is lost. Confirmed by VideoProc.
Are there any alterations to the EFI folder, config.plist, that should be made regarding IGPU for this to work ?

Have you tried shikigva=57?

On VideoProc, be sure to refresh by clicking on the circular arrows.
Screen Shot 2019-01-27 at 1.10.10 PM.png
 
I have tried with 57 aswell. And I have tried the circular arrows :D
Im in doubt as to if I should add my IGPU device properties to the config plist file, and disable the IGPU related ACPI renames.
- using shikigva=60 everything (except iTunes DRM content) worked without changing a thing.
(I use the 8700K UHD 630 with Sapphire Pulse Rx 580)

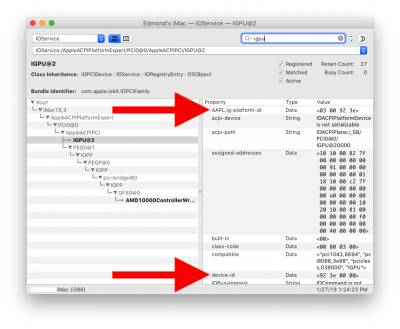
You can use IORegistryExplorer (attached to post #5232) to check if IGPU is configured correctly.
  1. Launch IORegistryExplorer.
  2. In the search field, enter "IGPU"
  3. Look at AAPL,ig-platform-id and device-id to confirm everything is configured correctly.

Screen Shot 2019-01-27 at 1.25.04 PM.png
 
Looks identical to yours. So I can't really tell what the problem is.
Think I'll just go back to shikigva=60, since I don't really need the iTunes content to work, though it would be nice.
 

Attachments

  • Peters-Mac.ioreg
    9 MB · Views: 227
Okay, are you ready for the real thing in terms of the macOS chime?

So, yesterday, I posted and I, and I think you were getting a chime at the very start of Clover loading. Nice, but as I load both Windows and Linux Mint, I wanted the chime to load only after macOS started. So, over at that "other" site, I did some research and got some really good answers.

This is how it goes:

1. Unfortunately, for this new method to work you must remove sound.wav from anywhere you might have put it.
2. From the attached zip folder, you have to copy bootchime.wav to the root of your EFI folder (and nowhere else).
3. From the attached zip folder, copy both AudioDxe.efi and BootChimeDxe.efi to your drivers64 folder, and overwrite as needed. I think you must use the AudioDxe.efi from this file for this to work (but I'm not absolutely sure about that).
4. From the attached zip folder, copy BootChimeCfg.efi and HdaCodecDump.efi to the tools folder in Clover.
5. I've only tested this on Clover 4862 - I doubt it will work on any other earlier version of Clover.

I have done this on two clones and both work as expected. Clover starts to load (and no sound yet), then the boot menu loads, and times out and loads the default OS, which for me is macOS. Immediately, and just as the Apple icon shows up, I get a chime, just as I wanted and hoped for.
 

Attachments

  • AudioPkg-R1-RELEASE.zip
    1.1 MB · Views: 257
Okay, are you ready for the real thing in terms of the macOS chime?

So, yesterday, I posted and I, and I think you were getting a chime at the very start of Clover loading. Nice, but as I load both Windows and Linux Mint, I wanted the chime to load only after macOS started. So, over at that "other" site, I did some research and got some really good answers.

This is how it goes:

1. Unfortunately, for this new method to work you must remove sound.wav from anywhere you might have put it.
2. From the attached zip folder, you have to copy bootchime.wav to the root of your EFI folder (and nowhere else).
3. From the attached zip folder, copy both AudioDxe.efi and BootChimeDxe.efi to your drivers64 folder, and overwrite as needed. I think you must use the AudioDxe.efi from this file for this to work (but I'm not absolutely sure about that).
4. From the attached zip folder, copy BootChimeCfg.efi and HdaCodecDump.efi to the tools folder in Clover.

I have done this on two clones and both work as expected. Clover starts to load (and no sound yet), then the boot menu loads, and times out and loads the default OS, which for me is macOS. Immediately, and just as the Apple icon shows up, I get a chime, just as I wanted and hoped for.


Awesome!! Thank you for this!!
 
One small detail: the bootchime.wav file in the zipped package is a 22255 hz file, and just in case someone can't play that, here's a 48000 hz bootchime.wav file that works also (I just tested it).


ADD: One bit of troubleshooting....Pavo, a developer over at the "other" site, had to clear his NVRAM for it to work for him (I did not have this issue, didn't have to do this...) From Pavo: "Had to clear NVRAM variables using BootChimeCfg.efi"

So, I'm guessing that clearing NVRAM using any utility just might get you working IF it doesn't work......and as I mentioned above, I did not have this problem on either of my two machines. I added the configuration as noted in my post #5251 and it worked first time on both and it hasn't failed since.....
 

Attachments

  • bootchime 48000 wav file.zip
    424.6 KB · Views: 206
Last edited:
Back
Top