
- Joined
- Sep 8, 2012
- Messages
- 103
- Motherboard
- Gigabyte GA-Z97x-UD7 TH
- CPU
- i7 4790K
- Graphics
- GTX 980
- Mac
- Mobile Phone
It took about 15 installs to get my procedures and MultiBeast settings just right but it is finally up and running and working pretty d@mn good. A few snags here and there that I will note but completely functional. Boots from hard drive, screensaver works, sleep works (monitors shutdown though PC doesn't sleep), wakes from sleep, App store works, internet works, HD audio working, bluetooth working, USB 3.0 connectivity works (USB3.0 speed charge not working). I'll recap my settings, procedures and the remaining issues I'm having. Hopefully this will help some of you guys with similar setups out.
System specs:
ASUS P8Z68-V Pro Gen 3 (1155 socket) mobo
Intel Core i72600k
Dual EVGA GTX 560ti 448 Classified gfx cards
Dual Western Digital Black Caviar SATA6 1TB HDDs
- Windows 7 & 8 dual partitioned on first drive, OS X ML on second, booting both fine
Install Procedures:
Before I started with the install, I flashed the patched 3402 BIOS for my board located here: http://bios4asus.blogspot.com
To flash the BIOS, just boot to the BIOS splash screen and select the EZFlash tool. Reboot and start the install process below.
1. Made UniBeast install USB per the Guide http://www.tonymacx86.com/61-unibeast-install-os-x-mountain-lion-any-supported-intel-based-pc.html
2. Unplugged the second monitor from the primary gfx card (PCIe slot 1) and the monitor plugged into the ssecond gfx card (PCIe slot 2) leaving only the single monitor plugged into the primary card
3. Booted to BIOS splash screen (press Delete to reach BIOS) and selected to boot from my USB
4. When the Chimera screen comes up, I entered the following boot command: PCIRootUID=0 GraphicEnabler=No -v
5. Verbose text flew and then switched to the OS X Install screen in full resolution
6. Follow the guide above for partioning your drive and installing OS X ML... wait 21 minutes
7. The system will restart on its own. I let my system boot into Windows 7 (primary boot partition) then shut down from there.
8. With the PC shut down, I plugged in my second monitor to the primary gfx card and my third monitor to the secondary gfx card.
9. Booted back up to the BIOS splash screen.
10. Select the USB again but this time, when the Chimera boot screen comes up, scroll to the hard drive (or partition) you installed OS X ML on. Before you select it, enter the following boot commands: PCIRootUID=0 -v
11. OS X should boot up in full resolution on all three monitors. Finish the install process by going through the configuration screens.
12. When you get to the desktop, internet should be working as OS X recognizes the Intel chipset natively. Audio will not work.
13. Open Safari and navigate to this site and to the download page and download MultiBeast 5.0.2 Mountain Lion or run it from your USB if you installed it on there.
14. Below is a screenshot of my MultiBeast settings. These are what worked for me for my specific hardware. I did not use a DSDT as it isn't needed on for this board with the patched BIOS.
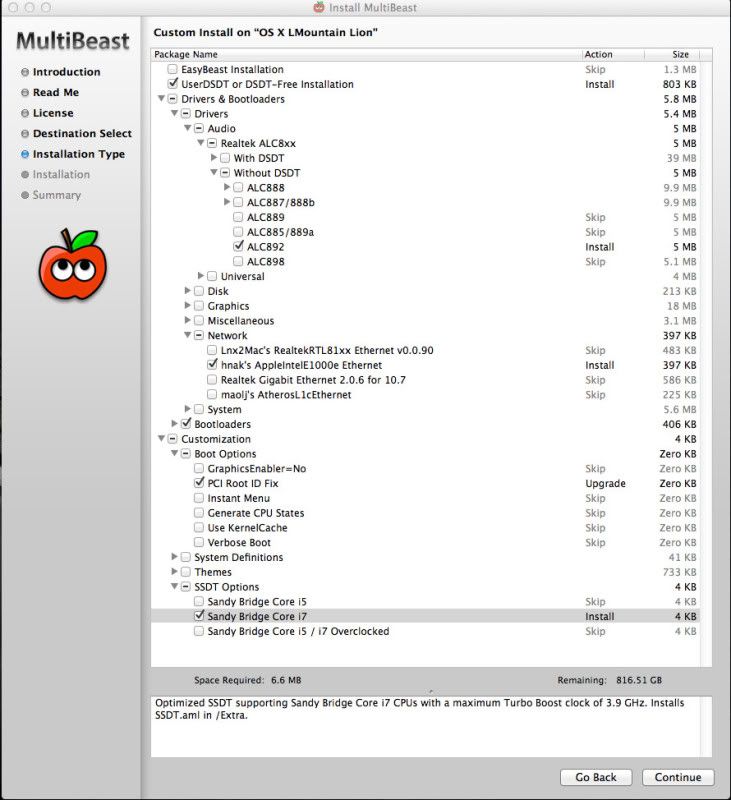
-NOTE- I would suggest NOT selecting the hnak AppleIntelE1000 network driver as the onboard LAN card was recognized out-of-the-box and I don't think it was actually necessary and may have slowed my internet down a touch, this is one of the *issues* I'm working on still.
DO NOT select the Graphic driver. The 560ti 448 cards are recognized out-of-the-box and when I did select the graphic driver, it would boot to a black screen.
***MOST IMPORTANT*** The boot options are the most important part, if they're wrong, you'll boot to a black screen and have to reinstall and start over. Note the PCIRoot ID Fix is selected although it actually makes the incorrect adjustment to the boot plist by notating the 1 identifier, we will fix this shortly. Do not select the Graphic Enabler option as we want the Graphic Enabler to be set to Yes. This is done as part of the UserDSDT/DSDT Free Installation option.
15. Select Continue and allow the installation to complete.
16. Once it is complete, close MultiBeast and go to your search Magnifier in the upper right hand corner and type the name of your hard drive/partition. When you open it up, there should be a file titled 'Extra' inside. Open that file, then open the org.chameleon.Boot.plist file. 17. This is where you will fix the PCIRootUID indicator. When you open the file, it will read PCIRootUID=1. Change the 1 to a 0. It should look like this:

18. Close the file and shutdown.
19. While the PC is off, remove the USB stick and then power back on.
20. Boot to the BIOS splash and this time, select your OS X hard drive/partition to boot from. The Chimera boot screen will come up with a small blue box that counts down for about 5 seconds. It should then go the Apple splash screen. For me, this screen was not in full resolution for some reason. But after about 8-10 seconds, it loaded up the desktop in full resolution, all three screens working, HD audio working, App store working, bluetooth working (as noted above), and sleep/wake working (sort of).
Issues:
Below are the problems I'm still currently having. I will follow up with resolutions if/when I find them.
1. Internet is a bit finicky. Sometimes it will be very slow, other times it is lightning fast. I think this is due to the hnak driver being selected when it wasn't necessary. A new driver should be out shortly that should fix this if you already have it installed.
2. PC doesn't sleep. The monitors shut down but the PC stays on. This isn't a huge issue for me but I'm working on it.
3. USB3.0 speed charging isn't working. Again, not a huge deal but if you use your USB3.0 for charging your devices, you know how nice it is to be able to fully charge a dead iPad in 20 minutes with it.
4. P States are untested. I just haven't gotten around to it yet. Anyone have any good apps for testing and suggestions for core clock rates for over clocking? I've read that all the cores need to be set at slightly different clock rates for best performance. Lots of detail in the post-install sections, i'll work my way to it.
All-in-all, it's working well. iTunes is syncing with my iPhone 4S and it just updated to 10.7 for iOS6 support for my iPad and iPhone 5 when it comes in next Friday.
I will try to help if you have a similar system/setup. Feel free to post questions.
Thanks samisnake, MacMan, and of course Tony for all the help with my install.
System specs:
ASUS P8Z68-V Pro Gen 3 (1155 socket) mobo
Intel Core i72600k
Dual EVGA GTX 560ti 448 Classified gfx cards
Dual Western Digital Black Caviar SATA6 1TB HDDs
- Windows 7 & 8 dual partitioned on first drive, OS X ML on second, booting both fine
Install Procedures:
Before I started with the install, I flashed the patched 3402 BIOS for my board located here: http://bios4asus.blogspot.com
To flash the BIOS, just boot to the BIOS splash screen and select the EZFlash tool. Reboot and start the install process below.
1. Made UniBeast install USB per the Guide http://www.tonymacx86.com/61-unibeast-install-os-x-mountain-lion-any-supported-intel-based-pc.html
2. Unplugged the second monitor from the primary gfx card (PCIe slot 1) and the monitor plugged into the ssecond gfx card (PCIe slot 2) leaving only the single monitor plugged into the primary card
3. Booted to BIOS splash screen (press Delete to reach BIOS) and selected to boot from my USB
4. When the Chimera screen comes up, I entered the following boot command: PCIRootUID=0 GraphicEnabler=No -v
5. Verbose text flew and then switched to the OS X Install screen in full resolution
6. Follow the guide above for partioning your drive and installing OS X ML... wait 21 minutes
7. The system will restart on its own. I let my system boot into Windows 7 (primary boot partition) then shut down from there.
8. With the PC shut down, I plugged in my second monitor to the primary gfx card and my third monitor to the secondary gfx card.
9. Booted back up to the BIOS splash screen.
10. Select the USB again but this time, when the Chimera boot screen comes up, scroll to the hard drive (or partition) you installed OS X ML on. Before you select it, enter the following boot commands: PCIRootUID=0 -v
11. OS X should boot up in full resolution on all three monitors. Finish the install process by going through the configuration screens.
12. When you get to the desktop, internet should be working as OS X recognizes the Intel chipset natively. Audio will not work.
13. Open Safari and navigate to this site and to the download page and download MultiBeast 5.0.2 Mountain Lion or run it from your USB if you installed it on there.
14. Below is a screenshot of my MultiBeast settings. These are what worked for me for my specific hardware. I did not use a DSDT as it isn't needed on for this board with the patched BIOS.
-NOTE- I would suggest NOT selecting the hnak AppleIntelE1000 network driver as the onboard LAN card was recognized out-of-the-box and I don't think it was actually necessary and may have slowed my internet down a touch, this is one of the *issues* I'm working on still.
DO NOT select the Graphic driver. The 560ti 448 cards are recognized out-of-the-box and when I did select the graphic driver, it would boot to a black screen.
***MOST IMPORTANT*** The boot options are the most important part, if they're wrong, you'll boot to a black screen and have to reinstall and start over. Note the PCIRoot ID Fix is selected although it actually makes the incorrect adjustment to the boot plist by notating the 1 identifier, we will fix this shortly. Do not select the Graphic Enabler option as we want the Graphic Enabler to be set to Yes. This is done as part of the UserDSDT/DSDT Free Installation option.
15. Select Continue and allow the installation to complete.
16. Once it is complete, close MultiBeast and go to your search Magnifier in the upper right hand corner and type the name of your hard drive/partition. When you open it up, there should be a file titled 'Extra' inside. Open that file, then open the org.chameleon.Boot.plist file. 17. This is where you will fix the PCIRootUID indicator. When you open the file, it will read PCIRootUID=1. Change the 1 to a 0. It should look like this:
18. Close the file and shutdown.
19. While the PC is off, remove the USB stick and then power back on.
20. Boot to the BIOS splash and this time, select your OS X hard drive/partition to boot from. The Chimera boot screen will come up with a small blue box that counts down for about 5 seconds. It should then go the Apple splash screen. For me, this screen was not in full resolution for some reason. But after about 8-10 seconds, it loaded up the desktop in full resolution, all three screens working, HD audio working, App store working, bluetooth working (as noted above), and sleep/wake working (sort of).
Issues:
Below are the problems I'm still currently having. I will follow up with resolutions if/when I find them.
1. Internet is a bit finicky. Sometimes it will be very slow, other times it is lightning fast. I think this is due to the hnak driver being selected when it wasn't necessary. A new driver should be out shortly that should fix this if you already have it installed.
2. PC doesn't sleep. The monitors shut down but the PC stays on. This isn't a huge issue for me but I'm working on it.
3. USB3.0 speed charging isn't working. Again, not a huge deal but if you use your USB3.0 for charging your devices, you know how nice it is to be able to fully charge a dead iPad in 20 minutes with it.
4. P States are untested. I just haven't gotten around to it yet. Anyone have any good apps for testing and suggestions for core clock rates for over clocking? I've read that all the cores need to be set at slightly different clock rates for best performance. Lots of detail in the post-install sections, i'll work my way to it.
All-in-all, it's working well. iTunes is syncing with my iPhone 4S and it just updated to 10.7 for iOS6 support for my iPad and iPhone 5 when it comes in next Friday.
I will try to help if you have a similar system/setup. Feel free to post questions.
Thanks samisnake, MacMan, and of course Tony for all the help with my install.