- Joined
- Mar 19, 2012
- Messages
- 33
- Motherboard
- Gigabyte X570 UD
- CPU
- Ryzen 5950X
- Graphics
- RX 6800XT
- Mac
- Classic Mac
Guide
For those interested here is a quick guide for Ryzen that should take you roughly 15-30 minutes instead of hours or days. All necessary files are linked. However if you want to get a good grasp on everything that is happening feel free to follow the original guide. The reason I created this guide was the original guide seemed a bit complicated and ended up in standard settings for most users. So my config.plist is attached with all necessary Ryzen entries added. There was also a lot of unnecessary clicking through to get to download links so I have streamlined that a bit.
You will need
Step 1
Download OpenCore here
Find the EFI folder. Download and drag the attached config.plist into EFI/OC. OC stands for OpenCore (instead of Clover). It has the necessary additions for Ryzen including replacing the Kernel Patch added under Kernel>Patch.
Step 2
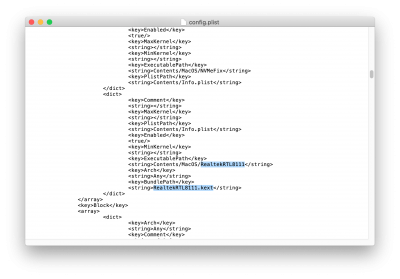
Open the OC folder and now put these files in your Drivers folder. Each item is a link to the download:
These in your Kexts folder:

Step 4
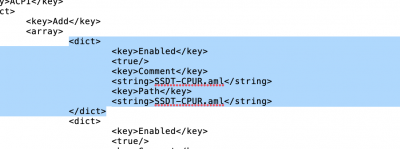
And this (or these) in your ACPI folder:

Delete what is in blue if you do NOT have a B550 or A520 motherboard i.e. You have X570 or B450 etc.

Likewise if you are NOT using A520 or B550 find <key>SetupVirtualMap</key in config.plist and make this setting true.
⌘ + S save
Step 5
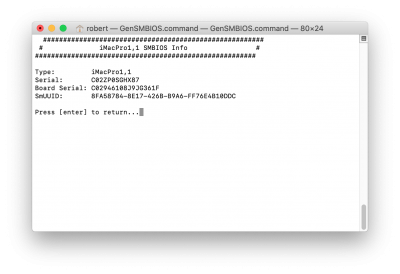
You will need to generate a serial number for your build. Download GenSMBIOS.
Run GenSMBIOS.command.
Type 1 and then press enter to download the Mac serials.
Now Type 3 and then press enter.
Then Type
You will get a window that looks like this

Now copy your info to your config.plist. You won't need to change the product name.
Like before open it in Text edit. Command Find iMac or <key>Generic</key>. Now copy and paste your info from the Terminal to your config.plist
Serial to SystemSerialNumber.
Board Serial to MLB.
SmUUID to SystemUUID.

⌘ + S and that's all you will be seeing of your config.plist
Step 6
Now download and create your Mac OS USB installer. Apple has the downloads listed here
At least 12GB required so a 16GB USB. 8GB won't work for Catalina at least it didn't for me.
Open Terminal
The command from Apple's guide is
Where you can delete /Volumes/MyVolume and drag and drop your install USB to the Terminal window
Step 6.2
Mount your installer's EFI partition using MountEFI (Double click MOUNTEFI.command)
Choose the number of your USB installer drive to mount its EFI partition.

Step 7
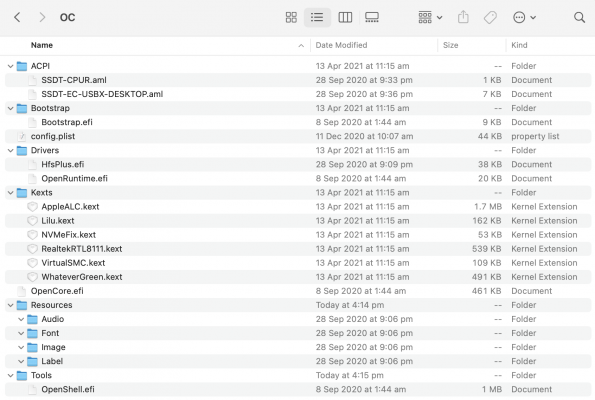
Copy the EFI folder from the OpenCore folder you downloaded (with all of your new files in it) into the EFI partition you just mounted.


Your EFI drive should look like this in the end:


Don't worry if you have more .efi files than pictured here. Most of them are unnecessary for initial install but will come in handy later. Delete them if you have problems but remember you should have HfsPlus.efi and OpenRuntime.efi to boot.
Step 8
The original guide says to disable these settings in BIOS. Don't worry if you can't find them all.
Step 9
Once installed repeat the steps you used to mount and copy the files to the EFI partition for the USB installer for your main boot drive so you can boot without the USB. Mount both your installer and boot drive using MOUNTEFI.command and copy it from the EFI partion of the USB folder.

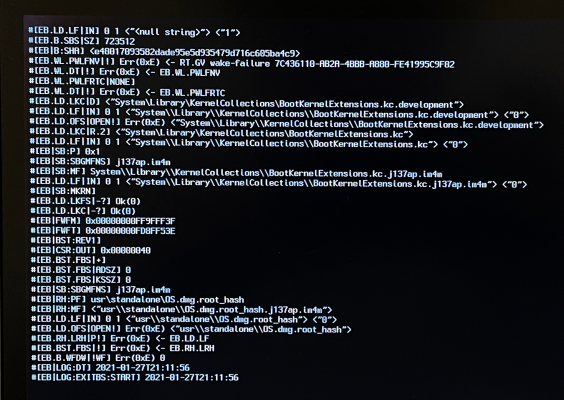
And soon enough you should have Mac OS installed on your Ryzen system.

If sound is not working remember to change your audio device in System Preferences. As far as I have seen AppleALC should work for most if not all Ryzen motherboards.

Once successfully booted you can delete -v, debug=0x100 keepsyms=1 from your bootargs in the config.plist. Command find <key>boot-args</key> and you will see the entries there.

You need alcid=1 for sound and npci=0x2000 unless you have Above4GDecoding enabled in the BIOS which I couldn't find. Above4GDecoding can mess with LAN drivers in Windows so I would keep it disabled it if it is giving you problems. Also add agdpmod=pikera for Big Sur if you get a black screen. Without this I couldn't boot. I believe it gets graphics working.
If you are on Big Sur and stuck on the Apple Logo make sure you set these in config.plist:
Disable
<key>AppleDebug</key>
<false/>
<key>ApplePanic</key>
<false/>
Enable
<key>PanicNoKextDump</key>
<true/>
And here is a Patch to fix Adobe applications crashing.
For everything else see the original guide on GitHub.
If all goes well and internet is working then you can use the rest of the original guide to check out other possible features such as boot options using icons with opencanopy.efi. If all else fails you can always fall back to the original guide.
For those interested here is a quick guide for Ryzen that should take you roughly 15-30 minutes instead of hours or days. All necessary files are linked. However if you want to get a good grasp on everything that is happening feel free to follow the original guide. The reason I created this guide was the original guide seemed a bit complicated and ended up in standard settings for most users. So my config.plist is attached with all necessary Ryzen entries added. There was also a lot of unnecessary clicking through to get to download links so I have streamlined that a bit.
You will need
- a 16GB USB drive (8GB won't be enough for Catalina in my tests. Not sure about Mojave)
- a Mac - or Hackintosh (for Windows see this page from the guide it will require that you have internet during the install)
- a blank drive (such as an SSD) to install to
Step 1
Download OpenCore here
Find the EFI folder. Download and drag the attached config.plist into EFI/OC. OC stands for OpenCore (instead of Clover). It has the necessary additions for Ryzen including replacing the Kernel Patch added under Kernel>Patch.
Step 2
Open the OC folder and now put these files in your Drivers folder. Each item is a link to the download:
- HfsPlus.efi
- OpenRuntime.efi (comes with OpenCore you downloaded in Step 1)
These in your Kexts folder:
- AppleALC.kext
- Lilu.kext
- RealtekRTL8111.kext If you aren't using Realtek Gigabit LAN here's some quick links for Intel, Atheros and Realtek 2.5g (you will need to make an Insanelymac account to download). Google your motherboard and go to your manufacturer page to find out what your ethernet/LAN is. You will have to to change the <dict> entry simply open config.plist in text edit and change the name to the kext you are using.
Step 4
And this (or these) in your ACPI folder:
- SSDT-EC-USBX-DESKTOP.aml
- SSDT-CPUR.aml (if using A550 or A520 motherboard) if not using those you will have to remove the <dict> entry from the config.plist, follow a similar method as above, open it in text edit it is right at the top. Then save.
Delete what is in blue if you do NOT have a B550 or A520 motherboard i.e. You have X570 or B450 etc.
Likewise if you are NOT using A520 or B550 find <key>SetupVirtualMap</key in config.plist and make this setting true.
⌘ + S save
Step 5
You will need to generate a serial number for your build. Download GenSMBIOS.
Run GenSMBIOS.command.
Type 1 and then press enter to download the Mac serials.
Now Type 3 and then press enter.
Then Type
iMacPro1,1 1 and press enter.You will get a window that looks like this
Now copy your info to your config.plist. You won't need to change the product name.
Like before open it in Text edit. Command Find iMac or <key>Generic</key>. Now copy and paste your info from the Terminal to your config.plist
Serial to SystemSerialNumber.
Board Serial to MLB.
SmUUID to SystemUUID.
⌘ + S and that's all you will be seeing of your config.plist
Step 6
Now download and create your Mac OS USB installer. Apple has the downloads listed here
At least 12GB required so a 16GB USB. 8GB won't work for Catalina at least it didn't for me.
Open Terminal
The command from Apple's guide is
sudo /Applications/Install\ macOS\ Catalina.app/Contents/Resources/createinstallmedia --volume /Volumes/MyVolumeWhere you can delete /Volumes/MyVolume and drag and drop your install USB to the Terminal window
Step 6.2
Mount your installer's EFI partition using MountEFI (Double click MOUNTEFI.command)
Choose the number of your USB installer drive to mount its EFI partition.
Step 7
Copy the EFI folder from the OpenCore folder you downloaded (with all of your new files in it) into the EFI partition you just mounted.
Your EFI drive should look like this in the end:
Don't worry if you have more .efi files than pictured here. Most of them are unnecessary for initial install but will come in handy later. Delete them if you have problems but remember you should have HfsPlus.efi and OpenRuntime.efi to boot.
Step 8
The original guide says to disable these settings in BIOS. Don't worry if you can't find them all.
- Fast Boot (might be optional)
- Secure Boot (might be optional)
- Serial/COM Port (I couldn't find this option)
- Parallel Port (I couldn't find this option)
- Compatibility Support Module (this one is important)
Step 9
Once installed repeat the steps you used to mount and copy the files to the EFI partition for the USB installer for your main boot drive so you can boot without the USB. Mount both your installer and boot drive using MOUNTEFI.command and copy it from the EFI partion of the USB folder.
And soon enough you should have Mac OS installed on your Ryzen system.
If sound is not working remember to change your audio device in System Preferences. As far as I have seen AppleALC should work for most if not all Ryzen motherboards.
Once successfully booted you can delete -v, debug=0x100 keepsyms=1 from your bootargs in the config.plist. Command find <key>boot-args</key> and you will see the entries there.
You need alcid=1 for sound and npci=0x2000 unless you have Above4GDecoding enabled in the BIOS which I couldn't find. Above4GDecoding can mess with LAN drivers in Windows so I would keep it disabled it if it is giving you problems. Also add agdpmod=pikera for Big Sur if you get a black screen. Without this I couldn't boot. I believe it gets graphics working.
If you are on Big Sur and stuck on the Apple Logo make sure you set these in config.plist:
Disable
<key>AppleDebug</key>
<false/>
<key>ApplePanic</key>
<false/>
Enable
<key>PanicNoKextDump</key>
<true/>
And here is a Patch to fix Adobe applications crashing.
For everything else see the original guide on GitHub.
If all goes well and internet is working then you can use the rest of the original guide to check out other possible features such as boot options using icons with opencanopy.efi. If all else fails you can always fall back to the original guide.
Attachments
-
 Screen Shot 2020-09-30 at 7.29.49 am.png423.8 KB · Views: 426
 -
 Screen Shot 2020-09-29 at 10.33.28 pm.png67.5 KB · Views: 321
 -
 Screen Shot 2020-09-29 at 10.31.34 pm.png78.7 KB · Views: 304
 -
 Screen Shot 2020-09-29 at 10.32.27 pm.png69 KB · Views: 257
 -
 Screen Shot 2020-09-29 at 10.56.41 pm.png58.1 KB · Views: 262
 -
 Screen Shot 2020-09-29 at 11.35.08 pm.png470.2 KB · Views: 254
 -
 Screen Shot 2020-09-30 at 12.40.03 am.png458.8 KB · Views: 265
 -
 Screen Shot 2020-09-30 at 12.48.41 am.png280.7 KB · Views: 296
 -
config.plist42.5 KB · Views: 967
-
 Screen Shot 2020-09-30 at 7.29.49 am.png423.8 KB · Views: 460
 -
RealtekRTL8111.kext.zip141.9 KB · Views: 491
Last edited: