
- Joined
- Apr 14, 2011
- Messages
- 37
- Motherboard
- Dell Inspiron 1720
- CPU
- X9000
- Graphics
- 8600 gt
- Mac
- Classic Mac
- Mobile Phone
Project: OLD S’KOOL
NOTE:
This is a build that I did a while back and figured I would put it up here so that it may inspire others as to what you can do with just some old stuff. The build still exists and works great, just looking around for some newer old stuff to throw into the case.
I started this MOD as a result of my desire to utilize an iconic case and my desire to run OSX. It took some serious thought, a lot of hard work and a lot of time consuming elbow grease, as there were several factors that came into play with the formulation and completion of this MOD. (No true MOD is ever really completed. It is, and always will be an ongoing project)
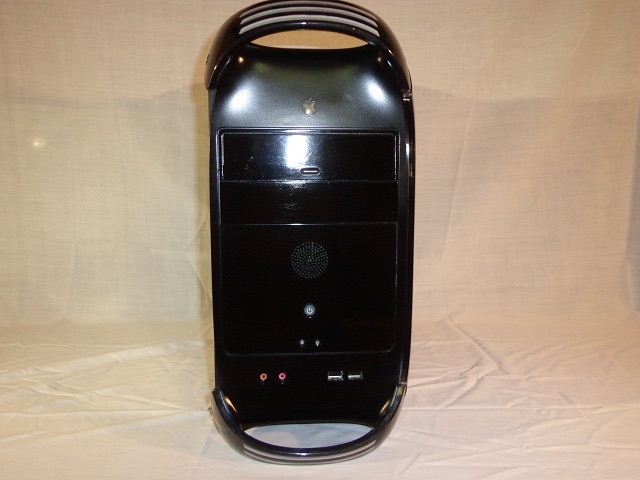
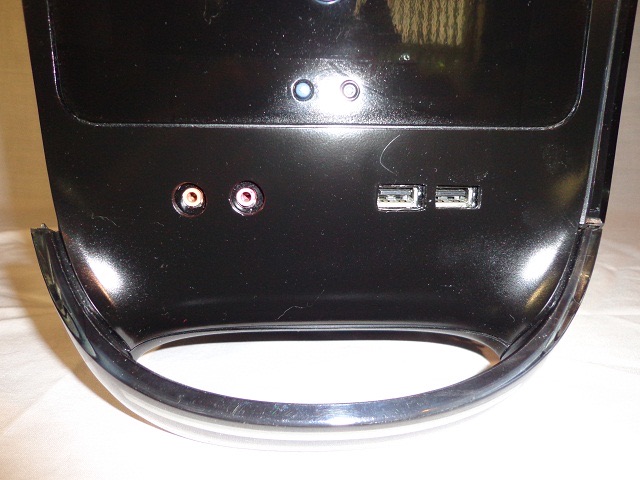
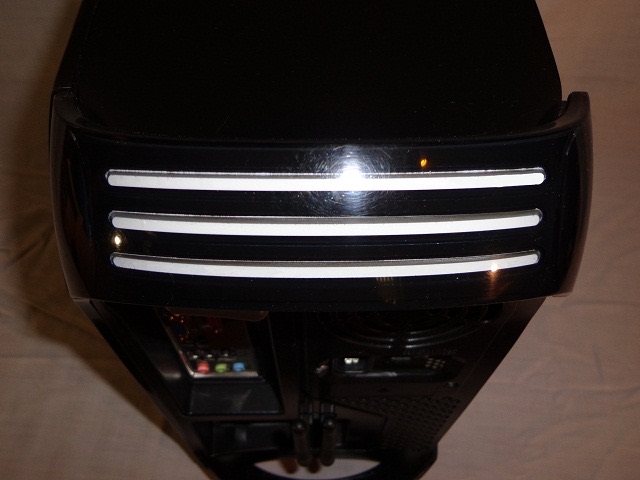
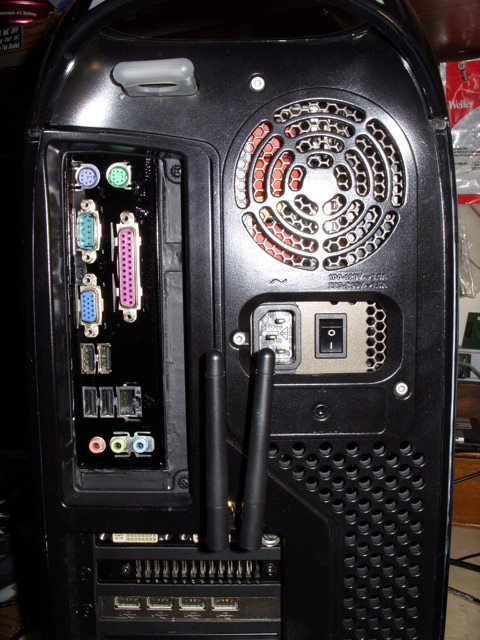
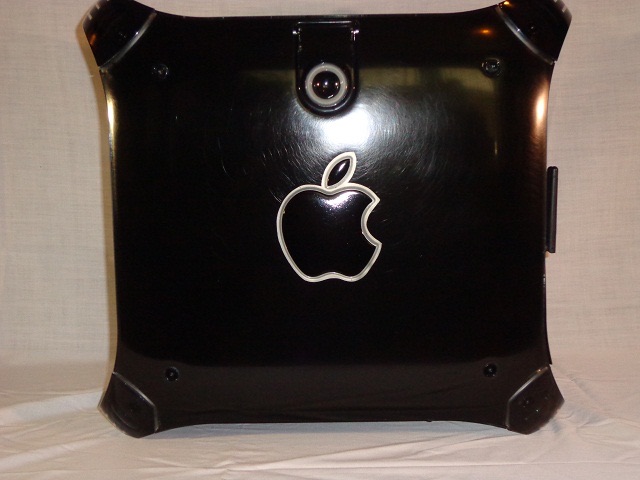
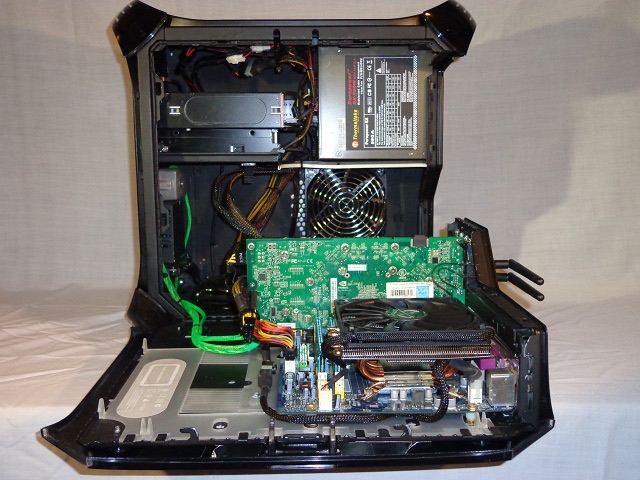
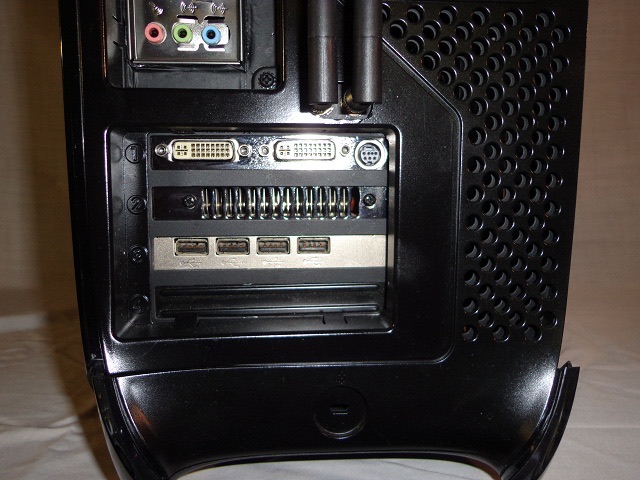
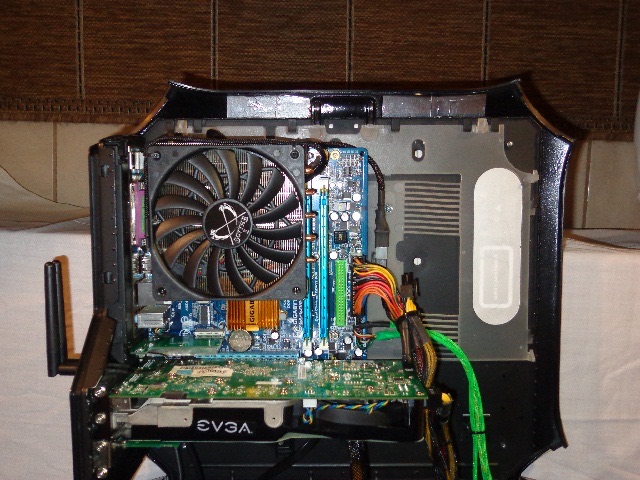
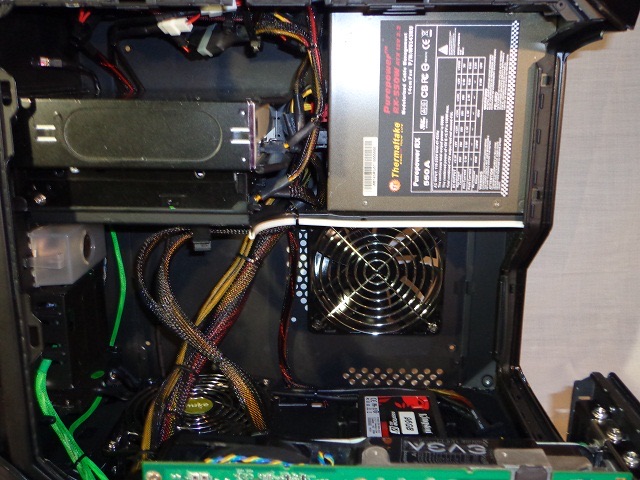
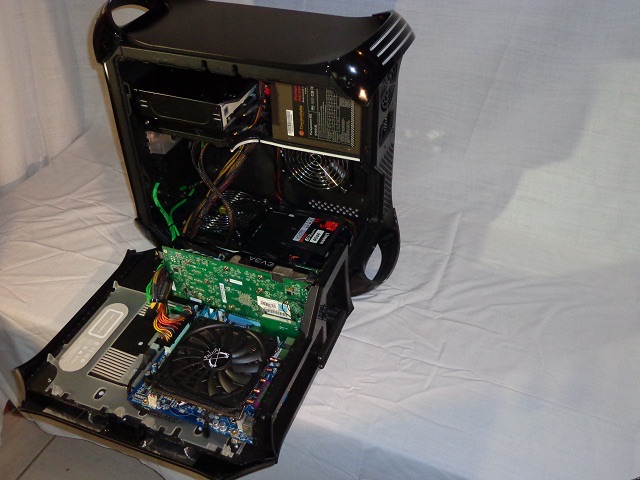
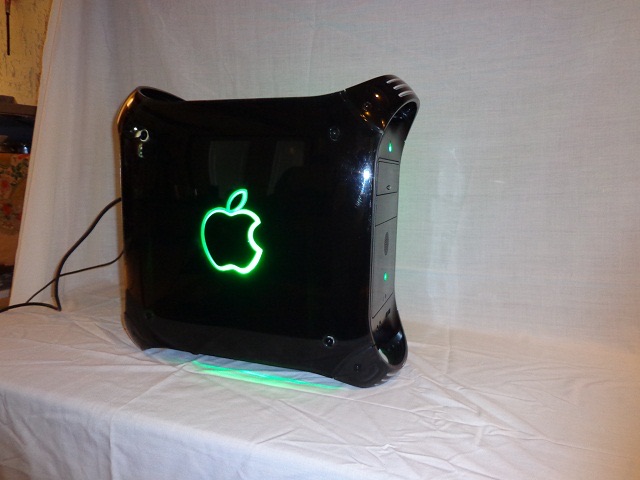
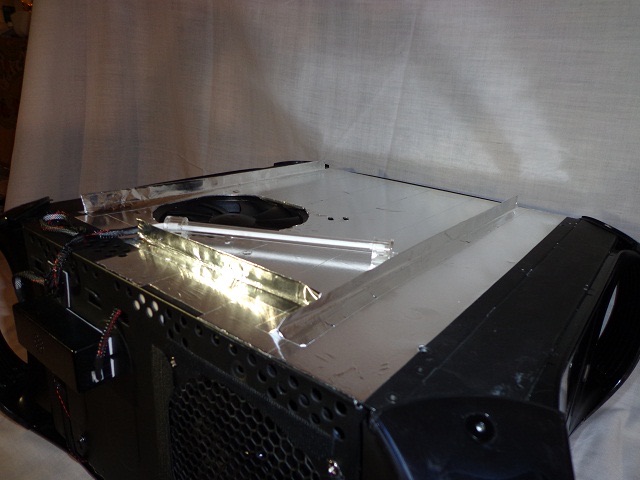
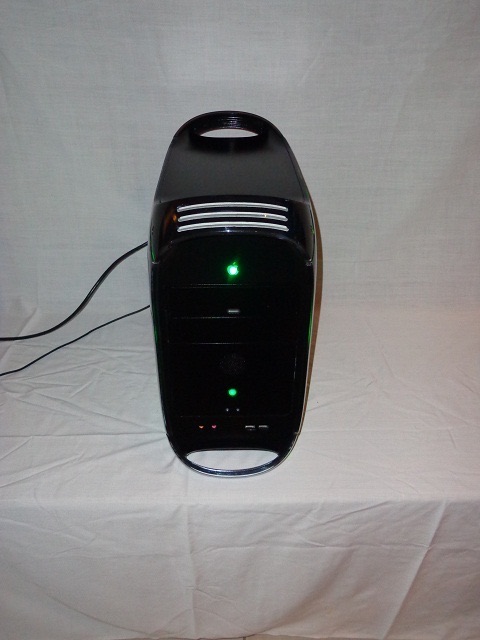
I started out with an PowerMac G4 case (Yes, I know it has been done perhaps a thousand times before, BUT not in this fashion). I liked the design and it has attained the reputation as almost a work of art. My feelings were that Apple may have missed the mark slightly by not offering any “Bling” or customization on this case. All of the cases that I have come across browsing the web that were painted had the paint applied to the outside of the case. Nice, but it took away from the depth of the appearance of the case. I fixed this travesty. All it took was countless hours (over 65) of wet sanding and polishing of the original polycarbonate case on the inside of the case to remove the factory paint on the interior. (No… you cannot use paint strippers or lacquer thinner or other such chemicals as it would fog the plastic almost instantly) I took the 4 corner pieces, cleaned them, masked off the “inset stripe” areas and shot them with high gloss white and then covered it with high gloss black IMRON on the inside of the "handles". (All of the painting was done to the inside of the components.) I applied 1/8th pin striping tape to the area around the relief for the apple appliqué and masked it off. I shot the rest of the inside with the same gloss black paint as before and removed the masking and the pin stripe tape and shot it with a “frost” paint to give the area a frosted look. (This is the area around the apple and leaf appliqué) so that I could give it some indirect neon backlighting. That was the hard part. Now I was ready for the easy stuff. I removed all of the interior components, trimmed off a corner of the CD/DVD carrier (that would interfere with the placement of the new motherboard), removed the original motherboard stand offs in lieu of new ones placed to meet the requirements of the new motherboard. I shot all of the interior and exterior metal components with flat black paint as well as the rear plastic panel. The front plastic panel was painted in both high gloss and satin black paints to give a slight contrast. Green LED’s were placed behind the front apple logo as well as on the original power button. (Both the power button and the reset button are functional with the modding to the circuit I did) Holes were drilled and cut outs made to accommodate a front panel audio out / line in ports as well as 2 USB ports. (Got this nifty little setup from an old HP that was laying around) After placement of the new motherboard standoffs and cutting out for the back plate I modded the white plastic sliding closures slide for the new standoffs. After determining the location of the fans I made the cut outs for them and airbrushed them gloss black. (Yeah, Noctua fans are normally a hideous tan and bone color) The plastic back cover was trimmed by the power plug to allow the use of my power supply and holes were made in the plastic cover to accommodate the wireless antennas. Perform touch up paint on the case, sleeve the wiring, mod the Hard drive mount on the bottom to accommodate the SSD, Protect the wires and cables inside the box with rubber and plastic edge guard moldings, Detail cable and zip tie the whole works after installing 2 green 4”CCF lights on the exterior metal sides ONLY after installing reflective foil tape on the sides. (To reflect the green lighting to the outside)
I run it a 4GHz (1.33125Volts Vcore1.3160) all the time and idle temp is 33C and at 100% load (Orthos 6 hours) it goes to 64C. (@26C ambient temp) It pulls an 11.809 1M calculation in superpi-mod v1.5. It is pretty snappy with 10.6.8 and Windows 7 x64 Pro.
This is not the fastest or the most powerful system here, BUT it is affordable and it meets the criteria of a MODDED BOX. IMHO a mod is not just spending tons of money bolting together a bunch of hardware of the latest and greatest to get a uber computer that will more than likely be underutilized but rather the customization of a system that has your own signature on it and it works well when you need it to and does what you want it to.
There are systems here that would make Apple itself drool as they are very impressive and they cost substantially less than an Apple equivalent and they are exquisite in their own way. My goal was to make an affordable system that will work well with what 90% of all Mac users utilize their systems for and use up some old parts and a case that was just getting ready to be thrown out.
UPDATE:
I have since upgraded the original install of Snow Leopard to Mavericks and have moved up to a Xeon X5450 and the LGA771 to LGA775 mod. It runs a little warmer and performs tasks faster but I am unable to maintain a stable overclock higher than 4.0GHZ on the quad core at a reasonable voltage and temperature, so I just settled for that.
COMPONENTS:
Motherboard: Gigabyte GA-G33M-S2L
Processor: Intel E8600 (Overclocked @ 4GHz.)
Memory: 4GB GSKILL DDR2 PC2-8500
Video: NIVIDIA 8800GTS 512
Drives: HDD1=Kingston V100 96GB SATA SSD (OSX install)
HDD2= WD1.5TB SATA HD (Windows 7 install)
Optical= Toshiba SATA CD/DVD Burner
Power supply: Thermaltake Purepower RX-550
Processor cooling: Scythe Big Shrunken 2 Rev. B
Case Cooling: Noctua NF-P12-1300 120mm Fans
Wireless: Mini PCI-E to PCI-E adaptor with Atheros AR8131 chipset
USB: 10 ports (2 Front, 4 Rear + 4 via PCI interface card)
Audio: Front: Line out and Mic in, Rear Line out and Mic in.

NOTE:
This is a build that I did a while back and figured I would put it up here so that it may inspire others as to what you can do with just some old stuff. The build still exists and works great, just looking around for some newer old stuff to throw into the case.
I started this MOD as a result of my desire to utilize an iconic case and my desire to run OSX. It took some serious thought, a lot of hard work and a lot of time consuming elbow grease, as there were several factors that came into play with the formulation and completion of this MOD. (No true MOD is ever really completed. It is, and always will be an ongoing project)
I started out with an PowerMac G4 case (Yes, I know it has been done perhaps a thousand times before, BUT not in this fashion). I liked the design and it has attained the reputation as almost a work of art. My feelings were that Apple may have missed the mark slightly by not offering any “Bling” or customization on this case. All of the cases that I have come across browsing the web that were painted had the paint applied to the outside of the case. Nice, but it took away from the depth of the appearance of the case. I fixed this travesty. All it took was countless hours (over 65) of wet sanding and polishing of the original polycarbonate case on the inside of the case to remove the factory paint on the interior. (No… you cannot use paint strippers or lacquer thinner or other such chemicals as it would fog the plastic almost instantly) I took the 4 corner pieces, cleaned them, masked off the “inset stripe” areas and shot them with high gloss white and then covered it with high gloss black IMRON on the inside of the "handles". (All of the painting was done to the inside of the components.) I applied 1/8th pin striping tape to the area around the relief for the apple appliqué and masked it off. I shot the rest of the inside with the same gloss black paint as before and removed the masking and the pin stripe tape and shot it with a “frost” paint to give the area a frosted look. (This is the area around the apple and leaf appliqué) so that I could give it some indirect neon backlighting. That was the hard part. Now I was ready for the easy stuff. I removed all of the interior components, trimmed off a corner of the CD/DVD carrier (that would interfere with the placement of the new motherboard), removed the original motherboard stand offs in lieu of new ones placed to meet the requirements of the new motherboard. I shot all of the interior and exterior metal components with flat black paint as well as the rear plastic panel. The front plastic panel was painted in both high gloss and satin black paints to give a slight contrast. Green LED’s were placed behind the front apple logo as well as on the original power button. (Both the power button and the reset button are functional with the modding to the circuit I did) Holes were drilled and cut outs made to accommodate a front panel audio out / line in ports as well as 2 USB ports. (Got this nifty little setup from an old HP that was laying around) After placement of the new motherboard standoffs and cutting out for the back plate I modded the white plastic sliding closures slide for the new standoffs. After determining the location of the fans I made the cut outs for them and airbrushed them gloss black. (Yeah, Noctua fans are normally a hideous tan and bone color) The plastic back cover was trimmed by the power plug to allow the use of my power supply and holes were made in the plastic cover to accommodate the wireless antennas. Perform touch up paint on the case, sleeve the wiring, mod the Hard drive mount on the bottom to accommodate the SSD, Protect the wires and cables inside the box with rubber and plastic edge guard moldings, Detail cable and zip tie the whole works after installing 2 green 4”CCF lights on the exterior metal sides ONLY after installing reflective foil tape on the sides. (To reflect the green lighting to the outside)
I run it a 4GHz (1.33125Volts Vcore1.3160) all the time and idle temp is 33C and at 100% load (Orthos 6 hours) it goes to 64C. (@26C ambient temp) It pulls an 11.809 1M calculation in superpi-mod v1.5. It is pretty snappy with 10.6.8 and Windows 7 x64 Pro.
This is not the fastest or the most powerful system here, BUT it is affordable and it meets the criteria of a MODDED BOX. IMHO a mod is not just spending tons of money bolting together a bunch of hardware of the latest and greatest to get a uber computer that will more than likely be underutilized but rather the customization of a system that has your own signature on it and it works well when you need it to and does what you want it to.
There are systems here that would make Apple itself drool as they are very impressive and they cost substantially less than an Apple equivalent and they are exquisite in their own way. My goal was to make an affordable system that will work well with what 90% of all Mac users utilize their systems for and use up some old parts and a case that was just getting ready to be thrown out.
UPDATE:
I have since upgraded the original install of Snow Leopard to Mavericks and have moved up to a Xeon X5450 and the LGA771 to LGA775 mod. It runs a little warmer and performs tasks faster but I am unable to maintain a stable overclock higher than 4.0GHZ on the quad core at a reasonable voltage and temperature, so I just settled for that.
COMPONENTS:
Motherboard: Gigabyte GA-G33M-S2L
Processor: Intel E8600 (Overclocked @ 4GHz.)
Memory: 4GB GSKILL DDR2 PC2-8500
Video: NIVIDIA 8800GTS 512
Drives: HDD1=Kingston V100 96GB SATA SSD (OSX install)
HDD2= WD1.5TB SATA HD (Windows 7 install)
Optical= Toshiba SATA CD/DVD Burner
Power supply: Thermaltake Purepower RX-550
Processor cooling: Scythe Big Shrunken 2 Rev. B
Case Cooling: Noctua NF-P12-1300 120mm Fans
Wireless: Mini PCI-E to PCI-E adaptor with Atheros AR8131 chipset
USB: 10 ports (2 Front, 4 Rear + 4 via PCI interface card)
Audio: Front: Line out and Mic in, Rear Line out and Mic in.


")